Target Usage: To work with an existing remote repository.
Motivation: Often, you will need to start with an existing remote repository. In such cases, you may have to create your own copies of that repository, and keep those copies updated when more changes appear in the remote repository.
Lesson plan:
T3L1. Duplicating a Remote Repo on the Cloud covers that part.
T3L2. Creating a Local Copy of a Repo covers that part.
T3L3. Downloading Data Into a Local Repo covers that part.
GitHub allows you to create a remote copy of another remote repo, called forking.
A fork is a copy of a remote repository created on the same hosting service such as GitHub, GitLab, or Bitbucket. On GitHub, you can fork a repository from another user or organisation into your own space (i.e., your user account or an organisation you have sufficient access to). Forking is particularly useful if you want to experiment with a repo but don't have write permissions to the original -- you can fork it (which gives you your own remote copy of the repo) and work with the forked repo without affecting the original repository.
Preparation Create a GitHub account if you don't have one yet.
1 Go to the GitHub repo you want to fork e.g., samplerepo-things
2 Click on the  button in the top-right corner. In the next step,
- choose to fork to your own account or to another GitHub organization that you are an admin of.
- un-tick the
[ ] Copy the master branch onlyoption, so that you get copies of other branches (if any) in the repo.
done!
Forking is not a Git feature, but a feature provided by hosted Git services like GitHub, GitLab, or Bitbucket.
GitHub does not allow you to fork the same repo more than once to the same destination. If you want to re-fork, you need to delete the previous fork.
The next step is to create a local copy of the remote repo, by cloning the remote repo.
You can clone a repository to create a full copy of it on your computer. This copy includes the entire revision history, branches, and files of the original, so it behaves just like the original repository. For example, you can clone a repository from a hosting service like GitHub to your computer, giving you a complete local version to work with.
Cloning a repo automatically creates a remote named origin which points to the repo you cloned from.
The repo you cloned from is often referred to as the upstream repo.
1 Clone the remote repo to your computer. For example, you can clone the samplerepo-things repo, or the fork you created from it in a previous lesson.
Note that the URL of the GitHub project is different from the URL you need to clone a repo in that GitHub project. e.g.
https://github.com/se-edu/samplerepo-things # GitHub project URL
https://github.com/se-edu/samplerepo-things.git # the repo URL
You can use the git clone <repository-url> [directory-name] command to clone a repo.
<repository-url>: The URL of the remote repository you want to copy.[directory-name](optional): The name of the folder where you want the repository to be cloned. If you omit this, Git will create a folder with the same name as the repository.
git clone https://github.com/se-edu/samplerepo-things.git # if using HTTPS
git clone git@github.com:se-edu/samplerepo-things.git # if using SSH
git clone https://github.com/foo/bar.git my-bar-copy # also specifies a dir to use
For exact steps for cloning a repo from GitHub, refer to this GitHub document.
File → Clone / New ... and provide the URL of the repo and the destination directory.
File → New ... → Choose as shown below → Provide the URL of the repo and the destination directory in the next dialog.


2 Verify the clone has a remote named origin pointing to the upstream repo.
Use the git remote -v command that you learned earlier.
Choose Repository → Repository Settings menu option.
done!
When there are new changes in the remote, you need to pull those changes down to your local repo.
There are two steps to bringing over changes from a remote repository into a local repository: fetch and merge.
- Fetch is the act of downloading the latest changes from the remote repository, but without applying them to your current branch yet. It updates metadata in your repo so that it knows what has changed in the remote repo, but your own local branch remains untouched.
- Merge is what you do after fetching, to actually incorporate the fetched changes into your local branch. It combines your local branch with the changes from the corresponding branch from the remote repo.
Scenario You have cloned a remote repo. After you have cloned, two new commits have been added to it. R and L1 in the diagram below represents this scenario.
gitGraph BT:
    %%{init: { 'theme': 'default', 'gitGraph': {'mainBranchName': 'master'}} }%%
    commit id: "add loans.txt"
    commit id: "add loan to Ben"
    commit id: "add assets.txt"
    commit id: "add goals.txt"
    commit id: "[head → master] add loan to Chang"
origin]
gitGraph BT:
    %%{init: { 'theme': 'default', 'gitGraph': {'mainBranchName': 'master'}} }%%
    commit id: "add loans.txt"
    commit id: "add loan to Ben"
    commit id: "[head → master][origin/master] add assets.txt"
2 commits behind the remote]
→
gitGraph BT:
    %%{init: { 'theme': 'default', 'gitGraph': {'mainBranchName': 'master'}} }%%
    commit id: "add loans.txt"
    commit id: "add loan to Ben"
    commit id: "add assets.txt"
    commit id: "add goals.txt"
    commit id: "[head → master][origin/master] add loan to Chang"
the missing commits]
Target Now, you wish to bring over those missing commits to your clone, taking it from the state L1 to state L2 (as given in the diagram above).
Preparation To create the initial state of the remote repo and the local repo (i.e., R and L1 given above), you can use the following steps.
- Clone the repo git-mastery/samplerepo-finances. It has 3 commits. Your clone now has a remote
originpointing to the remote repo you cloned from. - Change the remote
originto point to samplerepo-finances-2. This remote repo is a copy of the one you cloned, but it has two extra commits.
git remote set-url origin https://github.com/git-mastery/samplerepo-finances-2.git
Go to Repository → Repository settings ... to update remotes.
1 Verify the local repo is unaware of the extra commits in the remote.
git status
On branch master
Your branch is up to date with 'origin/master'.
nothing to commit, working tree clean
The revision graph should look like the below:

If it looks like the below, it is possible that Sourcetree is auto-fetching data from the repo periodically.
2 Fetch from the new remote.
Use the git fetch <remote> command to fetch changes from a remote. If the <remote> is not specified, the default remote origin will be used.
git fetch origin
remote: Enumerating objects: 8, done.
... # more output ...
afbe966..cc6a151 master -> origin/master
* [new tag] beta -> beta
Click on the Fetch button on the top menu:

3 Verify the fetch worked i.e., the local repo is now aware of the two missing commits. Also observe how the local branch ref of the master branch, the staging area, and the working directory remain unchanged after the fetch.
Use the git status command to confirm the repo now knows that it is behind the remote repo.
git status
On branch master
Your branch is behind 'origin/master' by 2 commits, and can be fast-forwarded.
(use "git pull" to update your local branch)
nothing to commit, working tree clean
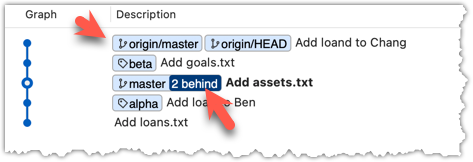
Now, the revision graph should look something like the below. Note how the origin/master ref is now two commits ahead of the master ref.
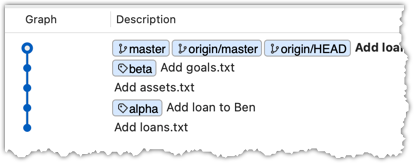
4 Merge the fetched changes.
Use the git merge <remote-tracking-branch> command to merge the fetched changes. Check the status and the revision graph to verify that the branch tip has now moved by two more commits.
git merge origin/master
git status
git log --oneline --decorate
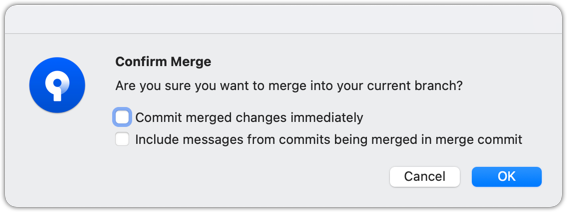
To merge the fetched changes, right-click on the latest commit on origin/remote branch and choose Merge.
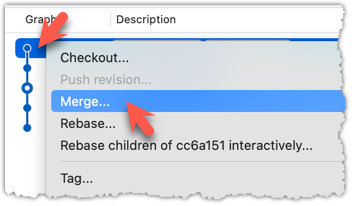
In the next dialog, choose as follows:
The final result should be something like the below (same as the repo state before we started this hands-on practical):
Note that merging the fetched changes can get complicated if there are multiple branches or the commits in the local repo conflict with commits in the remote repo. We will address them when we learn more about Git branches, in a later lesson.
done!
Pull is a shortcut that combines fetch and merge — it fetches the latest changes from the remote and immediately merges them into your current branch. In practice, Git users typically use the pull instead of the fetch-then-merge.
pull = fetch + merge
Scenario Same as previous hands-on practical.
Target Same as the previous, but this time we intend to fetch and merge in one step.
Preparation Same as previous, but use a different folder.
1 Pull the newer commits from the remote, instead of a fetch-then-merge.
Use the git pull <remote> <branch> command to pull changes.
git pull origin master
The following works too. If the <remote> and <branch> are not specified, Git will pull to the current branch from the remote branch it is tracking.
git pull
Click on the Pull button on the top menu:

2 Verify the outcome is same as the fetch + merge steps you did in the previous hands-on practical.
done!
You can pull from any number of remote repos, provided the repos involved have a shared history. This can be useful when the upstream repo you forked from has some new commits that you wish to bring over to your copies of the repo (i.e., your fork and your local repo).
Scenario You have forked and cloned a remote repo. Since then, new commits have been added to the original remote repo.
gitGraph BT:
    %%{init: { 'theme': 'default', 'gitGraph': {'mainBranchName': 'master'}} }%%
    commit id: "add loans.txt"
    commit id: "add loan to Ben"
    commit id: "add assets.txt"
    commit id: "add goals.txt"
    commit id: "[head → master] add loan to Chang"
gitGraph BT:
    %%{init: { 'theme': 'default', 'gitGraph': {'mainBranchName': 'master'}} }%%
    commit id: "add loans.txt"
    commit id: "add loan to Ben"
    commit id: "[head → master] add assets.txt"
2 commits behind the remote]
gitGraph BT:
    %%{init: { 'theme': 'default', 'gitGraph': {'mainBranchName': 'master'}} }%%
    commit id: "add loans.txt"
    commit id: "add loan to Ben"
    commit id: "[head → master][origin/master] add assets.txt"
2 commits behind]
Target Now, you wish to bring over new commits to your clone, and also update your fork with those commits.
Preparation You can use the following steps to create the initial state of the three repos mentioned above:
- Fork the repo git-mastery/samplerepo-finances to your account.
- Clone that fork to your computer.
1 Add the upstream repo git-mastery/samplerepo-finances-2 as remote named upstream in your local repo.
Adding remotes was covered in Lesson T2L4. Linking a Local Repo With a Remote Repo
2 Pull from the upstream repo. If there are new commits, those will come over to your local repo. For example:
git pull upstream master
3 Push to your fork. Any new commits you pulled from the upstream repo will now appear in your fork as well. For example:
git push origin master
The method given above is the more 'standard' method of synchronising a fork with the upstream repo. In addition, platforms such as GitHub can provide other ways (example: GitHub's Sync fork feature).
done!
At this point: Now you can create your own remote and local copies of any repo on GitHub, and update your copy when there are new changes in the upstream repo.
What's next: Tour 4: Using the Revision History of a Repo