Revision Control (Using Git & GitHub)
This topic is divided into several 'tours', each aiming to cover the knowledge required to perform a general revision control use case.
Target Usage: To use Git to systematically record the history of a folder in your own computer. More specifically, to use Git to save a snapshot of the folder at specific points of time.
Motivation: Recording the history of files in a folder (e.g, code files of a software project, case notes, files related to an article/book that you are authoring) can be useful in case you need to refer to past versions.
Lesson plan:
T1L1. Introduction to Revision Control covers that part.
T1L2. Preparing to Use Git covers that part.
T1L3. Putting a Folder Under Git's Control covers that part.
T1L4. Specifying What to Include in a Snapshot covers that part.
T1L5. Saving a Snapshot covers that part.
T1L6. Examining the Revision History covers that part.
Before you start learning Git, you need to install some tools on your computer.
Installing Git
Git is a free and open source software used for revision control. To use Git, you need to install Git on your computer.
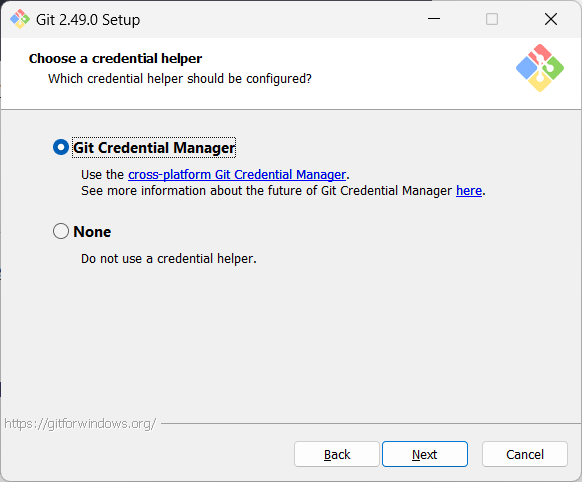
Download the Git installer from the official Git website.
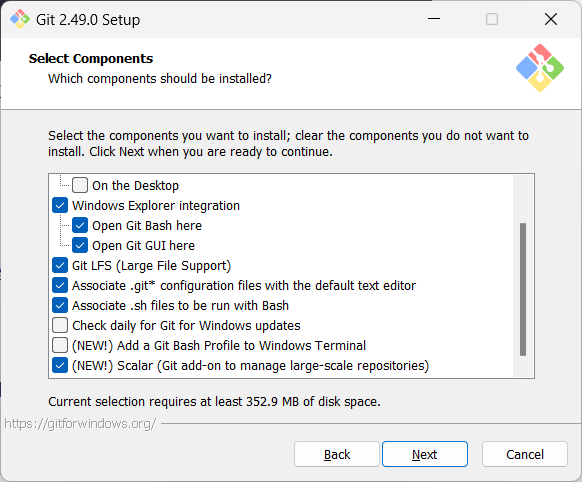
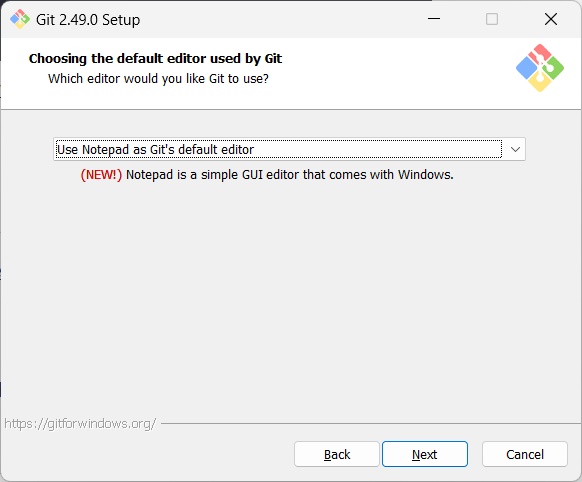
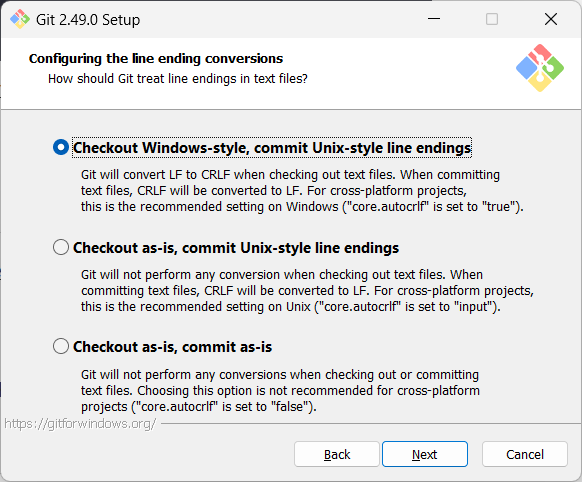
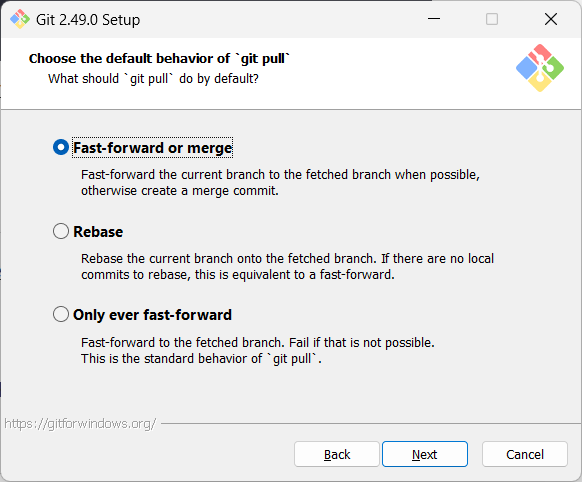
Run the installer and make sure to select the option to install Git Bash when prompted.
Screenshots given below provide some guidance on the dialogs you might encounter when installing Git. In other cases, go with the default option.
When running Git commands, we recommend Windows users to use the Git Bash terminal that comes with Git. To open Git Bash terminal, hit the key and type git-bash.
It may be possible that the installation didn't add a shortcut to the Start Menu.
You can navigate to the directory where git-bash.exe is (most likely C:\Program Files\Git\git-bash.exe), double click git-bash.exe to open Git Bash.
You can also right-click it and choose Pin to Start or Pin to taskbar.
SIDEBAR: Git Bash Terminal
Git Bash is a terminal application that lets you use Git from the command line on Windows. Since Git was originally developed for Unix-like systems (like Linux and macOS), Windows does not come with a native shell that supports all the commands and utilities commonly used with Git.

Git Bash provides a Unix-like command-line environment on Windows. It includes:
- A Bash shell (Bash stands for Bourne Again SHell), which is a widely used command-line interpreter on Linux and macOS.
- Common Unix tools and commands (like
ls,cat,ssh, etc.) that are useful when working with Git and scripting.
When copy-pasting text onto a Git Bash terminal, you will not be able to use the familiar Ctrl+V key combo to paste. Instead, right-click on the terminal and use the Paste menu option.
On Windows, you might need to close and open the terminal again for it to recognise changes done elsewhere in the computer (e.g., newly-installed software, changes to system variables, etc.).
Install homebrew if you don't already have it, and then, run brew install git
Use your Linux distribution's package manager to install Git. Examples:
- Debian/Ubuntu, run
sudo apt-get updateand thensudo apt-get install git. - Fedora: run
sudo dnf updateand thensudo dnf install git.
Verify Git is installed, by running the following command in a terminal.
git --version
git version 2._._
The output should display the version number.
Configuring user.name and user.email
Git needs to know who you are to record changes properly. When you save a snapshot of your work in Git, it records your name and email as the author of that change. This ensures everyone working on the project can see who made which changes. Accordingly, you should set the config settings user.name and user.email before you start Git for revision control.
Interacting with Git: CLI vs GUI
Git is fundamentally a command-line tool. You primarily interact with it through its by typing commands. This gives you full control over its features and helps you understand what’s really happening under the hood.
clients for Git also exist, such as Sourcetree, GitKraken, and the built-in Git support in editors like Intellij IDEA and VS Code. These tools provide a more visual way to perform some Git operations.
If you're new to Git, it's best to learn the CLI first. The CLI is universal, always available (even on servers), and helps you build a solid understanding of Git’s concepts. You can use GUI clients as a supplement — for example, to visualise complex history structures.
Mastering the CLI gives you confidence and flexibility, while GUI tools can serve as helpful companions.
Optionally, you can install a Git GUI client. e.g., Sourcetree (installation instructions).
Our Git lessons show how to perform Git operations in Git CLI, and in Sourcetree -- the latter just to illustrate how Git GUIs work. It is perfectly fine for you to learn the CLI only.
[image credit: https://www.sourcetreeapp.com]
Installing the Git-Mastery App
In these lessons, we will be using a companion app called Git-Mastery that we have developed to help Git learners. In particular, it provides exercises that you can do to self-test your Git knowledge, and also verifies if your solution is correct.
If you are new to Git, we strongly recommend that you install and use the Git-Mastery app.
To be able to save snapshots of a folder using Git, you must first put the folder under Git's control by initialising a Git repository in that folder.
Normally, we use Git to manage a revision history of a specific folder, which gives us the ability to revision-control any file in that folder and its subfolders.
To put a folder under the control of Git, we initialise a repository (short name: repo) in that folder. This way, we can initialise repos in different folders, to revision-control different clusters of files independently of each other e.g., files belonging to different projects.
You can follow the hands-on practical below to learn how to initialise a repo in a folder.
What is this? HANDS-ON panels contain hands-on activities you can do as you learn Git. If you are new to Git, we strongly recommend that you do them yourself (even if they appear straightforward), as hands-on usage will help you internalise the concepts and operations better.
Preparation Choose a folder to put under Git's control. The folder may or may not contain any files. For this practical, let us create a folder named things for this purpose.
You can get the Git-Mastery app to for doing this practical, or create the sandbox manually. Instructions for both options are given below.
To prepare the sandbox for this practical:
- Navigate inside the
gitmastery-exercisesfolder. - Run
gitmastery download hp-init-repocommand.
The sandbox will be set up inside the gitmastery-exercises/hp-init-repo folder.
Assuming you have a folder named git-practicals that you wish to use for doing Git hands-on practicals in, you can run the following commands.
cd git-practicals
mkdir things
Avoid putting Git repos inside cloud-synced (e.g., OneDrive, Dropbox) folders. Reason: Multiple tools trying to detect/sync changes in the same folder can cause conflicts and unexpected behaviors.
If you want to access project files from multiple computers, use Git to do that (rather than cloud syncing tools).
1 Then cd into it.
cd things
2 Run the git status command to check the status of the folder.
git status
fatal: not a git repository (or any of the parent directories): .git
Don't panic. The error message is expected. It confirms that the folder currently does not have a Git repo.
3 Now, initialise a repository in that folder.
Use the command git init which should initialise the repo.
git init
Initialized empty Git repository in things/.git/
The output might also contain a hint about a name for an initial branch (e.g., hint: Using 'master' as the name for the initial branch ...). You can ignore that for now.
Note how the output mentions the repo being created in things/.git/ (not things/). More on that later.
Click File → Clone/New… → Click on + Create button on the top menu bar.

Enter the location of the directory and click Create.
New... → Create Local Repository (or Create New Repository) → Click ... button to select the folder location for the repository → click the Create button.
done!
Initialising a repo results in two things:
- First, Git now recognises this folder as a Git repository, which means it can now help you track the version history of files inside this folder.
To confirm, you can run the git status command. It should respond with something like the following:
git status
On branch master
No commits yet
nothing to commit (create/copy files and use "git add" to track)
Don't worry if you don't understand the output (we will learn about them later); what matters is that it no longer gives an error message as it did before.
done!
- Second, Git created a hidden subfolder named
.gitinside thethingsfolder. This folder will be used by Git to store metadata about this repository.
A Git-controlled folder is divided into two main parts:
- The repository – stored in the hidden
.gitsubfolder, which contains all the metadata and history. - The working directory – everything else in that folder, where you create and edit files.
What is this? EXERCISE panels contain a Git-Mastery exercise that you can download using the Git-Mastery app, and you can use the same app to verify that your solution is correct.
What is this? DETOUR panels contain related directions you can optionally explore. We recommend that you only skim them the first time you are going through a tour (i.e., just to know what each detour covers); you can revisit them later, to deepen your knowledge further, or when you encounter a use case related to the concepts covered by the detour.
To save a snapshot, you start by specifying what to include in it, also called staging.
Git considers new files that you add to the working directory as 'untracked' i.e., Git is aware of them, but they are not yet under Git's control. The same applies to files that existed in the working folder at the time you initialised the repo.
A Git repo has an internal space called the staging area which it uses to build the next snapshot. Another name for the staging area is the index.
We can stage an untracked file to tell Git that we want its current version to be included in the next snapshot (in Git terminology, such a snapshot is called a commit). Once you stage an untracked file, it becomes 'tracked' (i.e., under Git's control). A staged file can be unstaged to indicate that we no longer want it to be included in the next snapshot.
In the example below, you can see how staging files change the status of the repo as you go from (a) to (c).
staging area
[empty]
other metadata ...
├─ fruits.txt (untracked!)
└─ colours.txt (untracked!)
(a) State of the repo, just after initialisation, and creating two files. Both are untracked.
staging area
└─ fruits.txt
other metadata ...
├─ fruits.txt (tracked)
└─ colours.txt (untracked!)
(b) State after staging
fruits.txt.staging area
├─ fruits.txt
└─ colours.txt
other metadata ...
├─ fruits.txt (tracked)
└─ colours.txt (tracked)
(c) State after staging
colours.txt.Preparation
You can continue using the sandbox created in the previous hands-on practical, or,
1 Add a file (e.g., fruits.txt) to the things repo folder.
Here is an easy way to do that with a single terminal command.
echo -e "apples\nbananas\ncherries" > fruits.txt
apples
bananas
cherries
Windows users: Use the git-bash terminal to run the above command (and all commands given in these lessons). Some of them might not work in other terminals such as the PowerShell.
To see the content of the file, you can use the cat command:
cat fruits.txt
2 Stage the new file.
2.1 Check the status of the folder using the git status command.
git status
On branch master
No commits yet
Untracked files:
(use "git add <file>..." to include in what will be committed)
fruits.txt
nothing added to commit but untracked files present (use "git add" to track)
2.2 Use the git add <file> command to stage the file.
git add fruits.txt
You can replace the add with stage (e.g., git stage fruits.txt) and the result is the same (they are synonyms).
Windows users: When using the echo command to write to text files from Git Bash, you might see a warning LF will be replaced by CRLF the next time Git touches it when Git interacts with such a file. This warning is caused by the way line endings are handled differently by Git and Windows. You can simply ignore it, or suppress it in future by running the following command:
git config --global core.safecrlf false
2.3 Check the status again. You can see the file is no longer 'untracked'.
git status
On branch master
No commits yet
Changes to be committed:
(use "git rm --cached <file>..." to unstage)
new file: fruits.txt
As before, don't worry if you don't understand the content of the output (we'll unpack it in a later lesson). The point to note is that the file is no longer listed as 'untracked'.
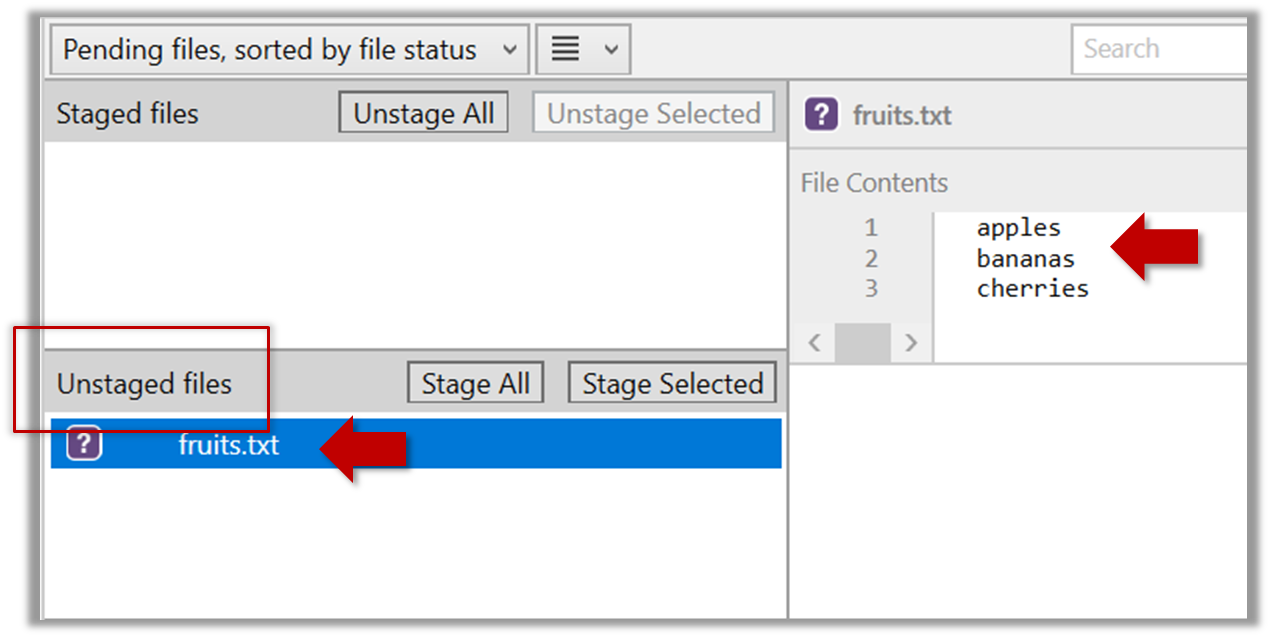
2.1 Note how the file is shown as ‘unstaged’. The question mark icon indicates the file is untracked.
If the newly-added file does not show up in Sourcetree UI, refresh the UI (: F5
| ⌥+R)
Sourcetree screenshots/instructions: vs
Note that Sourcetree UI can vary slightly between Windows and Mac versions. Some of the screenshots given in our lessons are from the Windows version while some are from the Mac version.
In some cases, we have specified how they differ.
In other cases, you may need to adapt if the given screenshots/instructions are slightly different from what you are seeing in your Sourcetree.
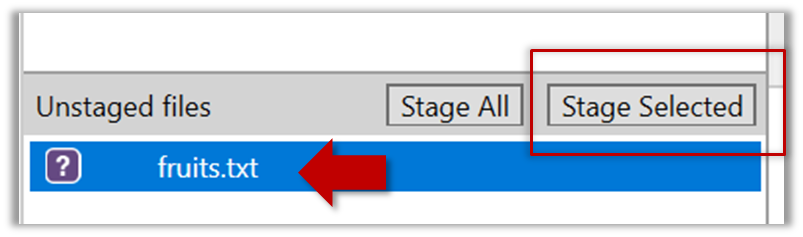
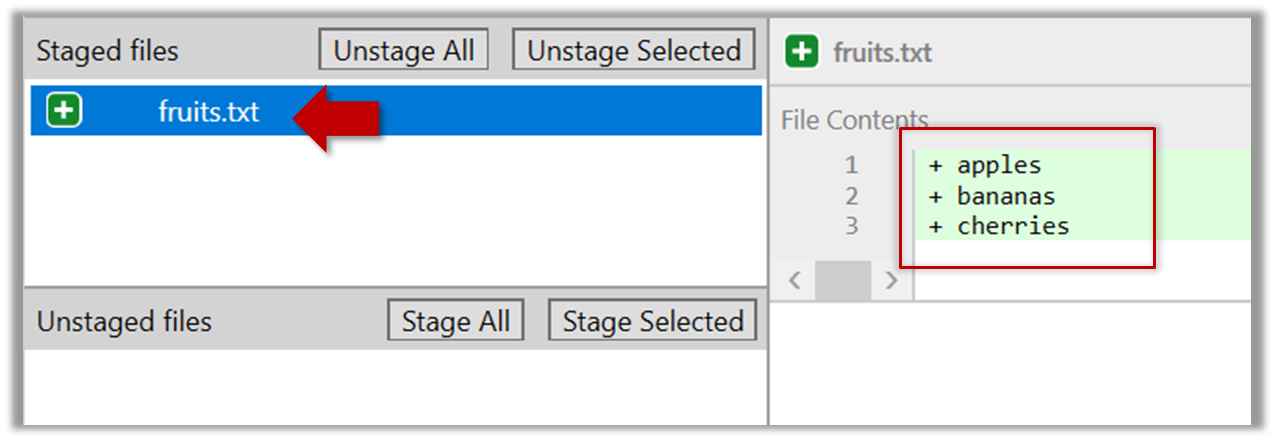
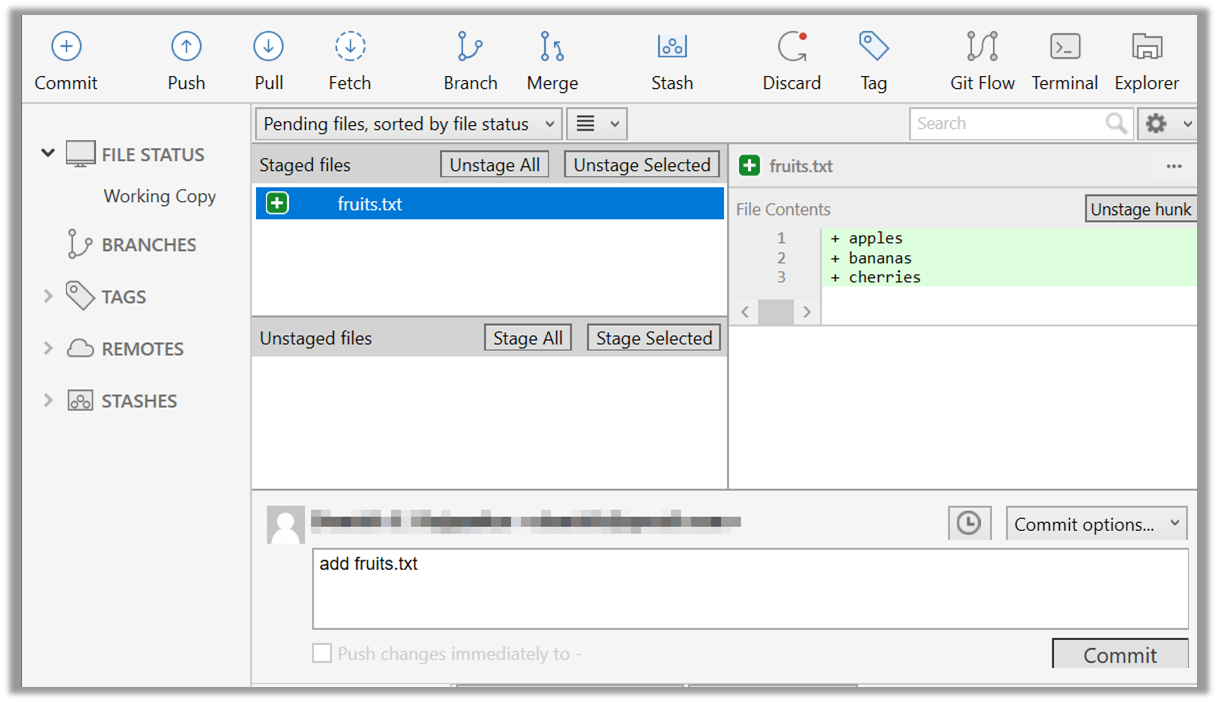
2.2 Stage the file:
Select the fruits.txt and click on the Stage Selected button.
Staging can be done using tick boxes or the ... menu in front of the file.
2.3 Note how the file is staged now i.e., fruits.txt appears in the Staged files panel now.
If Sourcetree shows a \ No newline at the end of the file message below the staged lines (i.e., below the cherries line in the above screenshot), that is because you did not hit enter after entering the last line of the file (hence, Git is not sure if that line is complete). To rectify, move the cursor to the end of the last line in that file and hit enter (like you are adding a blank line below it). This new change will now appear as an 'unstaged' change. Stage it as well.
done!
If you modify a staged file, it goes into the 'modified' state i.e., the file contains modifications that are not present in the copy that is waiting (in the staging area) to be included in the next snapshot. If you wish to include these new changes in the next snapshot, you need to stage the file again, which will overwrite the copy of the file that was previously in the staging area.
The example below shows how the status of a file changes when it is modified after it was staged.
staging area
Alice
other metadata ...
Alice
(a) The file names.txt is staged. The copy in the staging area is an exact match to the one in the working directory.
staging area
Alice
other metadata ...
Alice
Bob
(b) State after adding a line to the file. Git indicates it as 'modified' because it now differs from the version in the staged area.
staging area
Alice
Bob
other metadata ...
Alice
Bob
(c) After staging the file again, the staging area is updated with the latest copy of the file, and it is no longer marked as 'modified'.
Preparation
You can continue using the sandbox created in the previous hands-on practical, or,
1 First, add another line to fruits.txt, to make it 'modified'.
Here is a way to do that with a single terminal command.
echo "dragon fruits" >> fruits.txt
apples
bananas
cherries
dragon fruits
2 Now, verify that Git sees that file as 'modified'.
Use the git status command to check the status of the working directory.
$ git status
On branch master
No commits yet
Changes to be committed:
(use "git rm --cached <file>..." to unstage)
new file: fruits.txt
Changes not staged for commit:
(use "git add <file>..." to update what will be committed)
(use "git restore <file>..." to discard changes in working directory)
modified: fruits.txt
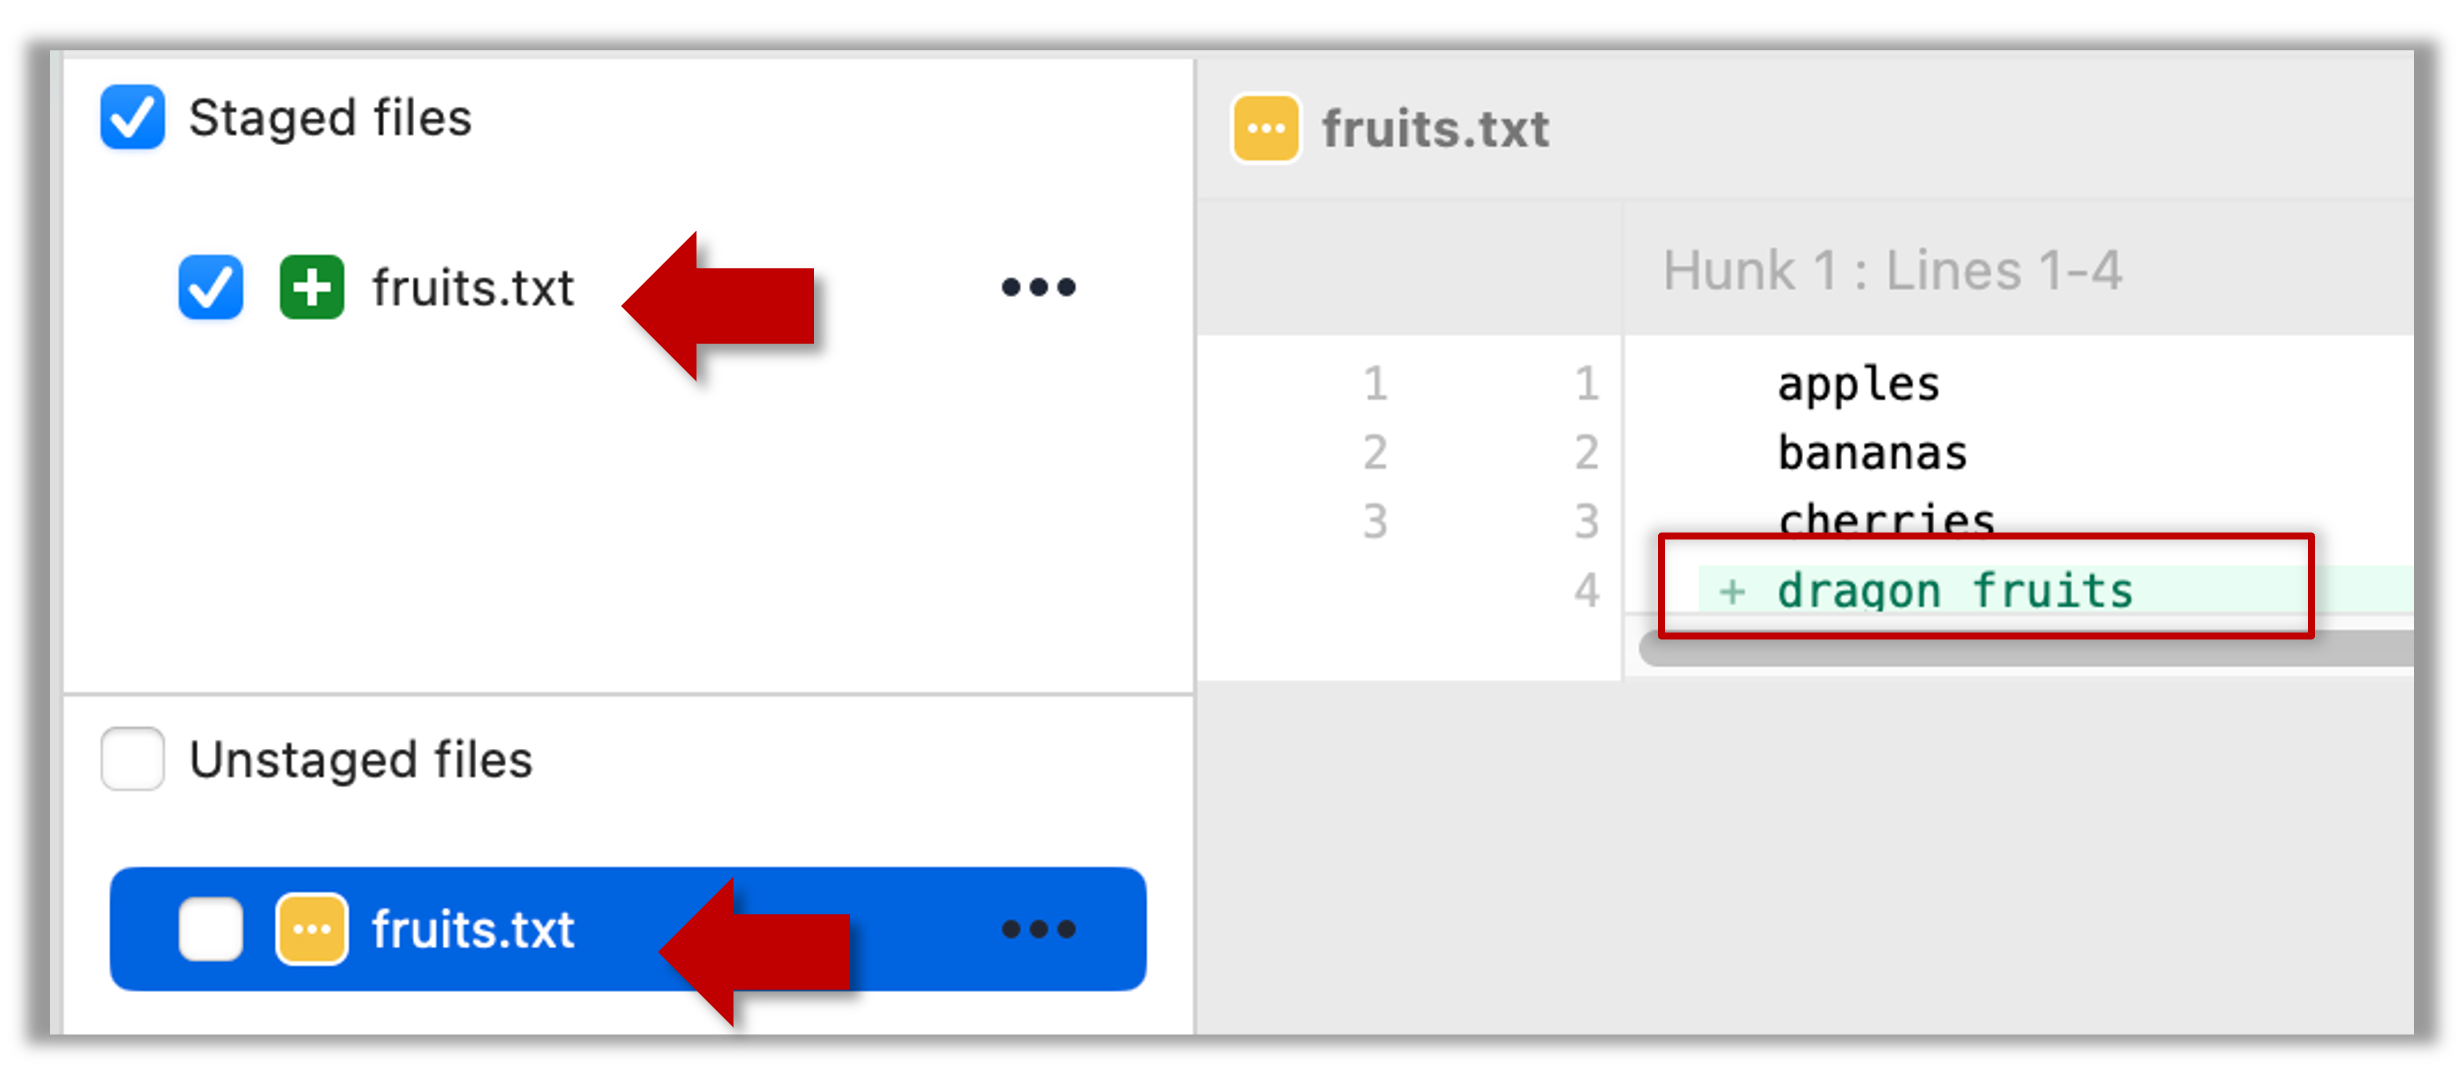
Note how fruits.txt now appears twice, once as new file: ... (representing the version of the file we staged earlier, which had only three lines) and once as modified: ... (representing the latest version of the file which now has a fourth line).
Note how fruits.txt appears in the Staged files panel as well as 'Unstaged files'.
3 Stage the file again, the same way you added/staged it earlier.
4 Verify that Git no longer sees it as 'modified', similar to step 2.
done!
Staging applies regardless of whether a file is currently tracked.
- Staging an untracked file will both begin tracking the file and include it in the next snapshot.
- Staging an already tracked file will simply mark its current changes for inclusion in the next commit.
Git also supports fine-grained selective staging i.e., staging only specific changes within a file while leaving other changes to the same file unstaged. This will be covered in a later lesson.
Git does not track empty folders. It tracks only folders that contain tracked files.
You can test this by adding an empty subfolder inside the things folder (e.g., things/more-things) and checking if it shows up as 'untracked' (it will not). If you add a file to that folder (e.g., things/more-things/food.txt) and then staged that file (e.g., git add more-things/food.txt), the folder will now be included in the next snapshot.
PRO-TIP: Applying a Git command to multiple files in one go
When a Git command expects a list of files or paths as a parameter (as the git add command does), these parameters are known as pathspecs — patterns that tell Git which files or directories to operate on. Pathspecs can be simple file names, directory names, or more complex patterns.
Here are some common ways to write them, shown with examples using the git add <pathspec> command:
Specify multiple files, separated by spaces:
git add f1.txt f2.txt data/lists/f3.txt # stages the specified three filesUse a glob pattern:
git add '*.txt' # stages all .txt files in the current directoryQuoting the glob pattern is recommended so your shell doesn’t expand it before Git sees it.
Use
.to indicate 'all in the current directory and subdirectories':git add . # stages all files in current directory and its subdirectoriesSpecific directory, to indicate 'this directory and its subdirectories':
git add path/to/dir # stages all files in path/to/dir and its subdirectoriesNegated pathspecs, to indicate 'except these':
git add . ':!*.log' # stage everything except .log files
Git supports combining these features — for example, you could add all .txt files except those in a certain folder using:
git add '*.txt' ':!docs/*.txt'
DETOUR: Unstaging Changes
You can unstage a staged file, which simply removes it from the staging area but keeps the changes in your working directory. This is useful if you later realise that you don’t actually want to include a staged file in the next commit — perhaps you staged it by mistake, or you want to include that change in a later commit.
To unstage a file you added or modified, run
git restore --staged <pathspec>. This command removes the file from the staging area, leaving your working directory untouched.git restore --staged plan.txt budget.txt data/list.txtIf your repo does not have any commits yet,
git restore --stagedwill fail with the error fatal: could not resolve HEAD.
The remedy is to usegit reset <pathspec>instead.git reset plan.txtIn fact,
git resetis an alternative way of unstaging files, and it works regardless of whether you have any commits.Wait. Then why does
git restore --stagedexists at all, given it is more verbose and doesn't even work in some special cases?
Answer: It is still considered the "modern" way of unstaging files (it was introduced more recently), because it is more intuitive and purpose-specific -- whereas thegit resetserves multiple purposes and, if used incorrectly, can cause unintended consequences.The
restorecommand can accept multiple files/paths as input, which means you can use the notation for specifying multiple files. For example, to unstage all changes you've staged, you can use thegit restore --staged .To unstage a file deletion (staged using
git rm), use the same command as above. It will unstage the deletion and restore the file in the staging area.
If you also deleted the file from your working directory, you may need to recover it separately withgit restore <file-name(s)>git restore data/list.txt data/plan.txtTo 'nuke' all changes (i.e., get rid of all staged and unstaged changes to tracked files), you can add the
--worktreeflag to thegit restore --staged <pathspec>command.git restore --staged --worktree . # nuke all changes in current folder and subfolders
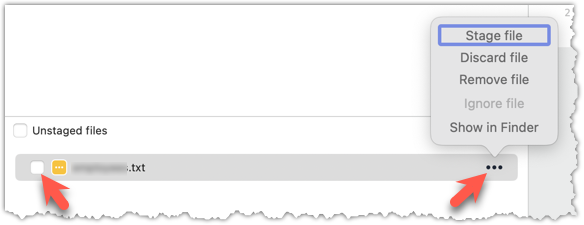
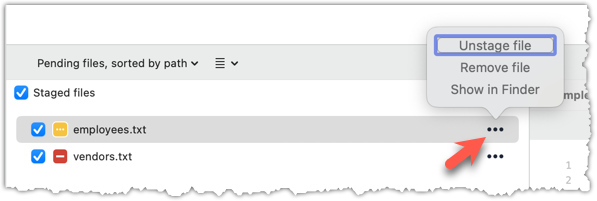
To unstage a file, locate the file among the staged files section, click the ... in front the file, and choose Unstage file:
After staging, you can now proceed to save the snapshot, aka creating a commit.
Saving a snapshot is called committing and a saved snapshot is called a commit.
A Git commit is a full snapshot of your working directory based on the files you have staged, more precisely, a record of the exact state of all files in the staging area (aka index) at that moment -- even the files that have not changed since the last commit. This is in contrast to the intuitive expectation that only the is stored in a commit. Consequently, a Git commit has all the information it needs to recreate the snapshot of the working directory at the time the commit was created.
A commit also includes metadata such as the author, date, and an optional commit message describing the change.
A Git commit is a snapshot of all tracked files, not simply a delta of what changed since the last commit.
Target To create a commit based on staged changes.
Preparation
You can continue using the sandbox created in the previous hands-on practical, or,
1 First, let us do a sanity check using the git status command, to confirm there are staged files.
git status
On branch master
No commits yet
Changes to be committed:
(use "git rm --cached <file>..." to unstage)
new file: fruits.txt
2 Now, create a commit using the commit command. The -m switch is used to specify the commit message.
git commit -m "Add fruits.txt"
[master (root-commit) d5f91de] Add fruits.txt
1 file changed, 5 insertions(+)
create mode 100644 fruits.txt
3 Verify the staging area is empty using the git status command again.
git status
On branch master
nothing to commit, working tree clean
Note how the output says nothing to commit which means the staging area is now empty.
1 Ensure the new file fruits.txt has been staged.
2 Click the Commit button at the top of the window.
3 Enter a commit message (e.g. add fruits.txt) into the text box.
4 Click Commit.
done!
It is useful to be able to visualise the commits timeline, aka the revision graph.
Git commits form a timeline, as each corresponds to a point in time when you asked Git to take a snapshot of your working directory. Each commit links to at least one previous commit, forming a structure that we can traverse.
A timeline of commits is called a branch. By default, Git names the initial branch master -- though many now use main instead. You'll learn more about branches in future lessons. For now, just be aware that the commits you create in a new repo will be on a branch called master (or main) by default.
gitGraph
    %%{init: { 'theme': 'default', 'gitGraph': {'mainBranchName': 'master (or main)'}} }%%
    commit id: "Add fruits.txt"
    commit id: "Update fruits.txt"
    commit id: "Add colours.txt"
    commit id: "..."
Git can show you the list of commits in the Git history.
Preparation
You can continue using the sandbox created in the previous hands-on practical, or,
1 View the list of commits, which should show just the one commit you created just now.
You can use the git log command to see the commit history.
git log
commit ... (HEAD -> master)
Author: ... <...@...>
Date: ...
Add fruits.txt
Use the Q key to exit the output screen of the git log command.
Note how the output has some details about the commit you just created. You can ignore most of it for now, but notice it also shows the commit message you provided.
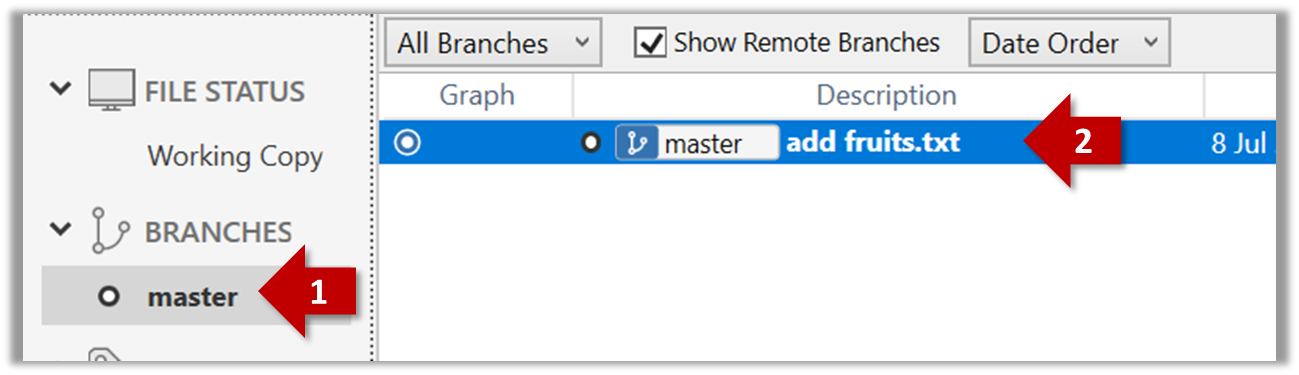
Expand the BRANCHES menu and click on the master to view the history graph, which contains only one node at the moment, representing the commit you just added. For now, ignore the label master attached to the commit.
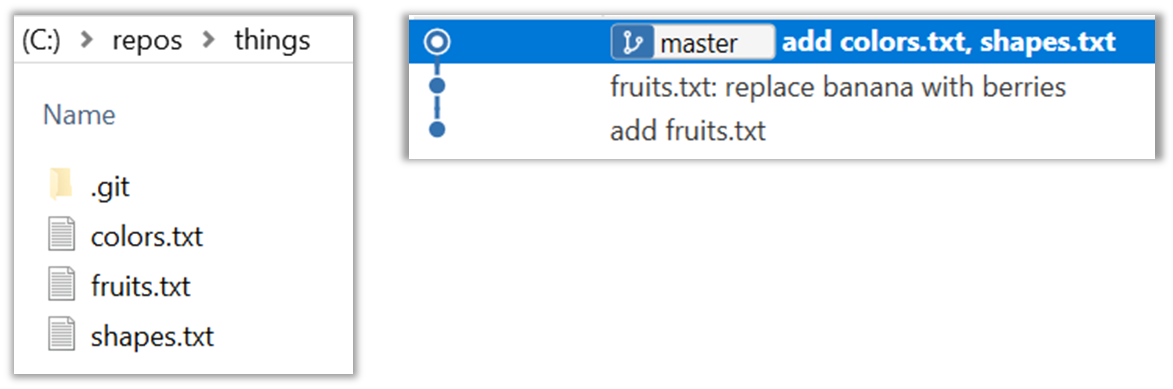
2 Create a few more commits (i.e., a few rounds of add/edit files → stage → commit), and observe how the list of commits grows.
Here is an example list of bash commands to add two commits while observing the list of commits after each commit.
echo "figs" >> fruits.txt # add another line to fruits.txt
git add fruits.txt # stage the updated file
git commit -m "Insert figs into fruits.txt" # commit the changes
git log # check commits list
echo "a file for colours" >> colours.txt # add a colours.txt file
echo "a file for shapes" >> shapes.txt # add a shapes.txt file
git add colours.txt shapes.txt # stage both files in one go
git commit -m "Add colours.txt, shapes.txt" # commit the changes
git log # check commits list
You can copy-paste a list of commands (such as commands given above), including any comments, to the terminal. After that, hit enter to run them in sequence.
The output of the final git log should be something like this:
commit ... (HEAD -> master)
Author: ... <...@...>
Date: ...
Add colours.txt, shapes.txt
commit ...
Author: ... <...@...>
Date: ...
Insert figs into fruits.txt
commit ...
Author: ... <...@...>
Date: ...
Add fruits.txt
SIDEBAR: Working with the 'less' pager
Some Git commands — such as git log— may show their output through a pager. A pager is a program that lets you view long text one screen at a time, so you don’t miss anything that scrolls off the top. For example, the output of git log command will temporarily hide the current content of the terminal, and enter the pager view that shows output one screen at a time. When you exit the pager, the git log output will disappear from view, and the previous content of the terminal will reappear.
command 1
output 1
git log
→
commit f761ea63738a...
Author: ... <...@...>
Date: Sat ...
Add colours.txt
By default, Git uses a pager called less. Given below are some useful commands you can use inside the less pager.
| Command | Description |
|---|---|
q | Quit less and return to the terminal |
↓ or j | Move down one line |
↑ or k | Move up one line |
Space | Move down one screen |
b | Move up one screen |
G | Go to the end of the content |
g | Go to the beginning of the content |
/pattern | Search forward for pattern (e.g., /fix) |
n | Repeat the last search (forward) |
N | Repeat the last search (backward) |
h | Show help screen with all less commands |
If you’d rather see the output directly, without using a pager, you can add the --no-pager flag to the command e.g.,
git --no-pager log
It is possible to ask Git to not use less at all, use a different pager, or fine-tune how less is used. For example, you can reduce Git's use of the pager (recommended), using the following command:
git config --global core.pager "less -FRX"
Explanation:
-F: Quit if the output fits on one screen (don’t show pager unnecessarily)-R: Show raw control characters (for coloured Git output)-X: Keep content visible after quitting the pager (so output stays on the terminal)
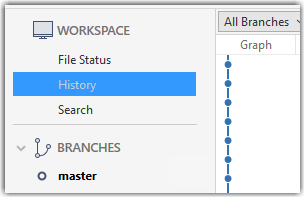
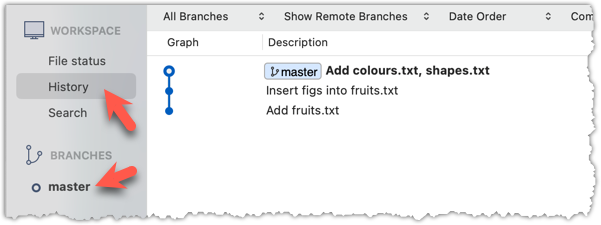
To see the list of commits, click on the History item (listed under the WORKSPACE section) on the menu on the right edge of Sourcetree.
After adding two more commits, the list of commits should look something like this:
done!
The Git data model consists of two types of entities: objects and refs (short for references). In this lesson, you will encounter examples of both.
A Git revision graph is a visualisation of a repo's revision history, consisting of one or more branches. First, let us learn to work with simpler revision graphs consisting of one branch, such as the one given below.
- Nodes in the revision graph represent commits. A commit is one of four main types of Git objects. For completeness, the other three are:
- blob (short for binary large object): stores the contents of a file
- tree: represents a directory and records the hierarchy of its contents by referencing blobs and other trees
- tag (specifically, annotated tag): a label-like object that can store additional metadata and point to a specific commit
- A commit is identified by its SHA value. A SHA (Secure Hash Algorithm) value is a unique identifier generated by Git to represent each commit. It is produced by using SHA-1 (i.e., one of the algorithms in the SHA family of cryptographic hash functions) on the entire content of the commit. It's a 40-character hexadecimal string (e.g.,
f761ea63738a67258628e9e54095b88ea67d95e2) that acts like a fingerprint, ensuring that every commit can be referenced unambiguously. That is, every commit has a unique SHA-1 hash value. - A commit is a full snapshot of the working directory, constructed based on the previous commit, and the changes staged. That means each commit (except the initial commit) is based on a another 'parent' commit. Some commits can have multiple parent commits -- we’ll cover that later.
Given every commit has a unique hash, the commit hash values you see in our examples will be different from the hash values of your own commits, for example, when following our hands-on practicals.
Edges in the revision graph represent links between a commit and its parent commit(s). In some revision graph visualisations, you might see arrows (instead of lines) showing how each commit points to its parent commit.
Git uses refs to name and keep track of various points in a repository’s history. These refs are essentially 'named-pointers' that can serve as bookmarks to reach a certain point in the revision graph using the ref name.
In the revision graph above, there are two refs master and ←HEAD.
- master is a branch ref. A branch ref points to the latest commit on a branch. In this visualisation, the commit shown alongside the ref is the one it points to i.e.,
C3.
When you create a new commit, the branch ref of the branch moves to the new commit.
You'll be learning more about Git branches in a later lesson. - ←HEAD is a special ref that typically points to the current branch and moves along with that branch ref. In this example, it is pointing to the
masterbranch.
In certain cases, theHEADmay point directly to a specific commit instead of a branch. This situation is called a 'detachedHEAD', which will be covered in a later lesson.
Target Use Git features to examine the revision graph of a simple repo.
Preparation
You can continue using the sandbox created in the previous hands-on practical, or,
1 First, use a simple git log to view the list of commits.
git log
commit f761ea63738a... (HEAD -> master)
Author: ... <...@...>
Date: Sat ...
Add colours.txt, shapes.txt
commit 2bedace69990...
Author: ... <...@...>
Date: Sat ...
Add figs to fruits.txt
commit d5f91de5f0b5...
Author: ... <...@...>
Date: Fri ...
Add fruits.txt
Given below the visual representation of the same revision graph. As you can see, the log output shows the refs slightly differently, but it is not hard to see what they mean.
2 Use the --oneline flag to get a more concise view. Note how the commit SHA has been truncated to first seven characters (first seven characters of a commit SHA is enough for Git to identify a commit).
git log --oneline
f761ea6 (HEAD -> master, origin/master) Add colours.txt, shapes.txt
2bedace Add figs to fruits.txt
d5f91de Add fruits.txt
3 The --graph flag makes the result closer to a graphical revision graph. Note the * that indicates a node in a revision graph.
git log --oneline --graph
* f761ea6 (HEAD -> master, origin/master) Add colours.txt, shapes.txt
* 2bedace Add figs to fruits.txt
* d5f91de Add fruits.txt
The --graph option is more useful when examining a more complicated revision graph consisting of multiple parallel branches.
Click the History to see the revision graph.
- In some versions of Sourcetree, the
HEADref may not be shown -- it is implied that theHEADref is pointing to the same commit the currently active branch ref is pointing.
done!
At this point: You should now be able to initialise a Git repository in a folder and commit snapshots of its files at times of your choice. So far, you did not learn how to actually make use of those snapshots (other than to show a list of them) -- we will do that in later tours.
What's next: Tour 2: Backing up a Repo on the Cloud
Target Usage: To back up a Git repository on a cloud-based Git service such as GitHub.
Motivation: One (of several) benefits of maintaining a copy of a repo on a cloud server: it acts as a safety net (e.g., against the folder becoming inaccessible due to a hardware fault).
Lesson plan:
T2L1. Remote Repositories covers that part.
T2L2. Preparing to use GitHub covers that part.
T2L3. Creating a Repo on GitHub covers that part.
T2L4. Linking a Local Repo With a Remote Repo covers that part.
T2L5. Updating the Remote Repo covers that part.
T2L6. Omitting Files from Revision Control covers that part.
To use GitHub, you need to sign up for an account, and configure related tools/settings first.
GitHub is a web-based service that hosts Git repositories and adds collaboration features on top of Git. Two other similar platforms are GitLab and Bitbucket. While you use Git to manage version-control locally, you can use such a platform in conjunction to utilise additional features such as shared access to repositories, issue tracking, code reviews, and permission controls. They are widely used in software development projects, for both open-source software (OSS) and closed-source software projects.
On GitHub, a Git repo can be put in one of two spaces:
- A GitHub user account represents an individual user. It is created when you sign up for GitHub and includes a username, profile page, and personal settings. With a user account, you can create your own repositories, contribute to others’ projects, and manage collaboration settings for any repositories you own.
- A GitHub organisation (org for short) is a shared account used by a group such as a team, company, or open-source project. Organisations can own repositories and manage access to them through teams, roles, and permissions. Organisations are especially useful when managing repositories with shared ownership or when working at scale.
Every GitHub user must have a user account, even if they primarily work within an organisation.
Before you can interact with GitHub from your local Git client, you need to set up authentication. In the past, you could simply enter your GitHub username and password, but GitHub no longer accepts passwords for Git operations. Instead, you’ll use a more secure method — such as a Personal Access Token (PAT) or SSH keys — to prove your identity.
A Personal Access Token (PAT) is essentially a long, random string that acts like a password, but it can be scoped to specific permissions (e.g., read-only or full access) and revoked at any time. This makes it more secure and flexible than a traditional password.
Git supports two main protocols for communicating with GitHub: HTTPS and SSH.
- With HTTPS, you connect over the web and authenticate using your GitHub username and a Personal Access Token.
- With SSH, you connect using a cryptographic key pair you generate on your machine. Once you add your public key to your GitHub account, GitHub recognises your machine and lets you authenticate without typing anything further.
GitHub associates a commit to a user based on the email address in the commit metadata. When you push a commit, GitHub checks if the email matches a verified email on a GitHub account. If it does, the commit is shown as authored by that user. If the email doesn’t match any account, the commit is still accepted but won’t be linked to any profile.
GitHub provides a no-reply email (e.g., 12345678+username@users.noreply.github.com) that you can use as your Git user.email to hide your real email while still associating commits with your GitHub account.
If you prefer not to include your real email address in commits, you can do the following:
Find your no-reply email provided by GitHub: Navigate to the email settings of your GitHub account and select the option to
Keep my email address private. The no-reply address will then be displayed, typically in the formatID+USERNAME@users.noreply.github.com.

Update your
user.emailwith that email address e.g.,git config --global user.email "12345678+username@users.noreply.github.com"
GitHub offers its own clients to make working with GitHub more convenient.
- The GitHub Desktop app provides a GUI for performing most GitHub operations from your desktop, without needing to visit the GitHub web UI.
- The GitHub CLI (
gh) brings GitHub-specific commands to your terminal, letting you perform most GitHub operations through your terminal.
If you are using Git-Mastery exercises (strongly recommended), you need to install and configure GitHub CLI because it is needed by Git-Mastery exercises involving GitHub.
The first step of backing up a local repo on GitHub: create an empty repository on GitHub.
You can create a remote repository based on an existing local repository, to serve as a remote copy of your local repo. For example, suppose you created a local repo and worked with it for a while, but now you want to upload it onto GitHub. The first step is to create an empty repository on GitHub.
Target Create an empty repo named gitmastery-things in your GitHub account.
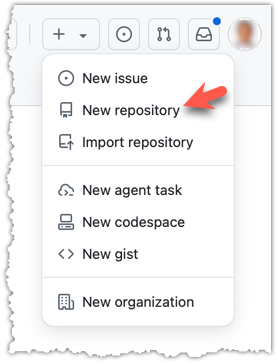
1 Login to your GitHub account and choose to create a new repo.
2 In the next screen, provide gitmastery-things as the name for your repo. Refer the screenshot below on some guidance on how to provide the required information.
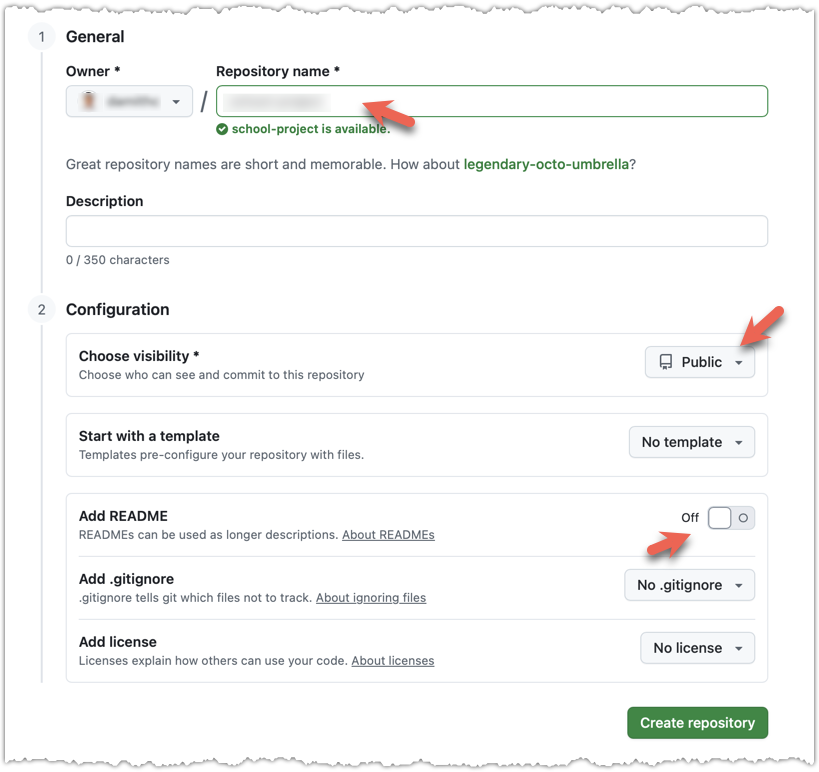
Click Create repository button to create the new repository.
If you enable any of the three Add _____ options shown above, GitHub will not only create a repo, but will also initialise it with some initial content. That is not what we want here. To create an empty remote repo, keep those options disabled.
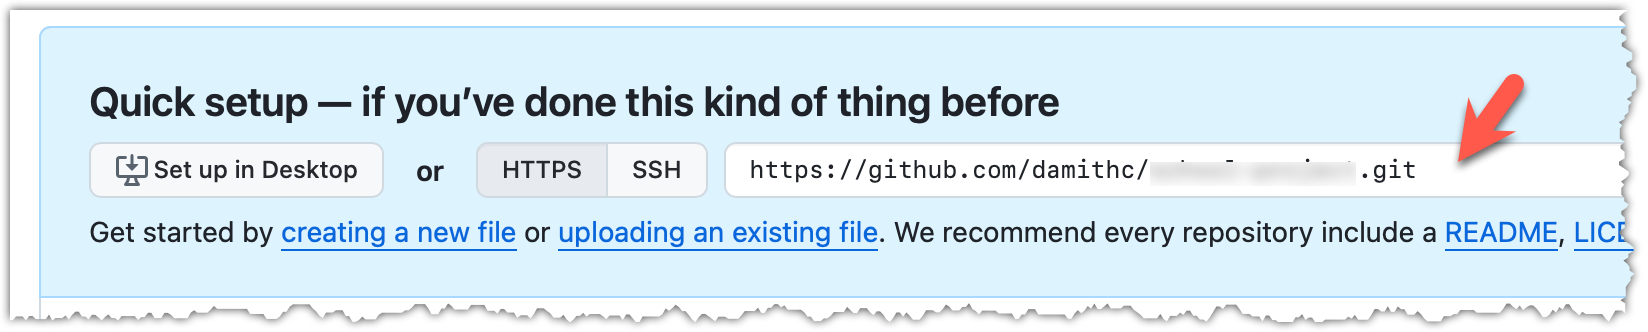
3 Note the URL of the repo. It will be of the form
https://github.com/{your_user_name}/{repo_name}.git.
e.g., https://github.com/johndoe/gitmastery-things.git (note the .git at the end)
done!
The second step of backing up a local repo on GitHub: link the local repo with the remote repo on GitHub.
A Git remote is a reference to a repository hosted elsewhere, usually on a server like GitHub, GitLab, or Bitbucket. It allows your local Git repo to communicate with another remote copy — for example, to upload locally-created commits that are missing in the remote copy.
By adding a remote, you are informing the local repo details of a remote repo it can communicate with, for example, where the repo exists and what name to use to refer to the remote.
The URL you use to connect to a remote repo depends on the protocol — HTTPS or SSH:
- HTTPS URLs use the standard web protocol and start with
https://github.com/(for GitHub users). e.g.,https://github.com/username/repo-name.git - SSH URLs use the secure shell protocol and start with
git@github.com:. e.g.,git@github.com:username/repo-name.git
A Git repo can have multiple remotes. You simply need to specify different names for each remote (e.g., upstream, central, production, other-backup ...).
Target Add the empty remote repo you created on GitHub as a remote of a local repo you have.
Preparation
You can continue using the things local repo created in the previous hands-on practical, or,
1 In a terminal, navigate to the folder containing the local repo things.
2 List the current list of remotes using the git remote -v command, for a sanity check. No output is expected if there are no remotes yet.
3 Add a new remote repo using the git remote add <remote-name> <remote-url> command.
Format of the <remote-url>:
https://github.com/<owner>/<remote-repo>.git # using HTTPS
git@github.com:<owner>/<remote-repo>.git # using SSH
The full command:
git remote add origin https://github.com/JohnDoe/gitmastery-things.git # using HTTPS
git remote add origin git@github.com:JohnDoe/gitmastery-things.git # using SSH
4 List the remotes again to verify the new remote was added.
git remote -v
origin https://github.com/johndoe/gitmastery-things.git (fetch)
origin https://github.com/johndoe/gitmastery-things.git (push)
The same remote will be listed twice, to show that you can do two operations (fetch and push) using this remote. You can ignore that for now. The important thing is the remote you added is being listed.
1 Open the local repo in Sourcetree.
2 Open the dialog for adding a remote, as follows:
Choose Repository → Repository Settings menu option.
Choose Repository → Repository Settings... → Choose Remotes tab.
3 Add a new remote to the repo with the following values.

Remote name: the name you want to assign to the remote repo i.e.,originURL/path: the URL of your remote repohttps://github.com/<owner>/<repo>.git # using HTTPS git@github.com:<owner>/<repo>.git # using SSHe.g.,
https://github.com/JohnDoe/things.git # using HTTPS git@github.com:JohnDoe/things.git # using SSHUsername: your GitHub username
4 Verify the remote was added by going to Repository → Repository Settings again.
5 Add another remote, to verify that a repo can have multiple remotes. You can use any name (e.g., backup and any made-up <owner>/<remote-repo> for this).
done!
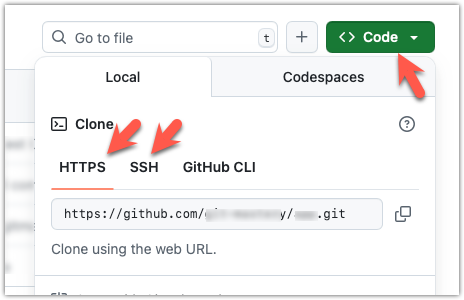
To find the URL of a repo on GitHub, you can click on the Code button:
The third step of backing up a local repo on GitHub: push a copy of the local repo to the remote repo.
You can push content of one repository to another, usually from your local repo to a remote repo. Pushing transfers recorded Git history (such as past commits), but it does not transfer unstaged changes or untracked files.
- To push, you need to have to the remote repo.
- Pushing is performed one branch at a time; you must specify which branch you want to push.
You can configure Git to track a pairing between a local branch and a remote branch, so in future you can push from the same local branch to the corresponding remote branch without needing to specify them again. For example, you can set your local master branch to track the master branch on the remote repo origin i.e., local master branch will track the branch origin/master.
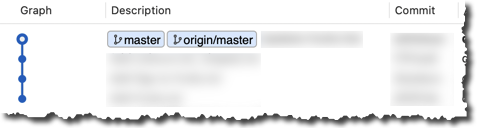
In the revision graph above, you see a new type of ref ( origin/master). This is a remote-tracking branch ref that represents the state of a corresponding branch in a remote repository (if you previously set up the branch to 'track' a remote branch). In this example, the master branch in the remote origin is also at the commit C3 (which means you have not created new commits after you pushed to the remote).
If you now create a new commit C4, the state of the revision graph will be as follows:
Explanation: When you create C4, the current branch master moves to C4, and HEAD moves along with it. However, the master branch in the remote origin remains at C3 (because you have not pushed C4 yet). That is, the remote-tracking branch origin/master is one commit behind the local branch master (or, the local branch is one commit ahead). The origin/master ref will move to C4 only after you push your local branch to the remote again.
Target Upload (i.e., push) the revision history from a local repo to a remote repo.
Preparation
You can continue using the things local repo and the gitmastery-things remote repo created in the previous hands-on practical, or,
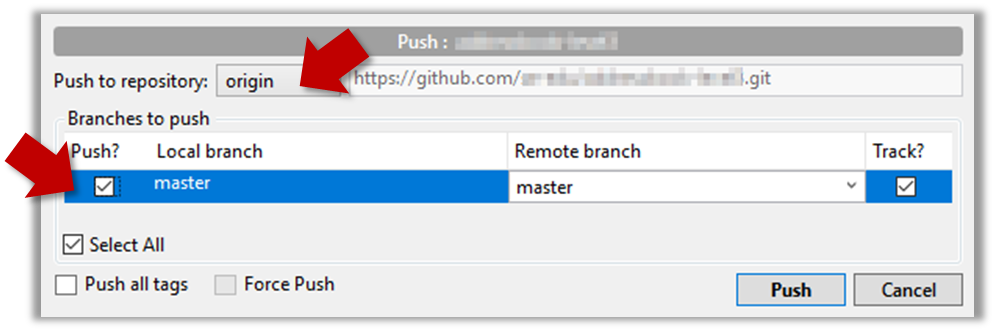
1 Push the master branch to the remote. Also instruct Git to track this branch pair.
Use the git push -u <remote-repo-name> <local-branch-name> to push the commits to a remote repository.
git push -u origin master
Explanation:
push: the Git sub-command that pushes the current local repo content to a remote repoorigin: name of the remotemaster: branch to push-u(or--set-upstream): the flag that tells Git to track that this localmasteris trackingorigin/masterbranch
Click the Push button on the buttons ribbon at the top.

In the next dialog, ensure the settings are as follows, ensure the Track option is selected, and click the Push button on the dialog.
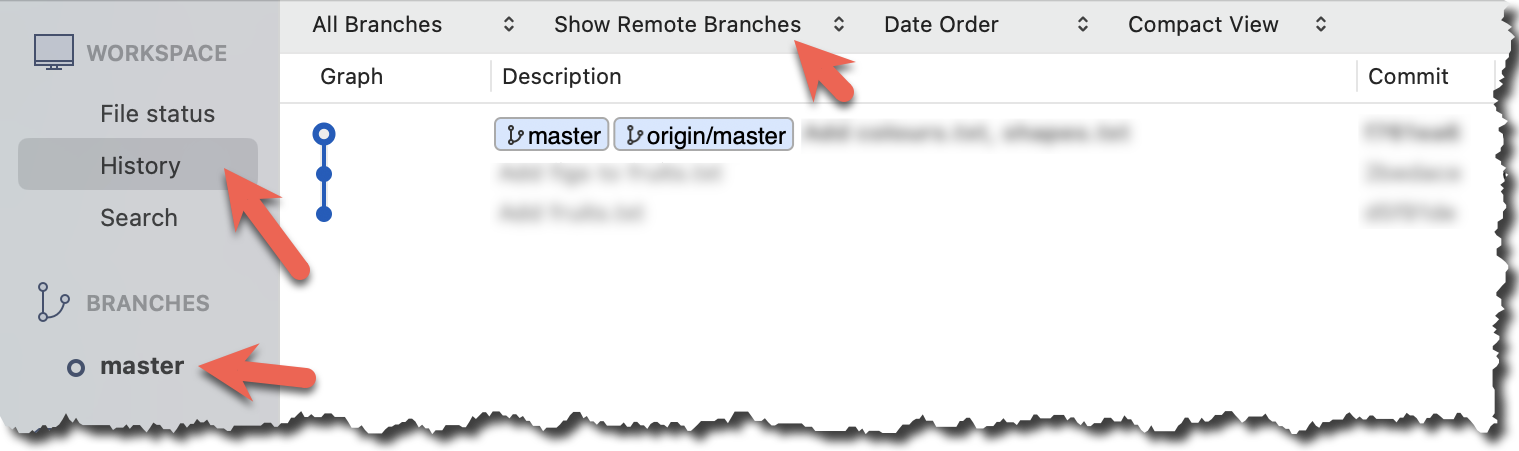
2 Observe the remote-tracking branch origin/master is now pointing at the same commit as the master branch.
Use the git log --oneline --graph to see the revision graph.
* f761ea6 (HEAD -> master, origin/master) Add colours.txt, shapes.txt
* 2bedace Add figs to fruits.txt
* d5f91de Add fruits.txt
Click the History to see the revision graph.
- In some versions of Sourcetree, the
HEADref may not be shown -- it is implied that theHEADref is pointing to the same commit the currently active branch ref is pointing. - If the remote-tracking branch ref (e.g.,
origin/master) is not showing up, you may need to enable theShow Remote Branchesoption.
done!
The push command can be used repeatedly to send further updates to another repo e.g., to update the remote with commits you created since you pushed the first time.
Target Add a commit to the same local repo, and push it to the remote repo.
Preparation
You can continue using the things local repo and the gitmastery-things remote repo created in the previous hands-on practical, or,
1 Commit some changes in your local repo. Example:
echo "Elderberries" >> fruits.txt
git commit -am "Update fruits list"
Optionally, you can run the git status command, which should confirm that your local branch is 'ahead' by one commit (i.e., the local branch has commits that are not present in the corresponding branch in the remote repo).
git status
On branch master
Your branch is ahead of 'origin/master' by 1 commit.
(use "git push" to publish your local commits)
nothing to commit, working tree clean
You can also use the git log --oneline --graph command to see where the branch refs are. Note how the remote-tracking branch origin/master is one commit behind the local master.
e60deae (HEAD -> master) Update fruits list
f761ea6 (origin/master) Add colours.txt, shapes.txt
2bedace Add figs to fruits.txt
d5f91de Add fruits.txt
Create commits as you did before.
Before pushing the new commit, Sourcetree will indicate that your local branch is 'ahead' by one commit (i.e., the local branch has one new commit that is not in the corresponding branch in the remote repo).

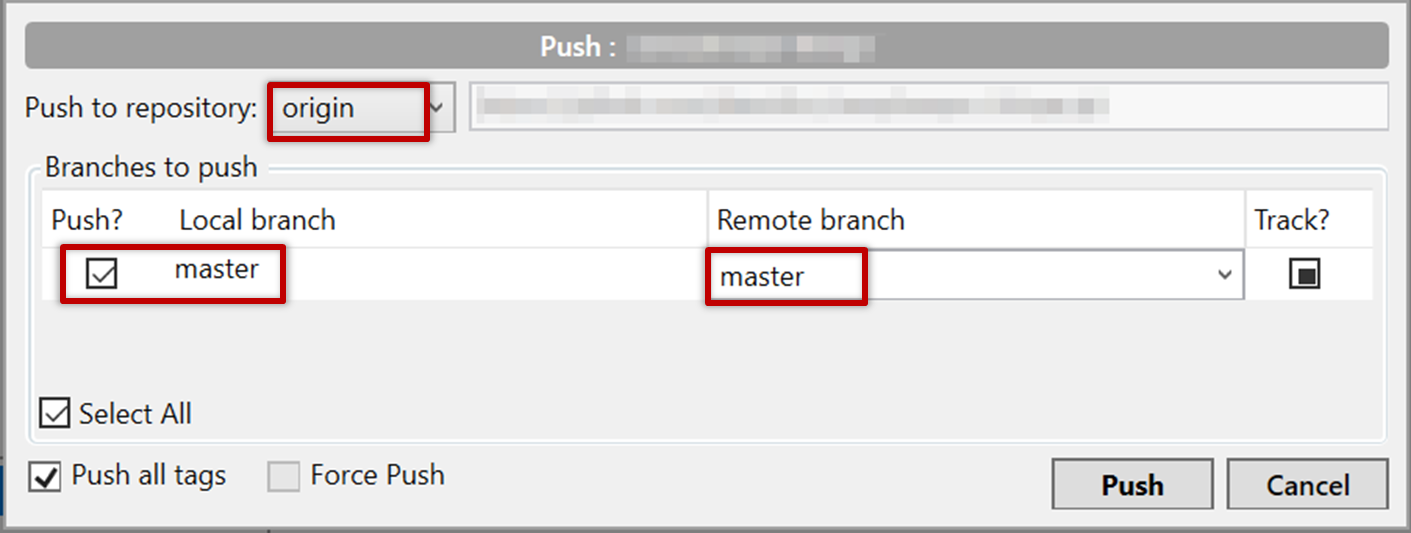
2 Push the new commits to your fork on GitHub.
To push the newer commit(s) in the current branch master to the remote origin, you can use any of the following commands:
git push origin mastergit push origin
→ Git will assume you are pushing the current branch (e.g.,master) even if you don't specify it.git push
→ Git will assume you are pushing the current branch (e.g.,master). Due to tracking you've set up earlier, Git will assume that you want to push it to the matching branch onorigin.
After pushing, the revision graph should look something like the following (note how both local and remote-tracking branch refs are pointing to the same commit again).
e60deae (HEAD -> master, origin/master) Update fruits list
f761ea6 Add colours.txt, shapes.txt
2bedace Add figs to fruits.txt
d5f91de Add fruits.txt
To push, click the Push button on the top buttons ribbon, ensure the settings are as follows in the next dialog, and click the Push button on the dialog.
After pushing the new commit to the remote, the remote-tracking branch ref should move to the new commit:
done!
Note that you can push between two repos only if those repos have a shared history among them (i.e., one should have been created by copying the other).
DETOUR: Pushing to Multiple Repos
You can push to any number of repos, as long as the target repos and your repo have a shared history.
- Add the GitHub repo URL as a remote while giving a suitable name (e.g.,
upstream,central,production,backup...), if you haven't done so already. - Push to the target repo -- remember to select the correct target repo when you do.
e.g., git push backup master
Git allows you to specify which files should be omitted from revision control.
You can specify which files Git should ignore from revision control. While you can always omit files from revision control simply by not staging them, having an 'ignore-list' is more convenient, especially if there are files inside the working folder that are not suitable for revision control (e.g., temporary log files) or files you want to prevent from accidentally including in a commit (files containing confidential information).
A repo-specific ignore-list of files can be specified in a .gitignore file, stored in the root of the repo folder.
The .gitignore file itself can be either revision controlled or ignored.
- To version control it (the more common choice – which allows you to track how the
.gitignorefile changes over time), simply commit it as you would commit any other file. - To ignore it, simply add its name to the
.gitignorefile itself.
The .gitignore file supports file patterns e.g., adding temp/*.tmp to the .gitignore file prevents Git from tracking any .tmp files in the temp directory.
SIDEBAR: .gitignore File Syntax
Blank lines: Ignored and can be used for spacing.
Comments: Begin with
#(lines starting with # are ignored).# This is a commentWrite the name or pattern of files/directories to ignore.
log.txt # Ignores a file named log.txtWildcards:
*matches any number of characters, except/(i.e., for matching a string within a single directory level):abc/*.tmp # Ignores all .tmp files in abc directory**matches any number of characters (including/)**/foo.tmp # Ignores all foo.tmp files in any directory?matches a single characterconfig?.yml # Ignores config1.yml, configA.yml, etc.[abc]matches a single character (a, b, or c)file[123].txt # Ignores file1.txt, file2.txt, file3.txt
Directories:
- Add a trailing
/to match directories.logs/ # Ignores the logs directory - Patterns without
/match files/folders recursively.*.bak # Ignores all .bak files anywhere - Patterns with
/are relative to the.gitignorelocation./secret.txt # Only ignores secret.txt in the root directory
- Add a trailing
Negation: Use
!at the start of a line to not ignore something.*.log # Ignores all .log files !important.log # Except important.log
Example:
# Ignore all log files
*.log
# Ignore node_modules folder
node_modules/
# Don’t ignore main.log
!main.log
Target Get Git to ignore some files in a repo.
Preparation
To prepare the sandbox for this practical:
- Navigate inside the
gitmastery-exercisesfolder. - Run
gitmastery download hp-ignore-filescommand.
The sandbox will be set up inside the gitmastery-exercises/hp-ignore-files folder.
Create a temp.txt file and a few .tmp files in a repo. These are presumably files we do not want to include in our revision history. For example, as follows:
echo “good stuff” > keep.txt
echo “temp stuff” > temp.txt
echo “more temp stuff” > file1.tmp
echo “even more temp stuff” > file2.tmp
1 Configure Git to ignore those files:
Create a file named .gitignore in the working directory root and add the text temp.txt into it.
echo "temp.txt" >> .gitignore
temp.txt
Observe how temp.txt is no longer detected as 'untracked' by running the git status command (but now it will detect the .gitignore file as 'untracked'.
Update the .gitignore file as follows:
temp.txt
*.tmp
Observe how .tmp files are no longer detected as 'untracked' by running the git status command.
The file should be currently listed under Unstaged files. Right-click it and choose Ignore.... Choose Ignore exact filename(s) and click OK.
Also take note of other options available e.g., Ignore all files with this extension etc. They may be useful in future.
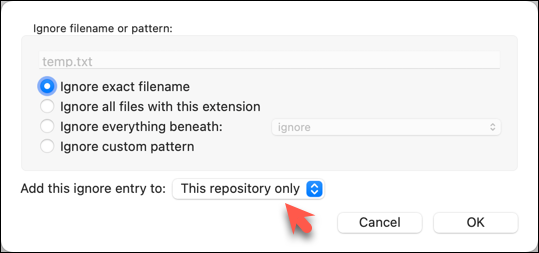
Note how the temp.text is no longer listed under Unstaged files. Observe that a file named .gitignore has been created in the working directory root and has the following line in it. This new file is now listed under Unstaged files.
temp.txt
Right-click on any of the .tmp files you added, and choose Ignore... as you did previously. This time, choose the option Ignore files with this extension.
Note how .temp files are no longer shown as unstaged files, and the .gitignore file has been updated as given below:
temp.txt
*.tmp
2 Optionally, stage and commit the .gitignore file.
done!
Files recommended to be omitted from version control
- Binary files generated when building your project e.g.,
*.class,*.jar,*.exe
Reasons:- no need to version control these files as they can be generated again from the source code
- Revision control systems are optimized for tracking text-based files, not binary files.
- Temporary files e.g., log files generated while testing the product
- Local files i.e., files specific to your own computer e.g., local settings of your IDE (
.idea/) - Sensitive content i.e., files containing sensitive/personal information e.g., credential files, personal identification data (especially if there is a possibility of those files getting leaked via the revision control system).
At this point: You should now be able to create a copy of your repo on GitHub, and keep it updated as you add more commits to your local repo. If something goes wrong with your local repo (e.g., disk crash), you can now recover the repo using the remote repo (this tour did not cover how exactly you can do that -- it will be covered in a future tour).
What's next: Tour 3: Working Off a Remote Repo
Target Usage: To work with an existing remote repository.
Motivation: Often, you will need to start with an existing remote repository. In such cases, you may have to create your own copies of that repository, and keep those copies updated when more changes appear in the remote repository.
Lesson plan:
T3L1. Duplicating a Remote Repo on the Cloud covers that part.
T3L2. Creating a Local Copy of a Repo covers that part.
T3L3. Downloading Data Into a Local Repo covers that part.
GitHub allows you to create a remote copy of another remote repo, called forking.
A fork is a copy of a remote repository created on the same hosting service such as GitHub, GitLab, or Bitbucket. On GitHub, you can fork a repository from another user or organisation into your own space (i.e., your user account or an organisation you have sufficient access to). Forking is particularly useful if you want to experiment with a repo but don't have write permissions to the original -- you can fork it (which gives you your own remote copy of the repo) and work with the forked repo without affecting the original repository.
Preparation Create a GitHub account if you don't have one yet.
1 Go to the GitHub repo you want to fork e.g., samplerepo-things
2 Click on the  button in the top-right corner. In the next step,
- choose to fork to your own account or to another GitHub organization that you are an admin of.
- un-tick the
[ ] Copy the master branch onlyoption, so that you get copies of other branches (if any) in the repo.
done!
Forking is not a Git feature, but a feature provided by hosted Git services like GitHub, GitLab, or Bitbucket.
GitHub does not allow you to fork the same repo more than once to the same destination. If you want to re-fork, you need to delete the previous fork.
The next step is to create a local copy of the remote repo, by cloning the remote repo.
You can clone a repository to create a full copy of it on your computer. This copy includes the entire revision history, branches, and files of the original, so it behaves just like the original repository. For example, you can clone a repository from a hosting service like GitHub to your computer, giving you a complete local version to work with.
Cloning a repo automatically creates a remote named origin which points to the repo you cloned from.
The repo you cloned from is often referred to as the upstream repo.
1 Clone the remote repo to your computer. For example, you can clone the samplerepo-things repo, or the fork you created from it in a previous lesson.
Note that the URL of the GitHub project is different from the URL you need to clone a repo in that GitHub project. e.g.
https://github.com/se-edu/samplerepo-things # GitHub project URL
https://github.com/se-edu/samplerepo-things.git # the repo URL
You can use the git clone <repository-url> [directory-name] command to clone a repo.
<repository-url>: The URL of the remote repository you want to copy.[directory-name](optional): The name of the folder where you want the repository to be cloned. If you omit this, Git will create a folder with the same name as the repository.
git clone https://github.com/se-edu/samplerepo-things.git # if using HTTPS
git clone git@github.com:se-edu/samplerepo-things.git # if using SSH
git clone https://github.com/foo/bar.git my-bar-copy # also specifies a dir to use
For exact steps for cloning a repo from GitHub, refer to this GitHub document.
File → Clone / New ... and provide the URL of the repo and the destination directory.
File → New ... → Choose as shown below → Provide the URL of the repo and the destination directory in the next dialog.


2 Verify the clone has a remote named origin pointing to the upstream repo.
Use the git remote -v command that you learned earlier.
Choose Repository → Repository Settings menu option.
done!
When there are new changes in the remote, you need to pull those changes down to your local repo.
There are two steps to bringing over changes from a remote repository into a local repository: fetch and merge.
- Fetch is the act of downloading the latest changes from the remote repository, but without applying them to your current branch yet. It updates metadata in your repo so that it knows what has changed in the remote repo, but your own local branch remains untouched.
- Merge is what you do after fetching, to actually incorporate the fetched changes into your local branch. It combines your local branch with the changes from the corresponding branch from the remote repo.
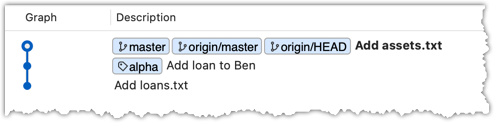
Scenario You have cloned a remote repo. After you have cloned, two new commits have been added to it. R and L1 in the diagram below represents this scenario.
gitGraph BT:
    %%{init: { 'theme': 'default', 'gitGraph': {'mainBranchName': 'master'}} }%%
    commit id: "add loans.txt"
    commit id: "add loan to Ben"
    commit id: "add assets.txt"
    commit id: "add goals.txt"
    commit id: "[head → master] add loan to Chang"
origin]
gitGraph BT:
%%{init: { 'theme': 'default', 'gitGraph': {'mainBranchName': 'master'}} }%%
commit id: "add loans.txt"
commit id: "add loan to Ben"
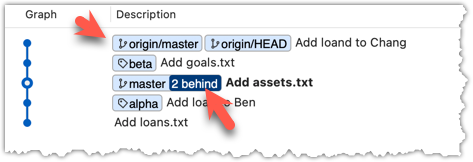
commit id: "[head → master][origin/master] add assets.txt"
2 commits behind the remote]
→
gitGraph BT:
    %%{init: { 'theme': 'default', 'gitGraph': {'mainBranchName': 'master'}} }%%
    commit id: "add loans.txt"
    commit id: "add loan to Ben"
    commit id: "add assets.txt"
    commit id: "add goals.txt"
    commit id: "[head → master][origin/master] add loan to Chang"
the missing commits]
Target Now, you wish to bring over those missing commits to your clone, taking it from the state L1 to state L2 (as given in the diagram above).
Preparation To create the initial state of the remote repo and the local repo (i.e., R and L1 given above), you can use the following steps.
- Clone the repo git-mastery/samplerepo-finances. It has 3 commits. Your clone now has a remote
originpointing to the remote repo you cloned from. - Change the remote
originto point to samplerepo-finances-2. This remote repo is a copy of the one you cloned, but it has two extra commits.
git remote set-url origin https://github.com/git-mastery/samplerepo-finances-2.git
Go to Repository → Repository settings ... to update remotes.
1 Verify the local repo is unaware of the extra commits in the remote.
git status
On branch master
Your branch is up to date with 'origin/master'.
nothing to commit, working tree clean
The revision graph should look like the below:
If it looks like the below, it is possible that Sourcetree is auto-fetching data from the repo periodically.
2 Fetch from the new remote.
Use the git fetch <remote> command to fetch changes from a remote. If the <remote> is not specified, the default remote origin will be used.
git fetch origin
remote: Enumerating objects: 8, done.
... # more output ...
afbe966..cc6a151 master -> origin/master
* [new tag] beta -> beta
Click on the Fetch button on the top menu:
3 Verify the fetch worked i.e., the local repo is now aware of the two missing commits. Also observe how the local branch ref of the master branch, the staging area, and the working directory remain unchanged after the fetch.
Use the git status command to confirm the repo now knows that it is behind the remote repo.
git status
On branch master
Your branch is behind 'origin/master' by 2 commits, and can be fast-forwarded.
(use "git pull" to update your local branch)
nothing to commit, working tree clean
Now, the revision graph should look something like the below. Note how the origin/master ref is now two commits ahead of the master ref.
4 Merge the fetched changes.
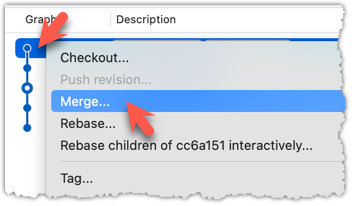
Use the git merge <remote-tracking-branch> command to merge the fetched changes. Check the status and the revision graph to verify that the branch tip has now moved by two more commits.
git merge origin/master
git status
git log --oneline --decorate
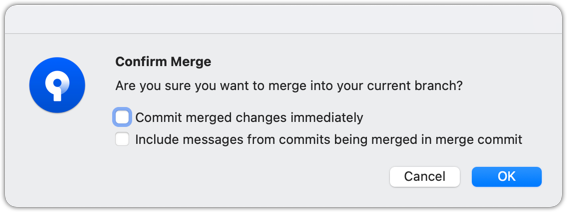
To merge the fetched changes, right-click on the latest commit on origin/remote branch and choose Merge.
In the next dialog, choose as follows:
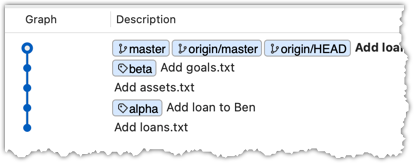
The final result should be something like the below (same as the repo state before we started this hands-on practical):
Note that merging the fetched changes can get complicated if there are multiple branches or the commits in the local repo conflict with commits in the remote repo. We will address them when we learn more about Git branches, in a later lesson.
done!
Pull is a shortcut that combines fetch and merge — it fetches the latest changes from the remote and immediately merges them into your current branch. In practice, Git users typically use the pull instead of the fetch-then-merge.
pull = fetch + merge
Scenario Same as previous hands-on practical.
Target Same as the previous, but this time we intend to fetch and merge in one step.
Preparation Same as previous, but use a different folder.
1 Pull the newer commits from the remote, instead of a fetch-then-merge.
Use the git pull <remote> <branch> command to pull changes.
git pull origin master
The following works too. If the <remote> and <branch> are not specified, Git will pull to the current branch from the remote branch it is tracking.
git pull
Click on the Pull button on the top menu:

2 Verify the outcome is same as the fetch + merge steps you did in the previous hands-on practical.
done!
You can pull from any number of remote repos, provided the repos involved have a shared history. This can be useful when the upstream repo you forked from has some new commits that you wish to bring over to your copies of the repo (i.e., your fork and your local repo).
Scenario You have forked and cloned a remote repo. Since then, new commits have been added to the original remote repo.
gitGraph BT:
    %%{init: { 'theme': 'default', 'gitGraph': {'mainBranchName': 'master'}} }%%
    commit id: "add loans.txt"
    commit id: "add loan to Ben"
    commit id: "add assets.txt"
    commit id: "add goals.txt"
    commit id: "[head → master] add loan to Chang"
gitGraph BT:
    %%{init: { 'theme': 'default', 'gitGraph': {'mainBranchName': 'master'}} }%%
    commit id: "add loans.txt"
    commit id: "add loan to Ben"
    commit id: "[head → master] add assets.txt"
2 commits behind the remote]
gitGraph BT:
    %%{init: { 'theme': 'default', 'gitGraph': {'mainBranchName': 'master'}} }%%
    commit id: "add loans.txt"
    commit id: "add loan to Ben"
    commit id: "[head → master][origin/master] add assets.txt"
2 commits behind]
Target Now, you wish to bring over new commits to your clone, and also update your fork with those commits.
Preparation You can use the following steps to create the initial state of the three repos mentioned above:
- Fork the repo git-mastery/samplerepo-finances to your account.
- Clone that fork to your computer.
1 Add the upstream repo git-mastery/samplerepo-finances-2 as remote named upstream in your local repo.
Adding remotes was covered in Lesson T2L4. Linking a Local Repo With a Remote Repo
2 Pull from the upstream repo. If there are new commits, those will come over to your local repo. For example:
git pull upstream master
3 Push to your fork. Any new commits you pulled from the upstream repo will now appear in your fork as well. For example:
git push origin master
The method given above is the more 'standard' method of synchronising a fork with the upstream repo. In addition, platforms such as GitHub can provide other ways (example: GitHub's Sync fork feature).
done!
At this point: Now you can create your own remote and local copies of any repo on GitHub, and update your copy when there are new changes in the upstream repo.
What's next: Tour 4: Using the Revision History of a Repo
Target Usage: To make use of the revision history stored by Git.
Motivation: Having put in effort to record the revision history of the working folder, it only makes sense that we use the revision history to our benefit. For example, to be able to answer questions such as "What did I change in this file since last Monday?"
Lesson plan:
T4L1. Examining a Commit covers that part.
T4L2. Tagging Commits covers that part.
T4L3. Comparing Points of History covers that part.
T4L4. Traversing to a Specific Commit covers that part.
T4L5. Rewriting History to Start Over covers that part.
T4L6. Reverting a Specific Commit covers that part.
It is useful to be able to see what changes were included in a specific commit.
When you examine a commit, normally what you see is the 'changes made since the previous commit'. This does not mean that a Git commit contains only the changes made since the previous commit. As you recall, a Git commit contains a full snapshot of the working directory. However, tools used to examine commits typically show only the changes, as that is the more informative part.
Git shows changes included in a commit by dynamically calculating the difference between the snapshots stored in the target commit and the parent commit. This is because Git commits store snapshots of the working directory, not changes themselves.
Although each commit represents a copy of the entire working directory, Git uses space efficiently in two main ways:
- Reuse of unchanged data: If a file hasn’t changed since a previous commit, the commit simply points to the already stored version of that file instead of making another copy. This means only new or changed files take up extra space, while unchanged files are reused.
- Compression: Git also compresses all the files and data it stores using an algorithm (zlib). So, even the objects that are stored (whether reused or new) take up less disk space because they are saved in a compressed format.
To address a specific commit, you can use its SHA (e.g., e60deaeb2964bf2ebc907b7416efc890c9d4914b). In fact, just the first few characters of the SHA is enough to uniquely address a commit (e.g., e60deae), provided the partial SHA is long enough to uniquely identify the commit (i.e., only one commit has that partial SHA).
Naturally, a commit can be addressed using any ref pointing to it too (e.g., HEAD, master).
Another related technique is to use the <ref>~<n> notation (e.g., HEAD~1) to address the commit that is n commits prior to the commit pointed by <ref> i.e., "start with the commit pointed by <ref> and go back n commits".
A related alternative notation is HEAD~, HEAD~~, HEAD~~~, ... to mean HEAD~1, HEAD~2, HEAD~3 etc.
HEAD or masterHEAD~1 or master~1 or HEAD~ or master~HEAD~2 or master~2Git uses the diff format to show file changes in a commit. The diff format was originally developed for Unix. It was later extended with headers and metadata to show changes between file versions and commits. Here is an example diff showing the changes to a file.
diff --git a/fruits.txt b/fruits.txt
index 7d0a594..f84d1c9 100644
--- a/fruits.txt
+++ b/fruits.txt
@@ -1,6 +1,6 @@
-apples
+apples, apricots
bananas
cherries
dragon fruits
-elderberries
figs
@@ -20,2 +20,3 @@
oranges
+pears
raisins
diff --git a/colours.txt b/colours.txt
new file mode 100644
index 0000000..55c8449
--- /dev/null
+++ b/colours.txt
@@ -0,0 +1 @@
+a file for colours
A Git diff can consist of multiple file diffs, one for each changed file. Each file diff can contain one or more hunk i.e., a localised group of changes within the file — including lines added, removed, or left unchanged (included for context).
Given below is how the above diff is divided into its components:
File diff for fruits.txt:
diff --git a/fruits.txt b/fruits.txt
index 7d0a594..f84d1c9 100644
--- a/fruits.txt
+++ b/fruits.txt
Hunk 1:
@@ -1,6 +1,6 @@
-apples
+apples, apricots
bananas
cherries
dragon fruits
-elderberries
figs
Hunk 2:
@@ -20,2 +20,3 @@
oranges
+pears
raisins
File diff for colours.txt:
diff --git a/colours.txt b/colours.txt
new file mode 100644
index 0000000..55c8449
--- /dev/null
+++ b/colours.txt
Hunk 1:
@@ -0,0 +1 @@
+a file for colours
Here is an explanation of the diff:
| Part of Diff | Explanation |
|---|---|
diff --git a/fruits.txt b/fruits.txt | The diff header, indicating that it is comparing the file fruits.txt between two versions: the old (a/) and new (b/). |
index 7d0a594..f84d1c9 100644 | Shows the before and after the change, and the file mode (100 means a regular file, 644 are file permission indicators). |
--- a/fruits.txt+++ b/fruits.txt | Marks the old version of the file (a/fruits.txt) and the new version of the file (b/fruits.txt). |
| This hunk header shows that lines 1-6 (i.e., starting at line 1, showing 6 lines) in the old file were compared with lines 1–6 in the new file. |
-apples+apples, apricots | Removed line apples and added line apples, apricots. |
bananascherriesdragon fruits | Unchanged lines, shown for context. |
-elderberries | Removed line: elderberries. |
figs | Unchanged line, shown for context. |
| Hunk header showing that lines 20-21 in the old file were compared with lines 20–22 in the new file. |
oranges+pearsraisins | Unchanged line. Added line: pears.Unchanged line. |
diff --git a/colours.txt b/colours.txt | The usual diff header, indicates that Git is comparing two versions of the file colours.txt: one before and one after the change. |
new file mode 100644 | This is a new file being added. 100644 means it’s a normal, non-executable file with standard read/write permissions. |
index 0000000..55c8449 | The usual SHA hashes for the two versions of the file. 0000000 indicates the file did not exist before. |
--- /dev/null+++ b/colours.txt | Refers to the "old" version of the file (/dev/null means it didn’t exist before), and the new version. |
@@ -0,0 +1 @@ | Hunk header, saying: “0 lines in the old file were replaced with 1 line in the new file, starting at line 1.” |
+a file for colours | Added line |
Points to note:
+indicates a line being added.
-indicates a line being deleted.- Editing a line is seen as deleting the original line and adding the new line.
Target View contents of specific commits in a repo.
Preparation You can use any repo that has commits e.g., the things repo.
1 Locate the commits to view, using the revision graph.
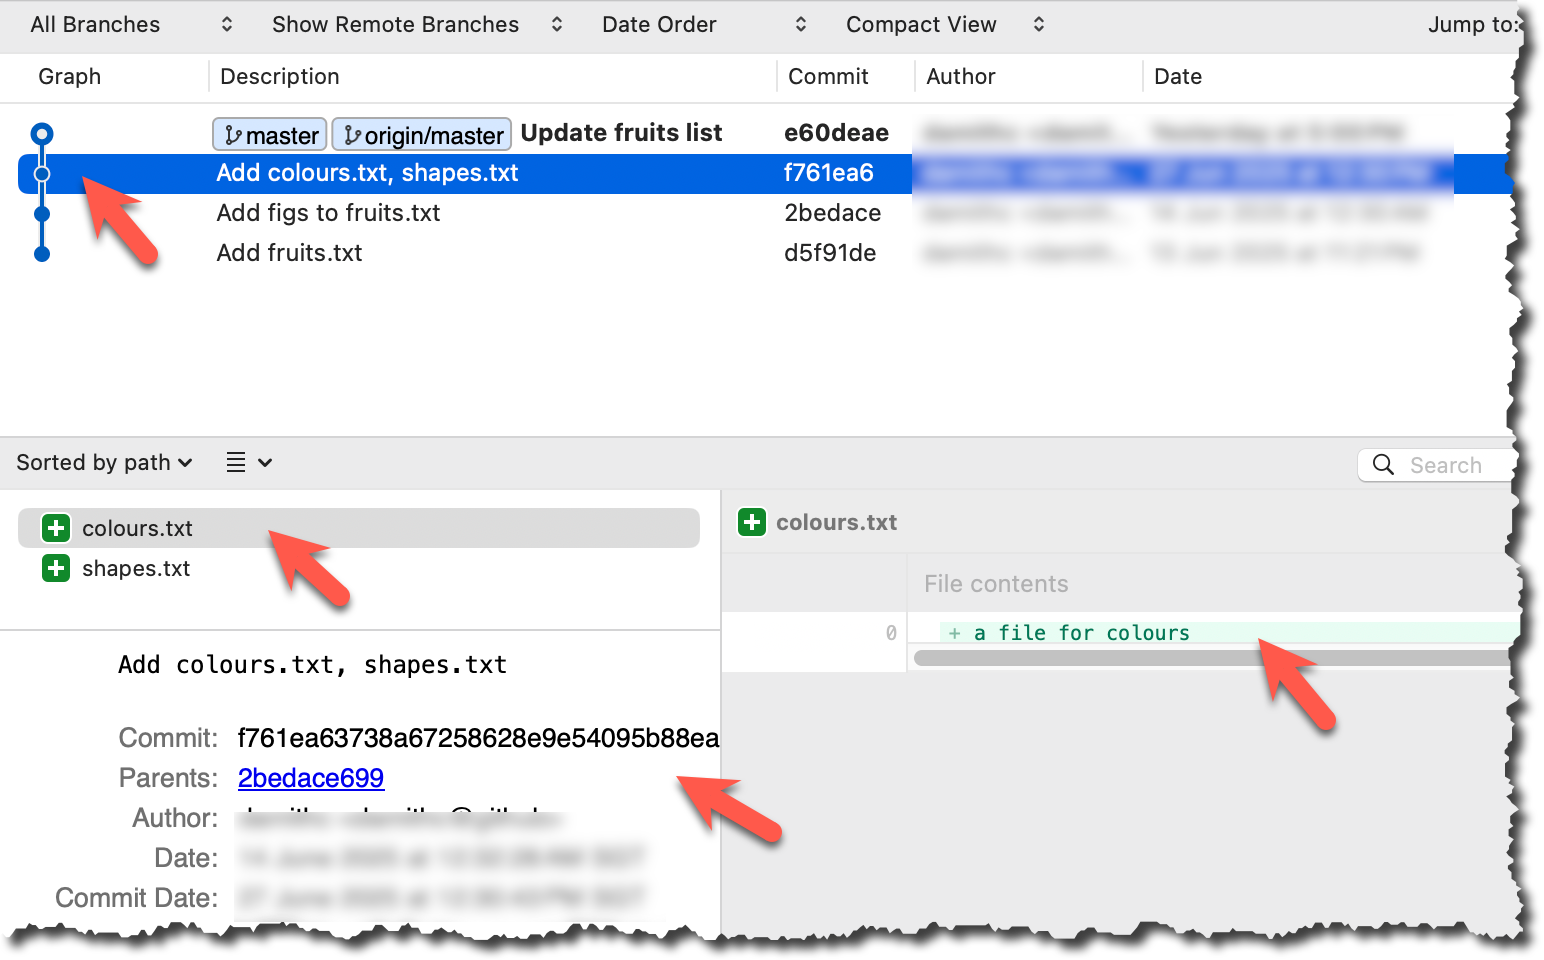
git log --oneline --decorate
e60deae (HEAD -> master, origin/master) Update fruits list
f761ea6 Add colours.txt, shapes.txt
2bedace Add figs to fruits.txt
d5f91de Add fruits.txt
2 Use the git show command to view specific commits.
git show # shows the latest commit
commit e60deaeb2964bf2ebc907b7416efc890c9d4914b (HEAD -> master, origin/master)
Author: damithc <...@...>
Date: Sat Jun ...
Update fruits list
diff --git a/fruits.txt b/fruits.txt
index 7d0a594..6d502c3 100644
--- a/fruits.txt
+++ b/fruits.txt
@@ -1,6 +1,6 @@
-apples
+apples, apricots
bananas
+blueberries
cherries
dragon fruits
-elderberries
figs
To view the parent commit of the latest commit, you can use any of these commands:
git show HEAD~1
git show master~1
git show e60deae # first few characters of the SHA
git show e60deae..... # run git log to find the full SHA and specify the full SHA
To view the commit that is two commits before the latest commit, you can use git show HEAD~2 etc.
Click on the commit. The remaining panels (indicated in the image below) will be populated with the details of the commit.
done!
PRO-TIP: Use Git Aliases to Work Faster
The Git alias feature allows you to create custom shortcuts for frequently used Git commands. This saves time and reduces typing, especially for long or complex commands. Once an alias is defined, you can use the alias just like any other Git command e.g., use git lodg as an alias for git log --oneline --decorate --graph.
To define a global git alias, you can use the git config --global alias.<alias> "<command>" command. e.g.,
git config --global alias.lodg "log --oneline --graph --decorate"
You can also create shell-level aliases using your shell configuration (e.g., .bashrc, .zshrc) to make even shorter aliases. This lets you create shortcuts for any command, including Git commands, and even combine them with other tools. e.g., instead of the Git alias git lodg, you can define a shorter shell-level alias glodg.
1. Locate your .bash_profile file (likely to be in : C:\Users\<YourName>\.bash_profile -- if it doesn’t exist, create it.)
1. Locate your shell's config file e.g., .bashrc or .zshrc (likely to be in your ~ folder)
1. Locate your shell's config file e.g., .bashrc or .zshrc (likely to be in your ~ folder)
Oh-My-Zsh for Zsh terminal supports a Git plugin that adds a wide array of Git command aliases to your terminal.
2. Add aliases to that file:
alias gs='git status'
alias glod='git log --oneline --graph --decorate'
3. Apply changes by running the command source ~/.zshrc or source ~/.bash_profile or source ~/.bashrc, depending on which file you put the aliases in.
When working with many commits, it helps to tag specific commits with custom names so they’re easier to refer to later.
Git lets you tag commits with names, making them easy to reference later. This is useful when you want to mark specific commits -- such as releases or key milestones (e.g., v1.0 or v2.1). Using tags to refer to commits is much more convenient than using SHA hashes. In the diagram below, v1.0 and interim are tags.
A tag stays fixed to the commit. Unlike branch refs or HEAD, tags do not move automatically as new commits are made. As you see below, after adding a new commit, tags stay in the previous commits while master←HEAD has moved to the new commit.
Git supports two kinds of tags:
- A lightweight tag is just a ref that points directly to a commit, like a branch that doesn’t move.
- An annotated tag is a full Git object that stores a reference to a commit along with metadata such as the tagger’s name, date, and a message.
Annotated tags are generally preferred for versioning and public releases, while lightweight tags are often used for less formal purposes, such as marking a commit for your own reference.
Target Add a few tags to a repository.
Preparation Fork and clone the samplerepo-preferences. Use the cloned repo on your computer for the following steps.
1 Add a lightweight tag to the current commit as v1.0:
git tag v1.0
2 Verify the tag was added. To view tags:
git tag
v1.0
To view tags in the context of the revision graph:
git log --oneline --decorate
507bb74 (HEAD -> master, tag: v1.0, origin/master, origin/HEAD) Add donuts
de97f08 Add cake
5e6733a Add bananas
3398df7 Add food.txt
3 Use the tag to refer to the commit e.g., git show v1.0 should show the changes in the tagged commit.
4 Add an annotated tag to an earlier commit. The example below adds a tag v0.9 to the commit HEAD~2 with the message First beta release. The -a switch tells Git this is an annotated tag.
git tag -a v0.9 HEAD~2 -m "First beta release"
5 Check the new annotated tag. While both types of tags appear similarly in the revision graph, the show command on an annotated tag will show the details of the tag and the details of the commit it points to.
git show v0.9
tag v0.9
Tagger: ... <...@...>
Date: Sun Jun ...
First beta release
commit ....999087124af... (tag: v0.9)
Author: ... <...@...>
Date: Sat Jun ...
Add figs to fruits.txt
diff --git a/fruits.txt b/fruits.txt
index a8a0a01..7d0a594 100644
# rest of the diff goes here
Right-click on the commit (in the graphical revision graph) you want to tag and choose Tag….
Specify the tag name e.g., v1.0 and click Add Tag.
Configure tag properties in the next dialog and press Add. For example, you can choose whether to make it a lightweight tag or an annotated tag (default).
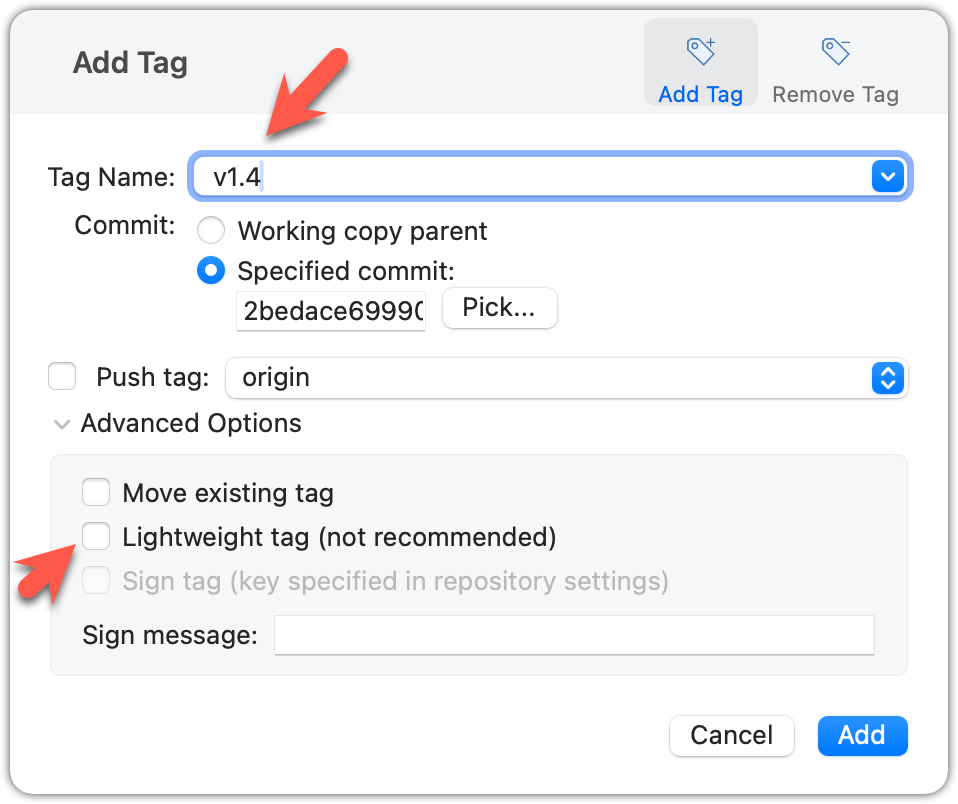
Tags will appear as labels in the revision graph, as seen below. To see the details of an annotated tag, you need to use the menu indicated in the screenshot.
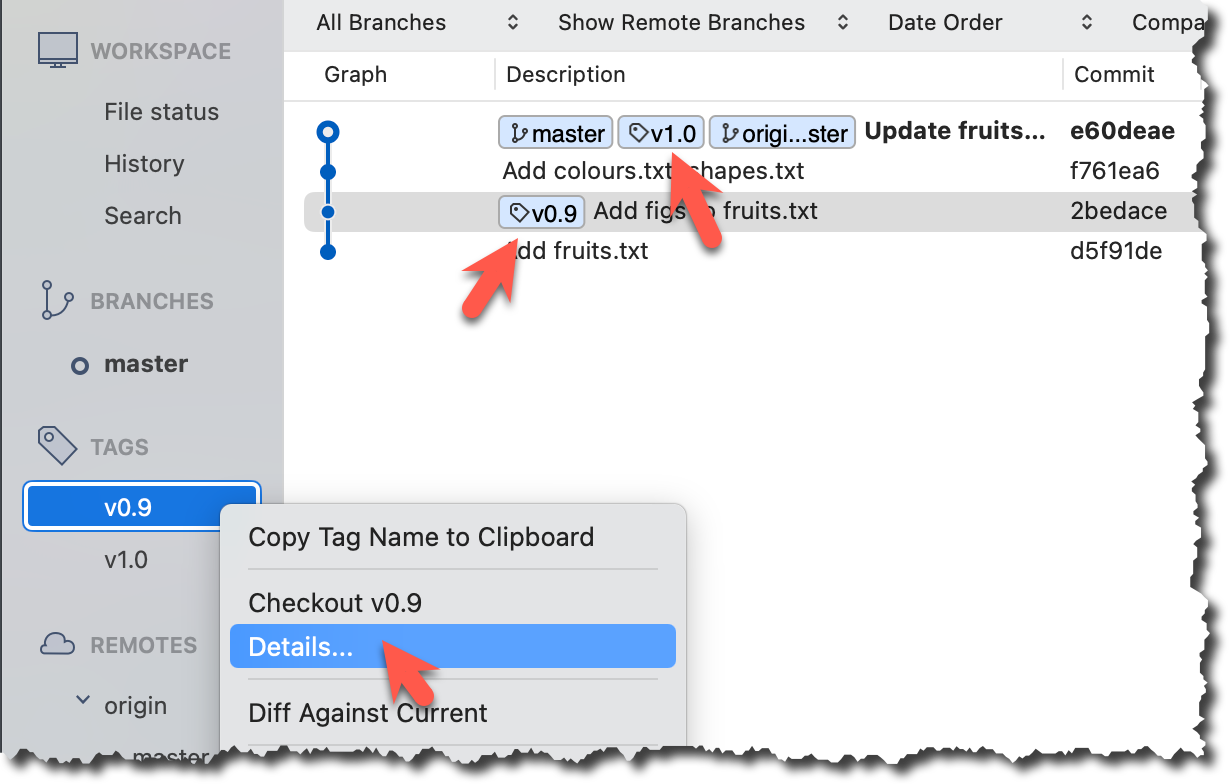
done!
If you need to change what a tag points to, you must delete the old one and create a new tag with the same name. This is because tags are designed to be fixed references to a specific commit, and there is no built-in mechanism to 'move' a tag.
Preparation Continue with the same repo you used for the previous hands-on practical.
Move the v1.0 tag to the commit HEAD~1, by deleting it first and creating it again at the destination commit.
Delete the previous v1.0 tag by using the -d . Add it again to the other commit, as before.
git tag -d v1.0
git tag v1.0 HEAD~1
The same dialog used to add a tag can be used to delete and even move a tag. Note that the 'moving' here translates to deleting and re-adding behind the scene.
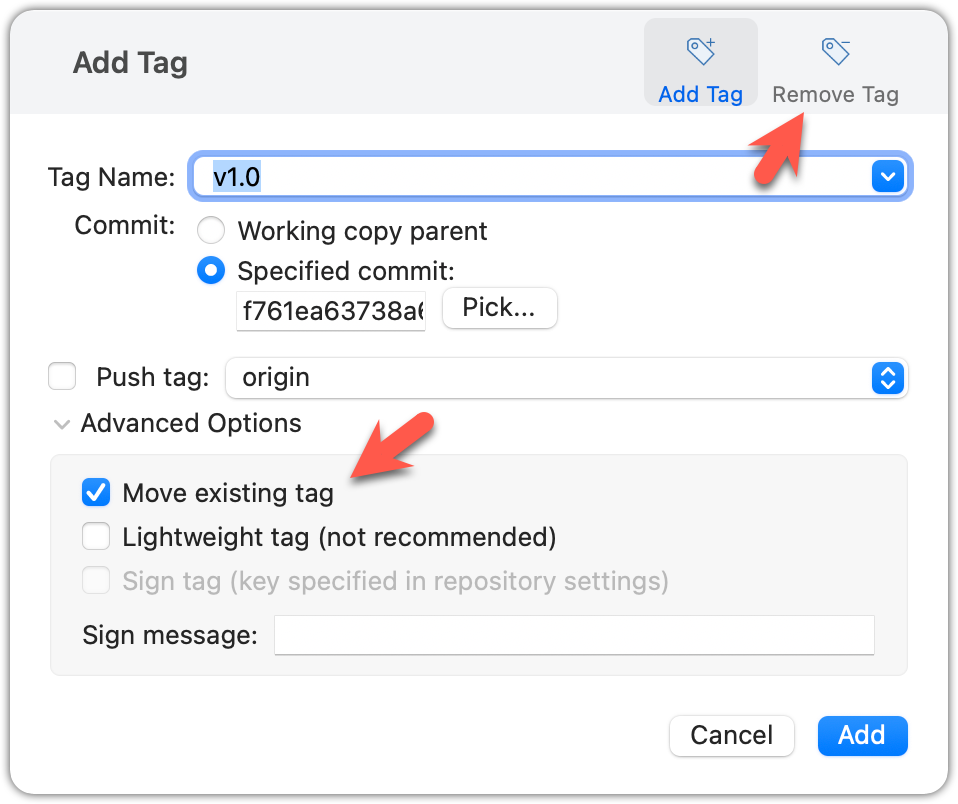
done!
Tags are different from commit messages, in purpose and in form. A commit message is a description of the commit that is part of the commit itself. A tag is a short name for a commit, which you can use to address a commit.
Pushing commits to a remote does not push tags automatically. You need to push tags specifically.
Target Push tags you created earlier to the remote.
Preparation Continue with the same repo you used for the previous hands-on practical.
You can go to your remote on GitHub link https://github.com/{USER}/{REPO}/tags (e.g., https://github.com/johndoe/samplerepo-preferences/tags) to verify the tag is present there.
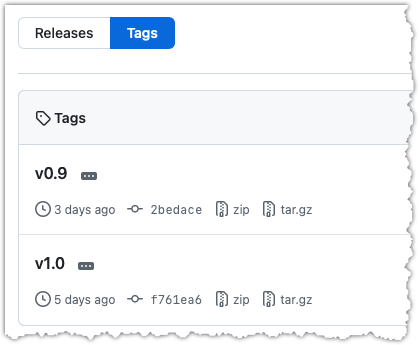
Note how GitHub assumes these tags are meant as releases, and automatically provides zip and tar.gz archives of the repo (as at that tag).
1 Push a specific tag in the local repo to the remote (e.g., v1.0) using the git push <remote> <tag-name> command.
git push origin v1.0
In addition to verifying the tag's presence via GitHub, you can also use the following command to list the tags presently in the remote.
git ls-remote --tags origin
2 Delete a tag in the remote, using the git push --delete <remote> <tag-name> command.
git push --delete origin v1.0
3 Push all tags to the remote repo, using the git push <remote> --tags command.
git push origin --tags
To push a specific tag, use the following menu:
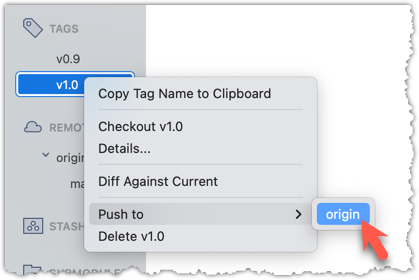
To push all tags, you can tick the Push all tags option when pushing commits:
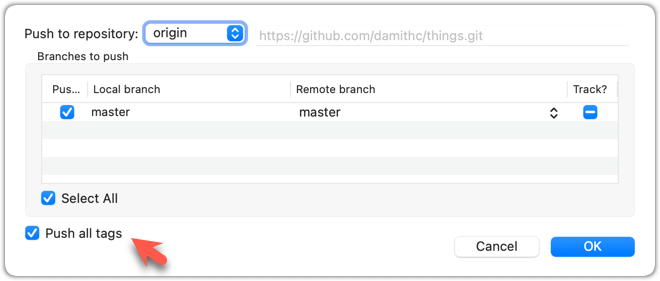
done!
Git can tell you the net effect of changes between two points of history.
Git's diff feature can show you what changed between two points in the revision history. Given below are some use cases.
Usage 1: Examining changes in the working directory
Example use case: To verify the next commit will include exactly what you intend it to include.
Preparation For this, you can use the things repo you created earlier. If you don't have it, you can clone a copy of a similar repo given here.
1 Do some changes to the working directory. Stage some (but not all) changes. For example, you can run the following commands.
echo -e "blue\nred\ngreen" >> colours.txt
git add . # a shortcut to stage all changes
echo "no shapes added yet" >> shapes.txt
2 Examine the staged and unstaged changes.
The git diff command shows unstaged changes in the working directory (tracked files only). The output of the diff command, is a diff view (introduced in this lesson).
git diff
diff --git a/shapes.txt b/shapes.txt
index 5c2644b..949c676 100644
--- a/shapes.txt
+++ b/shapes.txt
@@ -1 +1,2 @@
a file for shapes
+no shapes added yet!
The git diff --staged command shows the staged changes (same as git diff --cached).
git diff --staged
Select the two commits: Click on one commit, and Ctrl-Click (or Cmd-Click) on the second commit. The changes between the two selected commits will appear in the other panels, as shown below:
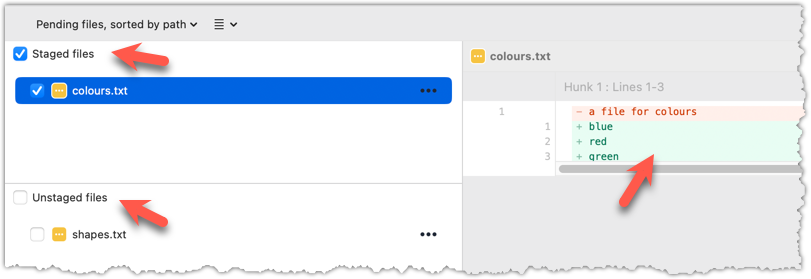
done!
Usage 2: Comparing two commits at different points of the revision graph
Example use case: Suppose you’re trying to improve the performance of a piece of software by experimenting with different code tweaks. You commit after each change (as you should). After several commits, you now want to review the overall effect of all those changes on the code.
Target Compare two commits in a repo.
Preparation You can use any repo with multiple commits e.g., the things repo.
You can use the git diff <commit1> <commit2> command for this.
- You may use any valid way to refer to commits (e.g., SHA, tag, HEAD~n etc.).
- You may also use the
..notation to specify the commit range too e.g.,0023cdd..fcd6199,HEAD~2..HEAD
git diff v0.9 HEAD
diff --git a/colours.txt b/colours.txt
new file mode 100644
index 0000000..55c8449
--- /dev/null
+++ b/colours.txt
@@ -0,0 +1 @@
+a file for colours
# rest of the diff ...
Swap the commit order in the command and see what happens.
git diff HEAD v0.9
diff --git a/colours.txt b/colours.txt
deleted file mode 100644
index 55c8449..0000000
--- a/colours.txt
+++ /dev/null
@@ -1 +0,0 @@
-a file for colours
# rest of the diff ...
As you can see, the diff is directional i.e., diff <commit1> <commit2> shows what changes you need to do to go from the <commit1> to <commit2>. If you swap <commit1> and <commit2>, the output will change accordingly e.g., lines previously shown as 'added' will now be shown as 'deleted'.
Select the two commits: Click on one commit, and Ctrl-Click (or Cmd-Click) on the second commit. The changes between the two selected commits will appear in the other panels, as shown below:
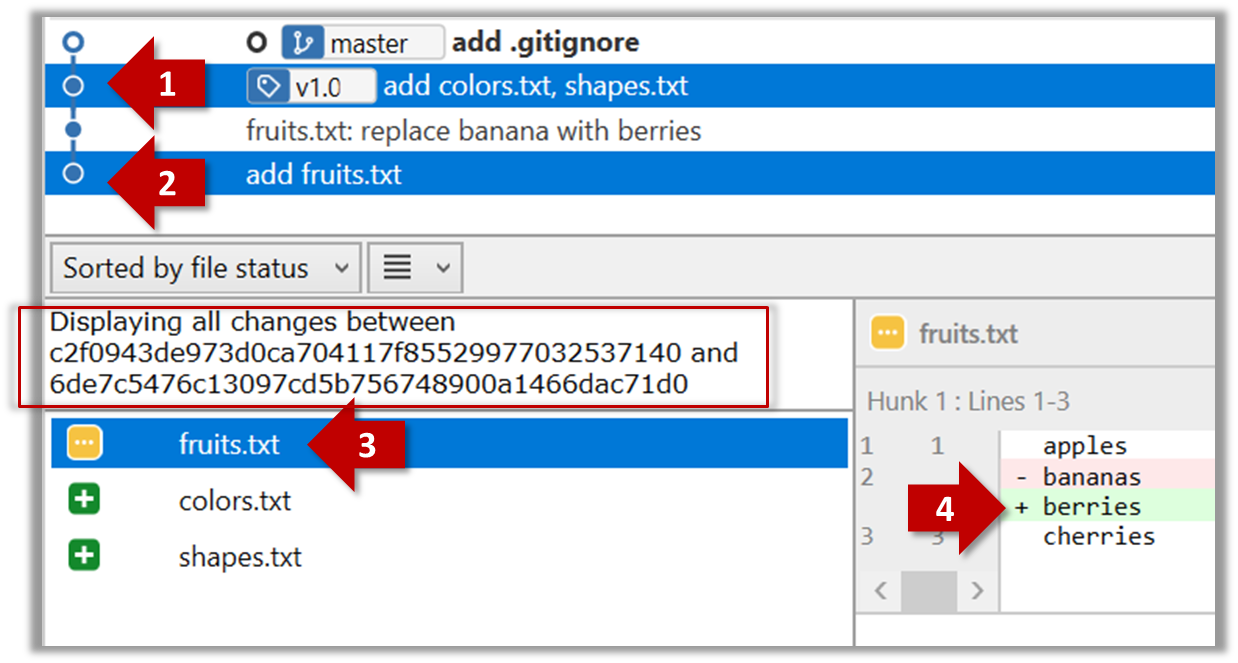
The same method can be used to compare the current state of the working directory (which might have uncommitted changes) to a point in the history.
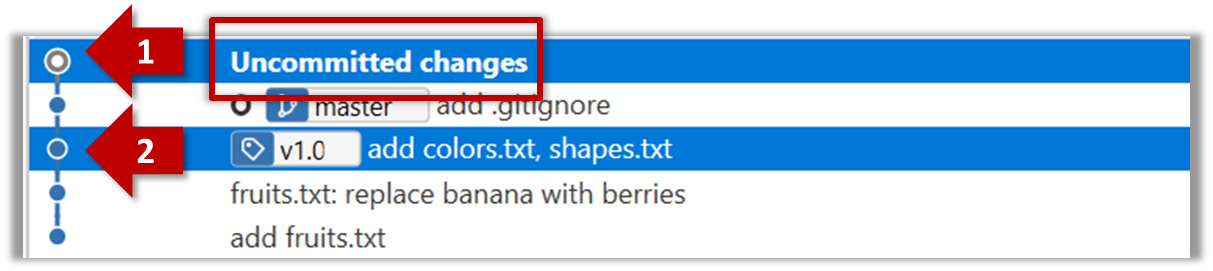
done!
Usage 3: Examining changes to a specific file
Example use case: Similar to other use cases but when you are interested in a specific file only.
Target Examine the changes done to a file between two different points in the version history (including the working directory).
Preparation Use any repo with multiple commits e.g. the things repo.
Add the -- path/to/file to a previous diff command to narrow the output to a specific file. Some examples:
git diff -- fruits.txt # unstaged changes to fruits.txt
git diff --staged -- src/main.java # staged changes to src/main.java
git diff HEAD~2..HEAD -- fruits.txt # changes to fruits.txt between commits
Sourcetree UI shows changes to one file at a time by default; just click on the file to view changes to that file. To view changes to multiple files, Ctrl-Click (or Cmd-Click) on multiple files to select them.
done!
Another useful feature of revision control is to be able to view the working directory as it was at a specific point in history, by checking out a commit created at that point.
Suppose you added a new feature to a software product, and while testing it, you noticed that another feature added two commits ago doesn’t handle a certain edge case correctly. Now you’re wondering: did the new feature break the old one, or was it already broken? Can you go back to the moment you committed the old feature and test it in isolation, and come back to the present after you found the answer? With Git, you can.
To view the working directory at a specific point in history, you can check out a commit created at that point.
When you check out a commit, Git:
- Updates your working directory to match the snapshot in that commit, overwriting current files as needed.
- Moves the
HEADref to that commit, marking it as the current state you’re viewing.
→
[check out commit C2...]
Checking out a specific commit puts you in a "detached HEAD" state: i.e., the HEAD no longer points to a branch, but directly to a commit (see the above diagram for an example). This isn't a problem by itself, but any commits you make in this state can be lost, unless certain follow-up actions are taken. It is perfectly fine to be in a detached state if you are only examining the state of the working directory at that commit.
To get out of a "detached HEAD" state, you can simply check out a branch, which "re-attaches" HEAD to the branch you checked out.
→
[check out master...]
Target Checkout a few commits in a local repo, while examining the working directory to verify that it matches the state when you created the corresponding commit
Preparation Use any repo with commits e.g., the things repo
1 Examine the revision tree, to get your bearing first.
git log --oneline --decorate
Reminder: You can use aliases to reduce typing Git commands.
e60deae (HEAD -> master, origin/master) Update fruits list
f761ea6 (tag: v1.0) Add colours.txt, shapes.txt
2bedace (tag: v0.9) Add figs to fruits.txt
d5f91de Add fruits.txt
2 Use the checkout <commit-identifier> command to check out a commit other than the one currently pointed by HEAD. You can use any of the following methods:
git checkout v1.0: checks out the commit taggedv1.0git checkout 0023cdd: checks out the commit with the hash0023cddgit checkout HEAD~2: checks out the commit 2 commits behind the most recent commit.
git checkout HEAD~2
Note: switching to 'HEAD~2'.
You are in 'detached HEAD' state.
# rest of the warning about the detached head ...
HEAD is now at 2bedace Add figs to fruits.txt
3 Verify HEAD and the working directory have updated as expected.
HEADshould now be pointing at the target commit- The working directory should match the state it was in at that commit (e.g., files added after that commit -- such as
shapes.txtshould not be in the folder).
git log --oneline --decorate
2bedace (HEAD, tag: v0.9) Add figs to fruits.txt
d5f91de Add fruits.txt
HEAD is indeed pointing at the target commit.
But note how the output does not show commits you added after the checked-out commit.
The --all switch tells git log to show commits from all refs, not just those reachable from the current HEAD. This includes commits from other branches, tags, and remotes.
git log --oneline --decorate --all
e60deae (origin/master, master) Update fruits list
f761ea6 (tag: v1.0) Add colours.txt, shapes.txt
2bedace (HEAD, tag: v0.9) Add figs to fruits.txt
d5f91de Add fruits.txt
4 Go back to the latest commit by checking out the master branch again.
git checkout master
In the revision graph, double-click the commit you want to check out, or right-click on that commit and choose Checkout....
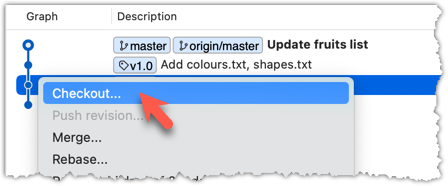
Click OK to the warning about ‘detached HEAD’ (similar to below).
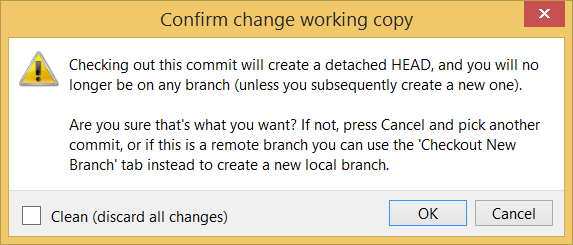
The specified commit is now loaded onto the working folder, as indicated by the HEAD label.
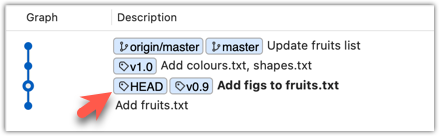
To go back to the latest commit on the master branch, double-click the master branch.
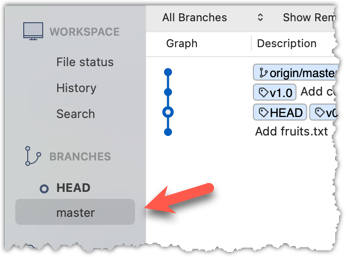
If you check out a commit that comes before the commit in which you added a certain file (e.g., temp.txt) to the .gitignore file, and if the .gitignore file is version controlled as well, Git will now show it under ‘unstaged modifications’ because at Git hasn’t been told to ignore that file yet.
done!
If there are uncommitted changes in the working directory, Git proceeds with a checkout only if it can preserve those changes.
- Example 1: There is a new file in the working directory that is not committed yet.
→ Git will proceed with the checkout and will keep the uncommitted file as well. - Example 2: There is an uncommitted change to a file that conflicts with the version of that file in the commit you wish to check out.
→ Git will abort the checkout, and the repo will remain in the current commit.
The Git stash feature temporarily sets aside uncommitted changes you’ve made (in your working directory and staging area), without committing them. This is useful when you’re in the middle of some work, but need to switch to another state (e.g., checkout a previous commit), and your current changes are not yet ready to be committed or discarded. You can later reapply the stashed changes when you’re ready to resume that work.
Git can also reset the revision history to a specific point so that you can start over from that point.
Suppose you realise your last few commits have gone in the wrong direction, and you want to go back to an earlier commit and continue from there — as if the “bad” commits never happened. Git’s reset feature can help you do that.
Git reset moves the tip of the current branch to a specific commit, optionally adjusting your staged and unstaged changes to match. This effectively rewrites the branch's history by discarding any commits that came after that point.
Resetting is different from the checkout feature:
- Reset: Lets you start over from a past state. It rewrites history by moving the branch ref to a new location.
- Checkout: Lets you explore a past state without rewriting history. It just moves the
HEADref.
→
[reset to C2...]
master branch!There are three types of resets: soft, mixed, hard. All three move the branch pointer to a new commit, but they vary based on what happens to the staging area and the working directory.
- soft reset: Moves the cumulative changes from the discarded commits into the staging area, waiting to be committed again. Any staged and unstaged changes that existed before the reset will remain untouched.
- mixed reset: Cumulative changes from the discarded commits, and any existing staged changes, are moved into the working directory.
- hard reset: All staged and unstaged changes are discarded. Both the working directory and the staging area are aligned with the target commit (as if no changes were done after that commit).
Preparation First, set the stage as follows (e.g., in the things repo):
i) Add four commits that are supposedly 'bad' commits.
ii) Do a 'bad' change to one file and stage it.
iii) Do a 'bad' change to another file, but don't stage it.
The following commands can be used to add commits B1-B4:
echo "bad colour" >> colours.txt
git add colours.txt
git commit -m "Incorrectly update colours.txt"
echo "bad shape" >> shapes.txt
git add shapes.txt
git commit -m "Incorrectly update shapes.txt"
echo "bad fruit" >> fruits.txt
git add fruits.txt
git commit -m "Incorrectly update fruits.txt"
echo "bad line" >> incorrect.txt
git add incorrect.txt
git commit -m "Add incorrect.txt"
echo "another bad colour" >> colours.txt
git add colours.txt
echo "another bad shape" >> shapes.txt
Now we have some 'bad' commits and some 'bad' changes in both the staging area and the working directory. Let's use the reset feature to get rid of all of them, but do it in three steps so that you can learn all three types of resets.
1 Do a soft reset to B2 (i.e., discard last two commits). Verify,
- the
masterbranch is now pointing atB2, and, - the changes that were in the discarded commits (i.e.,
B3andB4) are now in the staging area.
Use the git reset --soft <commit> command to do a soft reset.
git reset --soft HEAD~2
You can run the following commands to verify the current status of the repo is as expected.
git status # check overall status
git log --oneline --decorate # check the branch tip
git diff # check unstaged changes
git diff --staged # check staged changes
Right-click on the commit that you want to reset to, and choose Reset <branch-name> to this commit option.
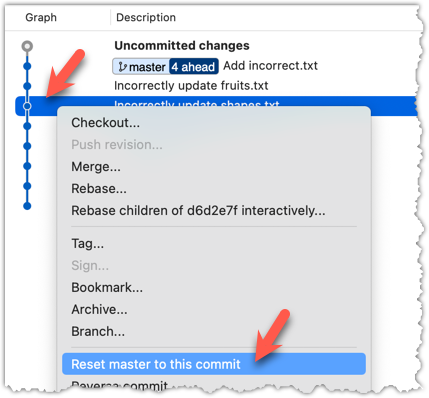
In the next dialog, choose Soft - keep all local changes.
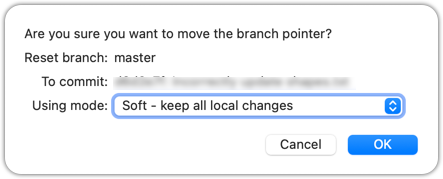
2 Do a mixed reset to commit B1. Verify,
- the
masterbranch is now pointing atB1. - the staging area is empty.
- the accumulated changes from all three discarded commits (including those from the previous soft reset) are now appearing as unstaged changes in the working directory.
Note howincorrect.txtappears as an 'untracked' file -- this is because unstaging a change of type 'add file' results in an untracked file.
Use the git reset --mixed <commit> command to do a mixed reset. The --mixed flag is the default, and can be omitted.
git reset HEAD~1
Verify the repo status, as before.
Similar to the previous reset, but choose the Mixed - keep working copy but reset index option in the reset dialog.
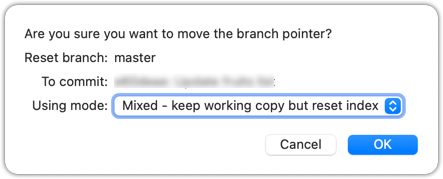
3 Do a hard reset to commit C4. Verify,
- the
masterbranch is now pointing atC4i.e., all 'bad' commits are gone. - the staging area is empty.
- there are no unstaged changes (except for the untracked files
incorrect.txt-- Git leaves untracked files alone, as untracked files are not meant to be under Git's control).
Use the git reset --hard <commit> command.
git reset --hard HEAD~1
Verify the repo status, as before.
Similar to the previous reset, but choose the Hard - discard all working copy changes option.
done!
Rewriting history can cause your local repo to diverge from its remote counterpart. For example, if you discard earlier commits and create new ones in their place, and you’ve already pushed the original commits to a remote repository, your local branch history will no longer match the corresponding remote branch. Git refers to this as a diverged history.
To protect the integrity of the remote, Git will reject attempts to push a diverged branch using a normal push. If you want to overwrite the remote history with your local version, you must perform a force push.
Preparation Choose a local-remote repo pair under your control e.g., the things repo from Tour 2: Backing up a Repo on the Cloud.
1 Rewrite the last commit: Reset the current branch back by one commit, and add a new commit.
For example, you can use the following commands.
git reset --hard HEAD~1
echo "water" >> drinks.txt
git add .
git commit -m "Add drinks.txt"
2 Observe how the local branch is diverged.
git log --oneline --graph --all
* fc1d04e (HEAD -> master) Add drinks.txt
| * e60deae (upstream/master, origin/master) Update fruits list
|/
* f761ea6 (tag: v1.0) Add colours.txt, shapes.txt
* 2bedace (tag: v0.9) Add figs to fruits.txt
* d5f91de Add fruits.txt
3 Attempt to push to the remote. Observe Git rejects the push.
git push origin master
To https://github.com/.../things.git
! [rejected] master -> master (non-fast-forward)
error: failed to push some refs to 'https://github.com/.../things.git'
hint: Updates were rejected because the tip of your current branch is behind
hint: its remote counterpart. If you want to integrate the remote changes,
hint: ...
4 Do a force-push.
You can use the --force (or -f) flag to force push.
git push -f origin master
A safer alternative to --force is --force-with-lease which overwrites the remote branch only if it hasn’t changed since you last fetched it (i.e., only if remote doesn't have recent changes that you are unaware of):
git push --force-with-lease origin master
done!
DETOUR: Resetting Uncommitted Changes
At times, you might need to get rid of uncommitted changes so that you have a fresh start to the next commit.
To get rid of uncommitted changes, you can reset the repo to the last commit (i.e., HEAD):
The command git reset (without specifying a commit) defaults to git reset HEAD.
git reset: moves any staged changes to working directory (i.e., unstage).git reset --hard: get rid of any staged and unstaged changes.
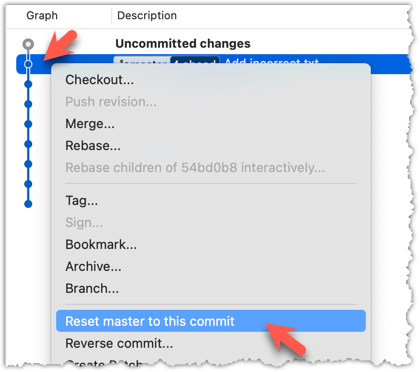
DETOUR: Undoing/Deleting Recent Commits
How do you undo or delete the last few commits if you realise they were incorrect, unnecessary, or done too soon?
Undoing or deleting recent n commits is easily accomplished with Git's reset feature.
- To delete recent
ncommits and discard the those changes entirely, do ahardreset the commitHEAD~ne.g.,git reset --hard HEAD~3 - To undo recent
ncommits, but keep changes staged, do asoftreset the commitHEAD~ne.g.,git reset --soft HEAD~3 - To undo recent
ncommits, and move changes to the working directory, do amixedreset the commitHEAD~ne.g.,git reset --mixed HEAD~3
To do the above for the most recent commit only, use HEAD~1 (or just HEAD~).
To undo the last commit, right-click on the commit just before it, and choose Reset current branch to this commit.
In the next dialog, choose the mode Mixed - keep working copy but reset index option. This will make the offending commit disappear but will keep the changes that you included in that commit intact.
If you use the Soft - ... mode instead, the last commit will be undone as before, but the changes included in that commit will stay in the staging area.
To delete the last commit entirely (i.e., undo the commit and also discard the changes included in that commit), do as above but choose the Hard - ... mode instead.
To undo/delete last n commits, right-click on the commit just before the last n commits, and do as above.
At this point: You should now be able to use a repository’s revision history to understand how the working directory evolved over time -- and use that insight to inform your work.
How useful this history is depends greatly on how well it was constructed -- for example, how frequently and meaningfully commits were made -- we’ll explore that in a later tour.
What's next: Tour 5: Fine-Tuning the Revision History
Target Usage: To maintain a clean and meaningful revision history.
Motivation: The usefulness of the revision history increases if it consists of well-crafted and well-documented commits.
Lesson plan:
T5L1. Controlling What Goes Into a Commit covers that part.
T5L2. Writing Good Commit Messages covers that part.
T5L3. Reorganising Commits covers that part.
To create well-crafted commits, you need to know how to control which precise changes go into a commit.
Crafting a commit involves two aspects:
- What changes to include in it: deciding what changes belong together in a single commit — this is about commit granularity, ensuring each commit represents a meaningful, self-contained change.
- How to include those changes: carefully staging just those changes — this is about using Git’s tools to precisely control what ends up in the commit.
SIDEBAR: Guidelines on what to include in a commit
A good commit represents a single, logical unit of change — something that can be described clearly in one sentence. For example, fixing a specific bug, adding a specific feature, or refactoring a specific function. If each commit tells a clear story about why the change was made and what it achieves, your repository history becomes a valuable narrative of the project’s development. Here are some (non-exhaustive) guidelines:
- No more than one change per commit: Avoid lumping unrelated changes into one commit, as this makes the history harder to understand, review, or revert (if each commit contains one standalone change, to reverse that change can be done by deleting or reverting that specific commit entirely, without affecting any other changes).
- Make the commit standalone: Don’t split a single logical change across multiple commits unnecessarily, as this can clutter the history and make it harder to follow the evolution of an idea or feature.
- Small enough to review easily, but large enough to stand on its own: For example, fixing the same typo in five files can be one commit — splitting it into five separate commits is excessive. Conversely, implementing a big feature may be too much for one commit — instead, break it down into a series of commits, each containing a meaningful yet standalone step towards the final goal.
Git can let you choose not just which files, but which specific changes within those files, to include in a commit. Most Git tools — including the command line and many GUIs — let you interactively select which "hunks" or even individual lines of a file to stage. This allows you to separate unrelated changes and avoid committing unnecessary edits. If you make multiple changes in the same file, you can selectively stage only the parts that belong to the current logical change.
This level of control is particularly useful when:
- You noticed and fixed a small, unrelated issue while working on something else.
- You experimented with multiple approaches in the same file and now want to commit only the final, clean solution.
- You want your commit history to clearly separate concerns, even when the edits touch the same files.
Preparation You can use any repo for this.
1 Do several changes to some tracked files. Change multiple files. Also change multiple locations in the same file.
2 Stage some changes in some files while keeping other changes in the same files unstaged.
As you know, you can use git add <filename> to stage changes to an entire file.
To select which hunks to stage, you can use the git add -p command instead (-p stands for 'by patch'):
git add -p
This command will take you to an interactive mode in which you can go through each hunk and decide if you want to stage it. The video below contains a demonstration of how this feature works:
To stage a hunk, you can click the Stage button above the hunk in question:
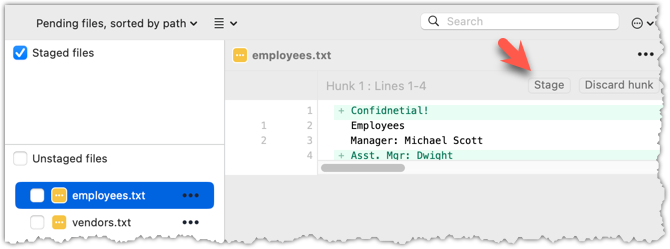
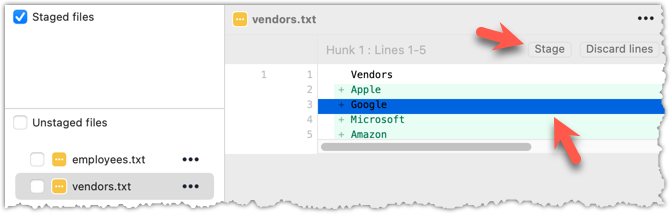 Unstaging can be done similarly:
Most git operations can be done faster through the CLI than equivalent Git GUI clients, once you are familiar enough with the CLI commands.
However, selective staging is one exception where a good GUI can do better than the CLI, if you need to do many fine-grained staging operations (e.g., frequently staging only parts of hunks).
done!
Detailed and well-written commit messages can increase the value of Git revision history.
Every commit you make in Git also includes a commit message that explains the change. While one-line messages are fine for small or obvious changes, as your revision history grows, good commit messages become an important source of information — for example, to understand the rationale behind a specific change made in the past.
A commit message is meant to explain the intent behind the changes, not just what was changed. The code (or diff) already shows what changed. Well-written commit messages make collaboration, code reviews, debugging, and future maintenance easier by helping you and others quickly understand the project’s history without digging into the code of every commit.
A complete commit message can include a short summary line (the subject) followed by a more detailed body if needed. The subject line should be a concise description of the change, while the body can elaborate on the context, rationale, side effects, or other details if the change is more complex.
A commit message has the following structure (note how the subject and the body are separated by a blank line):
Subject line
<blank line>
Body
# lines starting with '#' are ignored (they will not be included in the commit message)
Here is an example commit message:
Find command: make matching case-insensitive
Find command is case-sensitive.
A case-insensitive find is more user-friendly because users cannot be
expected to remember the exact case of the keywords.
Let's,
* update the search algorithm to use case-insensitive matching
* add a script to migrate stress tests to the new format
Do some changes to a repo you have.
Commit the changes while writing a full commit message (i.e., subject + body).
When you are ready to commit, use the git commit command (without specifying a commit message).
git commit
This will open your default text editor (like Vim, Nano, or VS Code). Write the commit message inside the editor.
Save and close the editor to create the commit.
You can write your full commit message in the textbox you have been using to write commit messages already.
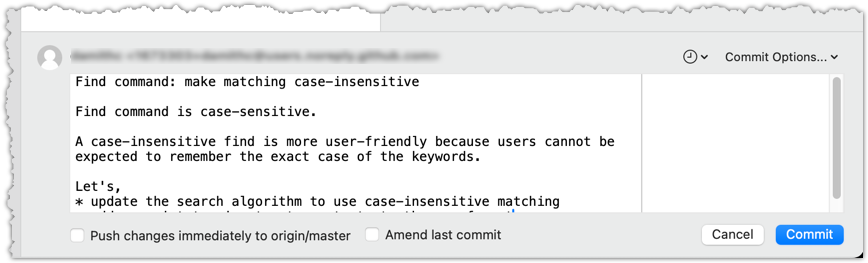
done!
Following a style guide makes your commit messages more consistent and fit-for-purpose. Many teams adopt established guidelines. These style guides typically contain common conventions that Git users follow when writing commit messages. For example:
- Keep the subject line (the first line) under 50–72 characters.
- Write the subject in the imperative mood (e.g.,
Fix typo in READMErather thanFixed typoorFixes typo). - Leave a blank line between the subject and the body, if you include a body.
- Wrap the body at around 72 characters per line for readability.
PRO-TIP: Configure Git to use your preferred text editor
Git will use the default text editor when it needs you to write a commit message. However, Git can be configured to use a different text editor of your choice.
You can use the following command to set the Git's default text editor:
git config --global core.editor "<editor command>"
Some examples for <editor command>
| Editor | Command to use |
|---|---|
| Vim (default) | vim |
| Nano | nano |
| VS Code | code --wait e.g., git config --global core.editor "code --wait"For this to work, your computer should already be configured to launch VS Code using the code command. See here to find how (refer the 'Launching from command line' section). |
| Sublime Text | subl -n -w |
| Atom | atom --wait |
| Notepad++ | notepad++.exe (Windows only) |
| Notepad | notepad (Windows built-in) |
Why use --wait or -w? Graphical editors (like VS Code or Sublime) start a separate process, which can take a few seconds. Without --wait, Git may think editing is done before you actually write the message. --wait makes Git pause until the editor window is closed.
When the revision history gets 'messy', Git has a way to 'tidy up' the recent commits.
Git has a powerful tool called interactive rebasing which lets you review and reorganise your recent commits. With it, you can reword commit messages, change their order, delete commits, combine several commits into one (squash), or split a commit into smaller pieces. This feature is useful for tidying up a commit history that has become messy — for example, when some commits are out of order, poorly described, or include changes that would be clearer if split up or combined.
Preparation Run the following commands to create a sample repo that we'll be using for this hands-on practical:
mkdir samplerepo-sitcom
cd samplerepo-sitcom
git init
echo "Aspiring actress" >> Penny.txt
git add .
git commit -m "C1: Add Penny.txt"
echo "Scientist" >> Sheldon.txt
git add .
git commit -m "C3: Add Sheldon.txt"
echo "Comic book store owner" >> Stuart.txt
git add .
git commit -m "C2: Add Stuart.txt"
echo "Engineer" >> Stuart.txt
git commit -am "X: Incorrectly update Stuart.txt"
echo "Engineer" >> Howard.txt
git add .
git commit -m "C4: Adddd Howard.txt"
Target Here are the commits that should be in the created repo, and how each commit needs to be 'tidied up'.
C4: Adddd Howard.txt-- Fix typo in the commit messageAdddd→Add.X: Incorrectly update Stuart.txt-- Drop this commit.C2: Add Stuart.txt-- Swap this commit with the one below.C3: Add Sheldon.txt-- Swap this commit with the one above.C1: Add Penny.txt-- No change required.
1 Start the interactive rebasing.
To start the interactive rebase, use the git rebase -i <start-commit> command. -i stands for 'interactive'. In this case, we want to modify the last four commits (hence, HEAD~4).
git rebase -i HEAD~4
pick 97a8c4a C3: Add Sheldon.txt
pick 60bd28d C2: Add Stuart.txt
pick 8b9a36f X: Incorrectly update Stuart.txt
pick 8ab6941 C4: Adddd Howard.txt
# Rebase ee04afe..8ab6941 onto ee04afe (4 commands)
#
# Commands:
# p, pick <commit> = use commit
# r, reword <commit> = use commit, but edit the commit message
# e, edit <commit> = use commit, but stop for amending
# s, squash <commit> = use commit, but meld into previous commit
# f, fixup [-C | -c] <commit> = like "squash" but keep only the previous
# commit's log message, unless -C is used, in which case
# keep only this commit's message; -c is same as -C but
# opens the editor
# x, exec <command> = run command (the rest of the line) using shell
# b, break = stop here (continue rebase later with 'git rebase --continue')
# d, drop <commit> = remove commit
# l, label <label> = label current HEAD with a name
# t, reset <label> = reset HEAD to a label
# m, merge [-C <commit> | -c <commit>] <label> [# <oneline>]
# create a merge commit using the original merge commit's
# message (or the oneline, if no original merge commit was
# specified); use -c <commit> to reword the commit message
# u, update-ref <ref> = track a placeholder for the <ref> to be updated
# to this position in the new commits. The <ref> is
# updated at the end of the rebase
#
# These lines can be re-ordered; they are executed from top to bottom.
#
# If you remove a line here THAT COMMIT WILL BE LOST.
#
# However, if you remove everything, the rebase will be aborted.
#
The command will take you to the text editor, which will present you with a wall of text similar to the above. It has two parts:
- At the top, the list of commits and the action to take on each, oldest commit first, with the action
pickindicated by default (pickmeans 'use this commit in the result') for each. - At the bottom, instructions on how to edit those lines.
2 Edit the commit list to specify the rebase actions, as follows:
pick 60bd28d C2: Add Stuart.txt
pick 97a8c4a C3: Add Sheldon.txt
drop 8b9a36f X: Incorrectly update Stuart.txt
reword 8ab6941 C4: Addddd Howard.txt
4 Once you save edits and exit the text editor, Git will perform the rebase based on the actions you specified, from top to bottom.
At some steps, Git will pause the rebase and ask for your inputs. In this case, it will ask you to specify the new commit message when it is processing the following line.
reword 8ab6941 C4: Addddd Howard.txt
To go to the interactive rebase mode, right-click the parent commit of the earliest commit you want to reorganise (in this case, it is C1: Add Penny.txt) and choose Rebase children of <SHA> interactively...

2 To indicate what action you want to perform on each commit, select the commit in the list and click on the button for the action you want to do on it:
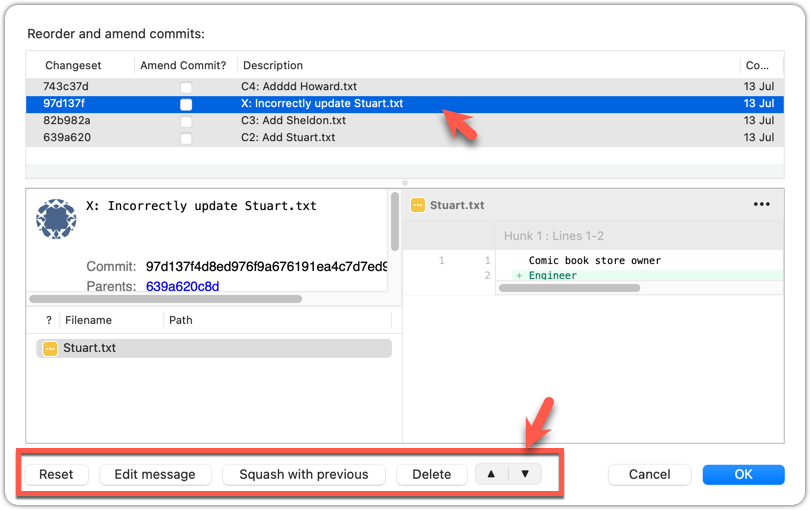
3 To execute the rebase, after indicating the action for all commits (the dialog will look like the below), click OK.

The final result should be something like the following, 'tidied up' exactly as we wanted:
* 727d877 C4: Add Howard.txt
* 764fc29 C3: Add Sheldon.txt
* 08a965a C2: Add Stuart.txt
* 6436598 C1: Add Penny.txt
done!
Rebasing rewrites history. It is not recommended to rebase commits you have already shared with others.
DETOUR: Updating the Last Commit
Git allows you to amend the most recent commit. This is useful when you realise there’s something you’d like to change — e.g., fix a typo in the commit message, or to exclude some unintended change from the commit.
Updating the commit message
To change the commit message subject only, use the git commit --amend -m "<new commit message>" command.
git commit --amend -m "Fix bug that froze the GUI"
To change the entire commit message (not just the subject), run the git commit --amend command, which will open the text editor for you to edit the commit message. The commit will be updated when you close the text editor.
Click on the Commit button on the top menu. In the region that you use to enter the commit message, use one of the two methods given below to go into the 'Amend last commit' mode.
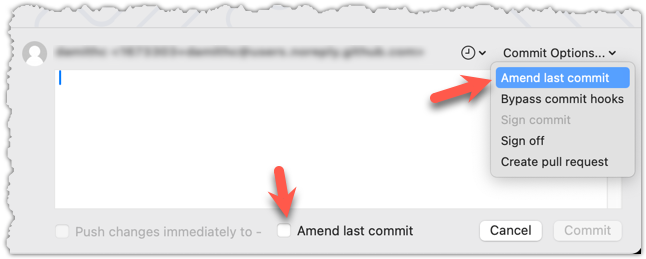
Updating changes in the commit
While there are multiple ways to do this, one method that will work universally is to do a 'soft reset' of the last commit, update the staging area as you wish, and commit again.
'Updating' a commit does not really update that commit -- it simply creates a new commit with the new data. The original commit remains and is 'left behind' in the repo, and will be garbage-collected after a while if it is not referenced by anything else.
At this point: You should now be able to create more meaningful commits from the start, and also refine them further after they’ve been created.
What's next: Tour 6: Branching Locally
Target Usage: To make use of multiple timelines of work in a local repository.
Motivation: At times, you need to do multiple parallel changes to files (e.g., to try two alternative implementations of the same feature).
Lesson plan:
T6L1. Creating Branches covers that part.
T6L2. Merging Branches covers that part.
T6L3. Resolving Merge Conflicts covers that part.
T6L4. Renaming Branches covers that part.
T6L5. Deleting Branches covers that part.
To work in parallel timelines, you can use Git branches.
Git branches let you develop multiple versions of your work in parallel — effectively creating diverged timelines of your repository’s history. For example, one team member can create a new branch to experiment with a change, while the rest of the team continues working on another branch. Branches can have meaningful names, such as master, release, or draft.
A Git branch is simply a ref (a named label) that points to a commit and automatically moves forward as you add new commits to that branch. As you’ve seen before, the HEAD ref indicates which branch you’re currently working on, by pointing to the corresponding branch ref.
When you add a commit, it goes into the branch you are currently on, and the branch ref (together with the HEAD ref) moves to the new commit.
Git creates a branch named master by default (Git can be configured to use a different name e.g., main).
Given below is an illustration of how branch refs move as branches evolve. Refer to the text below it for explanations of each stage.
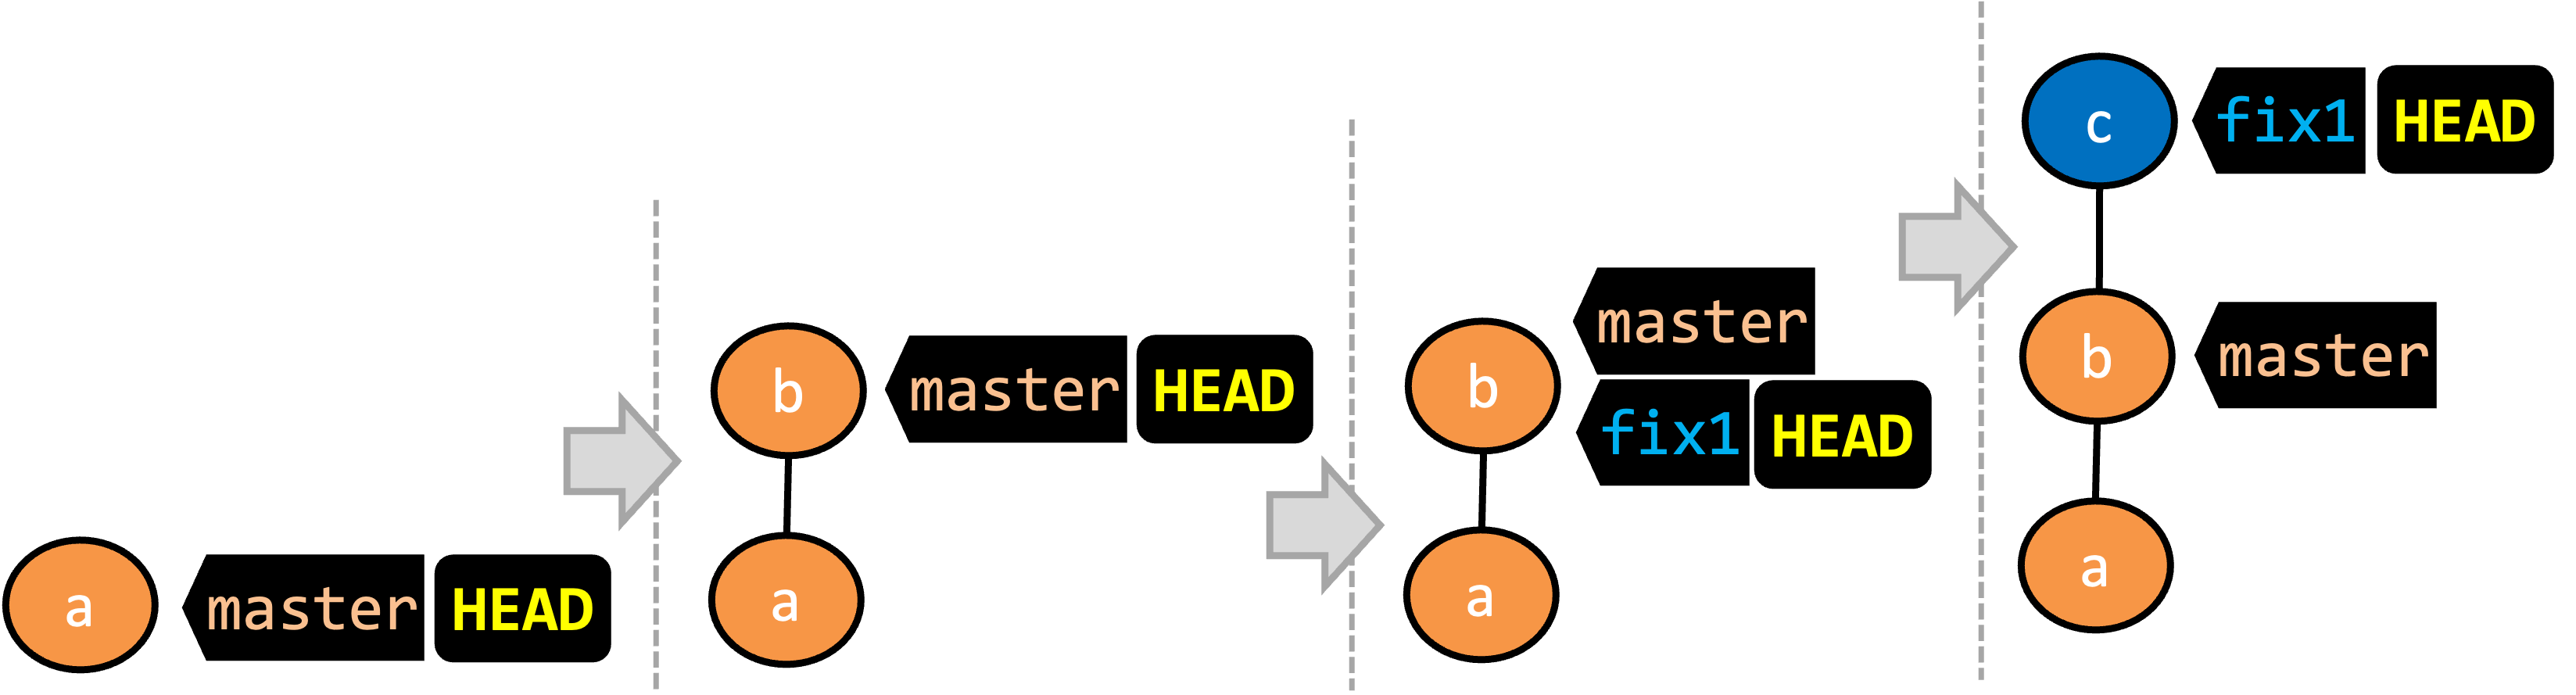
- There is only one branch (i.e.,
master) and there is only one commit on it. TheHEADref is pointing to themasterbranch (as we are currently on that branch). - A new commit has been added. The
masterand theHEADrefs have moved to the new commit. - A new branch
fix1has been added. The repo has switched to the new branch too (hence, theHEADref is attached to thefix1branch). - A new commit (
c) has been added. The current branch reffix1moves to the new commit, together with theHEADref. At this point, the repo's working directory reflects the code at commitb(notc).
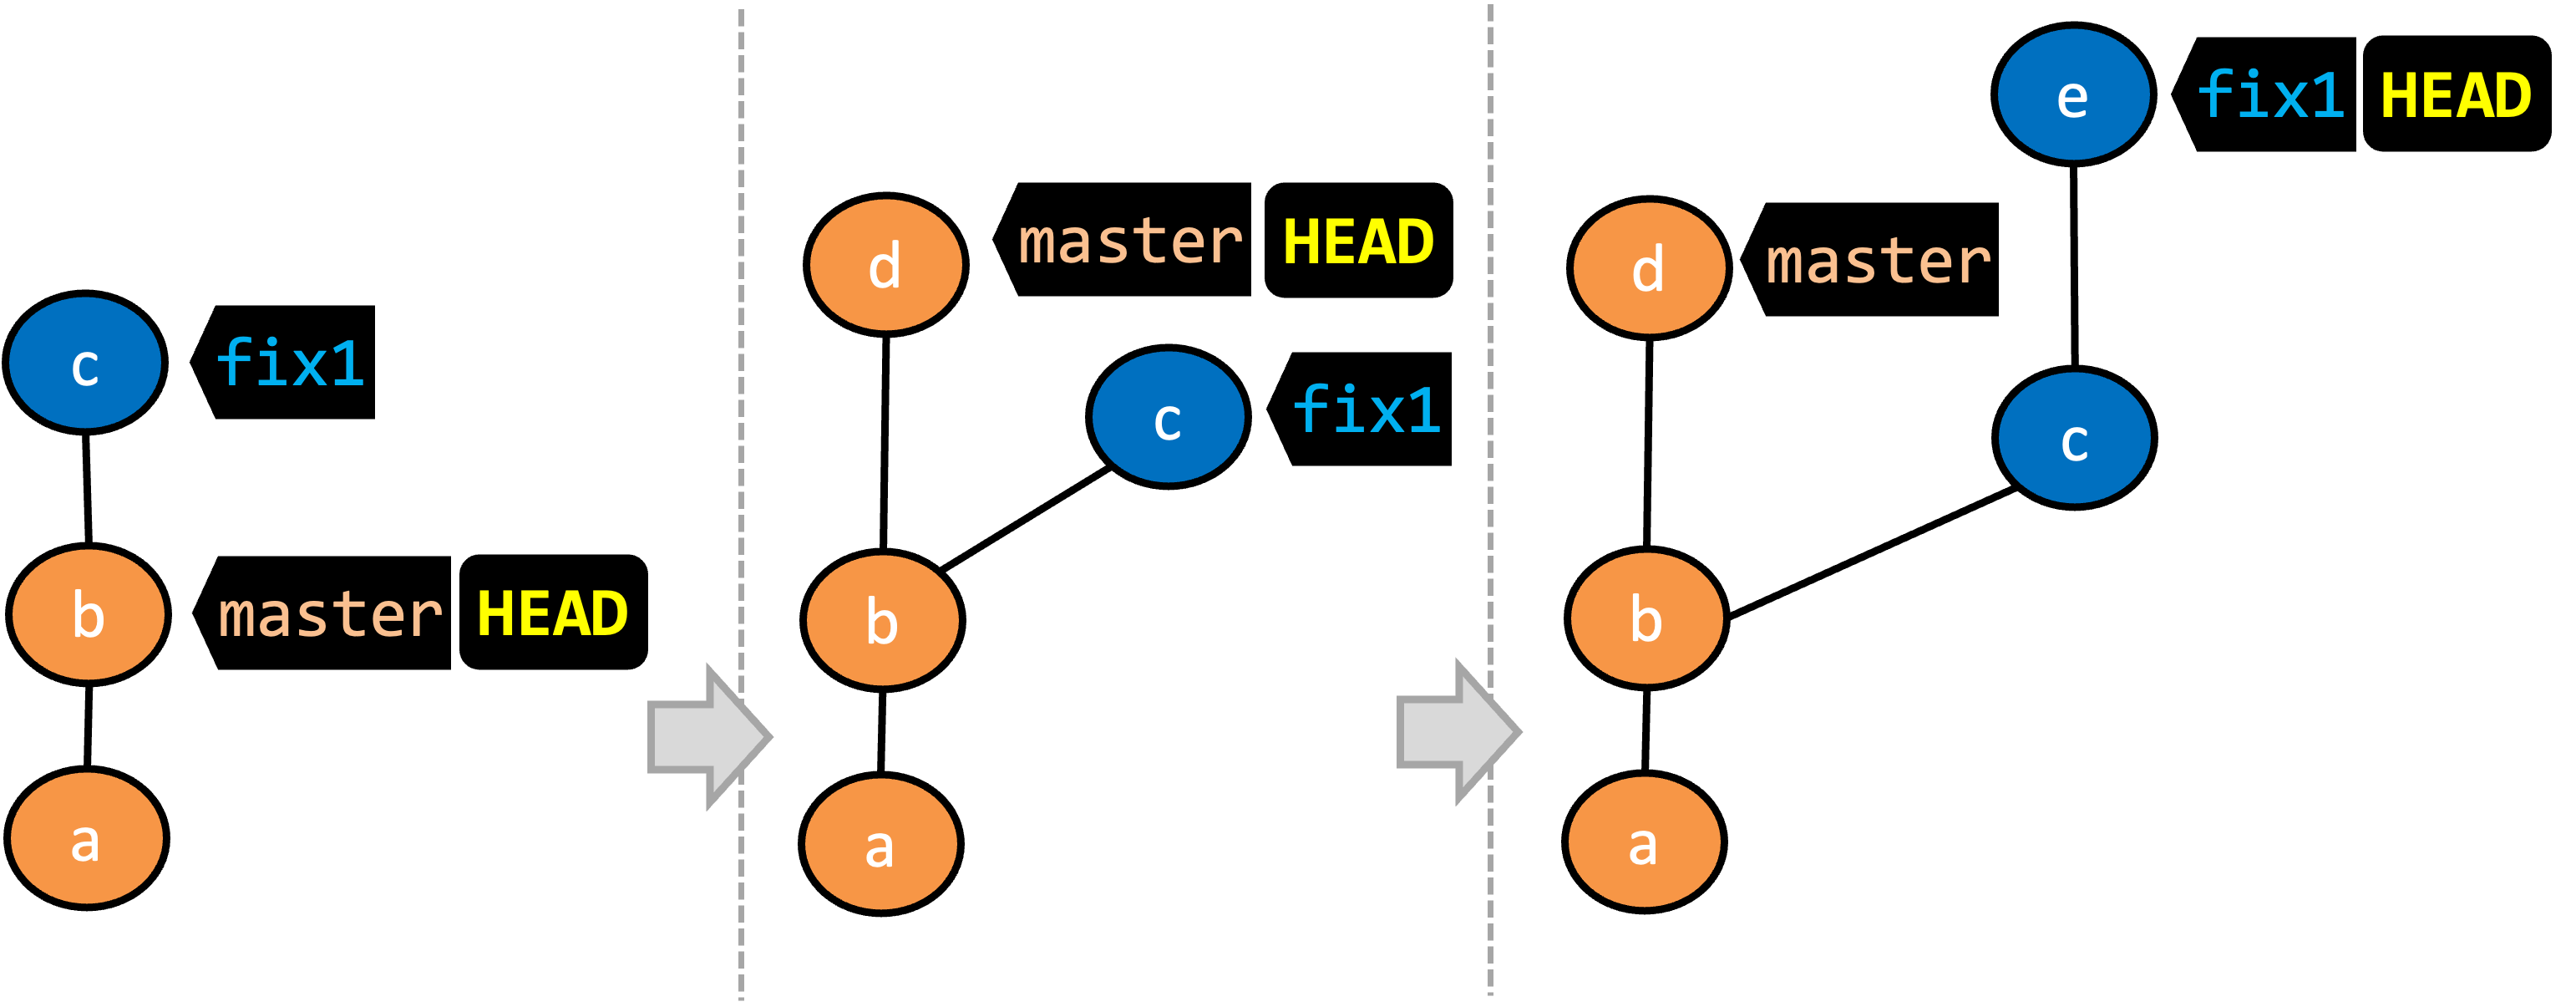
- A new commit (
d) has been added. Themasterand theHEADrefs have moved to that commit. - The repo has switched back to the
fix1branch and added a new commiteto it. Note how the branch reffix1(together withHEAD) has moved to the new commitewhile the branch refmasterstill points tod. - The repo has switched back to the
masterbranch. Hence, theHEADhas moved back tomasterbranch's .
Note that appearance of the revision graph (colors, positioning, orientation etc.) varies based on the Git client you use, and might not match the exact diagrams given above.
Preparation Let's create a repo named sports, as follows:
md sports
cd sports
git init
echo -e "Arnold Palmer\nTiger Woods" > golf.txt
git stage golf.txt
git commit -m "Add golf.txt"
echo -e "Pete Sampras\nRoger Federer\nSerena Williams" > tennis.txt
git stage tennis.txt
git commit -m "Add tennis.txt"
echo -e "Pele\nMaradona" > football.txt
git stage football.txt
git commit -m "Add football.txt"
1 Observe that you are on the branch called master.
git status
on branch master
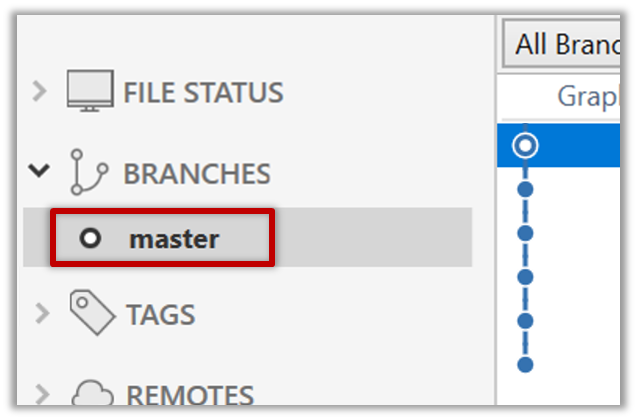
2 Start a branch named feature1 and switch to the new branch.
You can use the branch command to create a new branch and the checkout command to switch to a specific branch.
git branch feature1
git checkout feature1
One-step shortcut to create a branch and switch to it at the same time:
git checkout -b feature1
Switched to branch 'feature1'
The new switch command
Git recently introduced a switch command that you can use instead of the checkout command given above.
To create a new branch and switch to it:
git branch feature1
git switch feature1
One-step shortcut (by using -c or --create flag):
git switch -c feature1
Click on the Branch button on the main menu. In the next dialog, enter the branch name and click Create Branch.
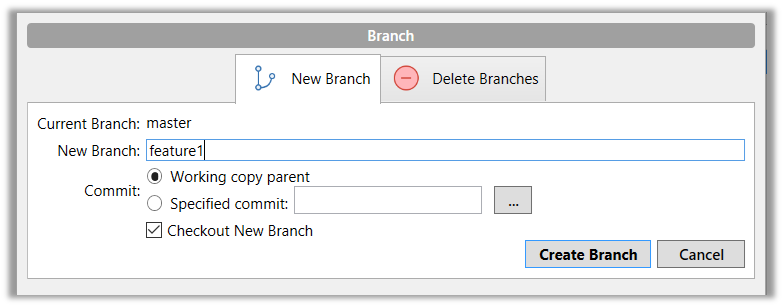
Note how the feature1 is indicated as the current branch (reason: Sourcetree automatically switches to the new branch when you create a new branch, if the Checkout New Branch was selected in the previous dialog).
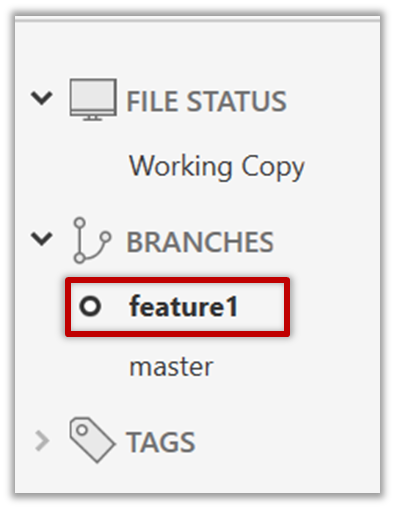
3 Create some commits in the new branch, as follows.
- Add a file named
boxing.txt, stage it, commit it.echo -e "Muhammad Ali" > boxing.txt git stage boxing.txt git commit -m "Add boxing.txt" - Observe how commits you add while on
feature1branch will becomes part of that branch.
Observe how themasterref and theHEADref move to the new commit.
As before, you can use the git log --oneline --decorate command for this.
- At times, the
HEADref of the local repo is represented as in Sourcetree, as illustrated in the screenshot below .
. - The
HEADref is not shown in the UI if it is already pointing at the active branch.
- Add some more texts to
boxing.txt, stage the changes, and commit it. This commit too will be added to thefeature1branch.echo -e "Mike Tyson" >> boxing.txt git commit -am "Add Tyson to boxing.txt"
4 Switch to the master branch. Note how the changes you made in the feature1 branch are no longer in the working directory.
git switch master
Double-click the master branch.
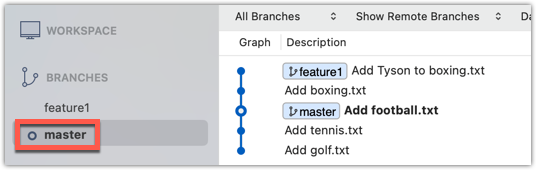
Revisiting master vs origin/master
In the screenshot above, you see a master ref and a origin/master ref for the same commit. The former identifies the of the local master branch while the latter identifies the tip of the master branch at the remote repo named origin. The fact that both refs point to the same commit means the local master branch and its remote counterpart are with each other.
Similarly, origin/HEAD ref appearing against the same commit indicates that of the remote repo is pointing to this commit as well.
5 Add a commit to the master branch. Let’s imagine it’s a bug fix.
To keep things simple for the time being, this commit should not involve the boxing.txt file that you changed in the feature1 branch. Of course, this is easily done, as the boxing.txt file you added in the feature1 branch is not even visible when you are in the master branch.
echo -e "Martina Navratilova" >> tennis.txt
git commit -am "Add Martina to tennis.txt"
gitGraph BT:
%%{init: { 'theme': 'default', 'gitGraph': {'mainBranchName': 'master'}} }%%
commit id: "m1"
commit id: "m2"
branch feature1
commit id: "f1"
commit id: "[feature1] f2"
checkout master
commit id: "[HEAD → master] m3"
checkout feature1
6 Switch between the two branches and see how the working directory changes accordingly. That is, now you have two parallel timelines that you can freely switch between.
done!
You can also start a branch from an earlier commit, instead of the latest commit in the current branch. For that, simply check out the commit you wish to start from.
Preparation Continue with the sports repo.
Scenario Suppose we want to create a branch containing an alternative version of the content we added in the feature1 branch.
Target Create a new branch that starts from the same commit the feature1 branch started from, as shown below:
gitGraph BT:
%%{init: { 'theme': 'default', 'gitGraph': {'mainBranchName': 'master'}} }%%
commit id: "m1"
commit id: "m2"
branch feature1
branch feature1-alt
checkout feature1
commit id: "f1"
commit id: "[feature1] f2"
checkout master
commit id: "[HEAD → master] m3"
checkout feature1-alt
commit id: "[HEAD → feature1-alt] a1"
Avoid this rookie mistake!
Always remember to switch back to the master branch before creating a new branch. If not, your new branch will be created on top of the current branch.
1 Switch to the master branch.
2 Checkout the commit at which the feature1 branch diverged from the master branch (e.g. git checkout HEAD~1). This will create a detached HEAD.
3 Create a new branch called feature1-alt. The HEAD will now point to this new branch (i.e., no longer 'detached').
PRO-TIP: Creating a branch based on another branch in one shot
Suppose you are currently on branch b2 and you want to create a new branch b3 that starts from b1. Normally, you can do that in two steps:
git switch b1 # switch to the intended base branch first
git switch -c b3 # create the new branch and switch to it
This can be done in one shot using the git switch -c <new-branch> <base-branch> command:
git switch -c b3 b1
4 Add a commit on the new branch.
done!
Most work done in branches eventually gets merged together.
Merging combines the changes from one branch into another, bringing their diverged timelines back together.
When you merge, Git looks at the two branches and figures out how their histories have diverged since their merge base (i.e., the most recent common ancestor commit of two branches). It then applies the changes from the other branch onto your current branch, creating a new commit. The new commit created when merging is called a merge commit — it records the result of combining both sets of changes.
Given below is an illustration of how such a merge looks like in the revision graph:
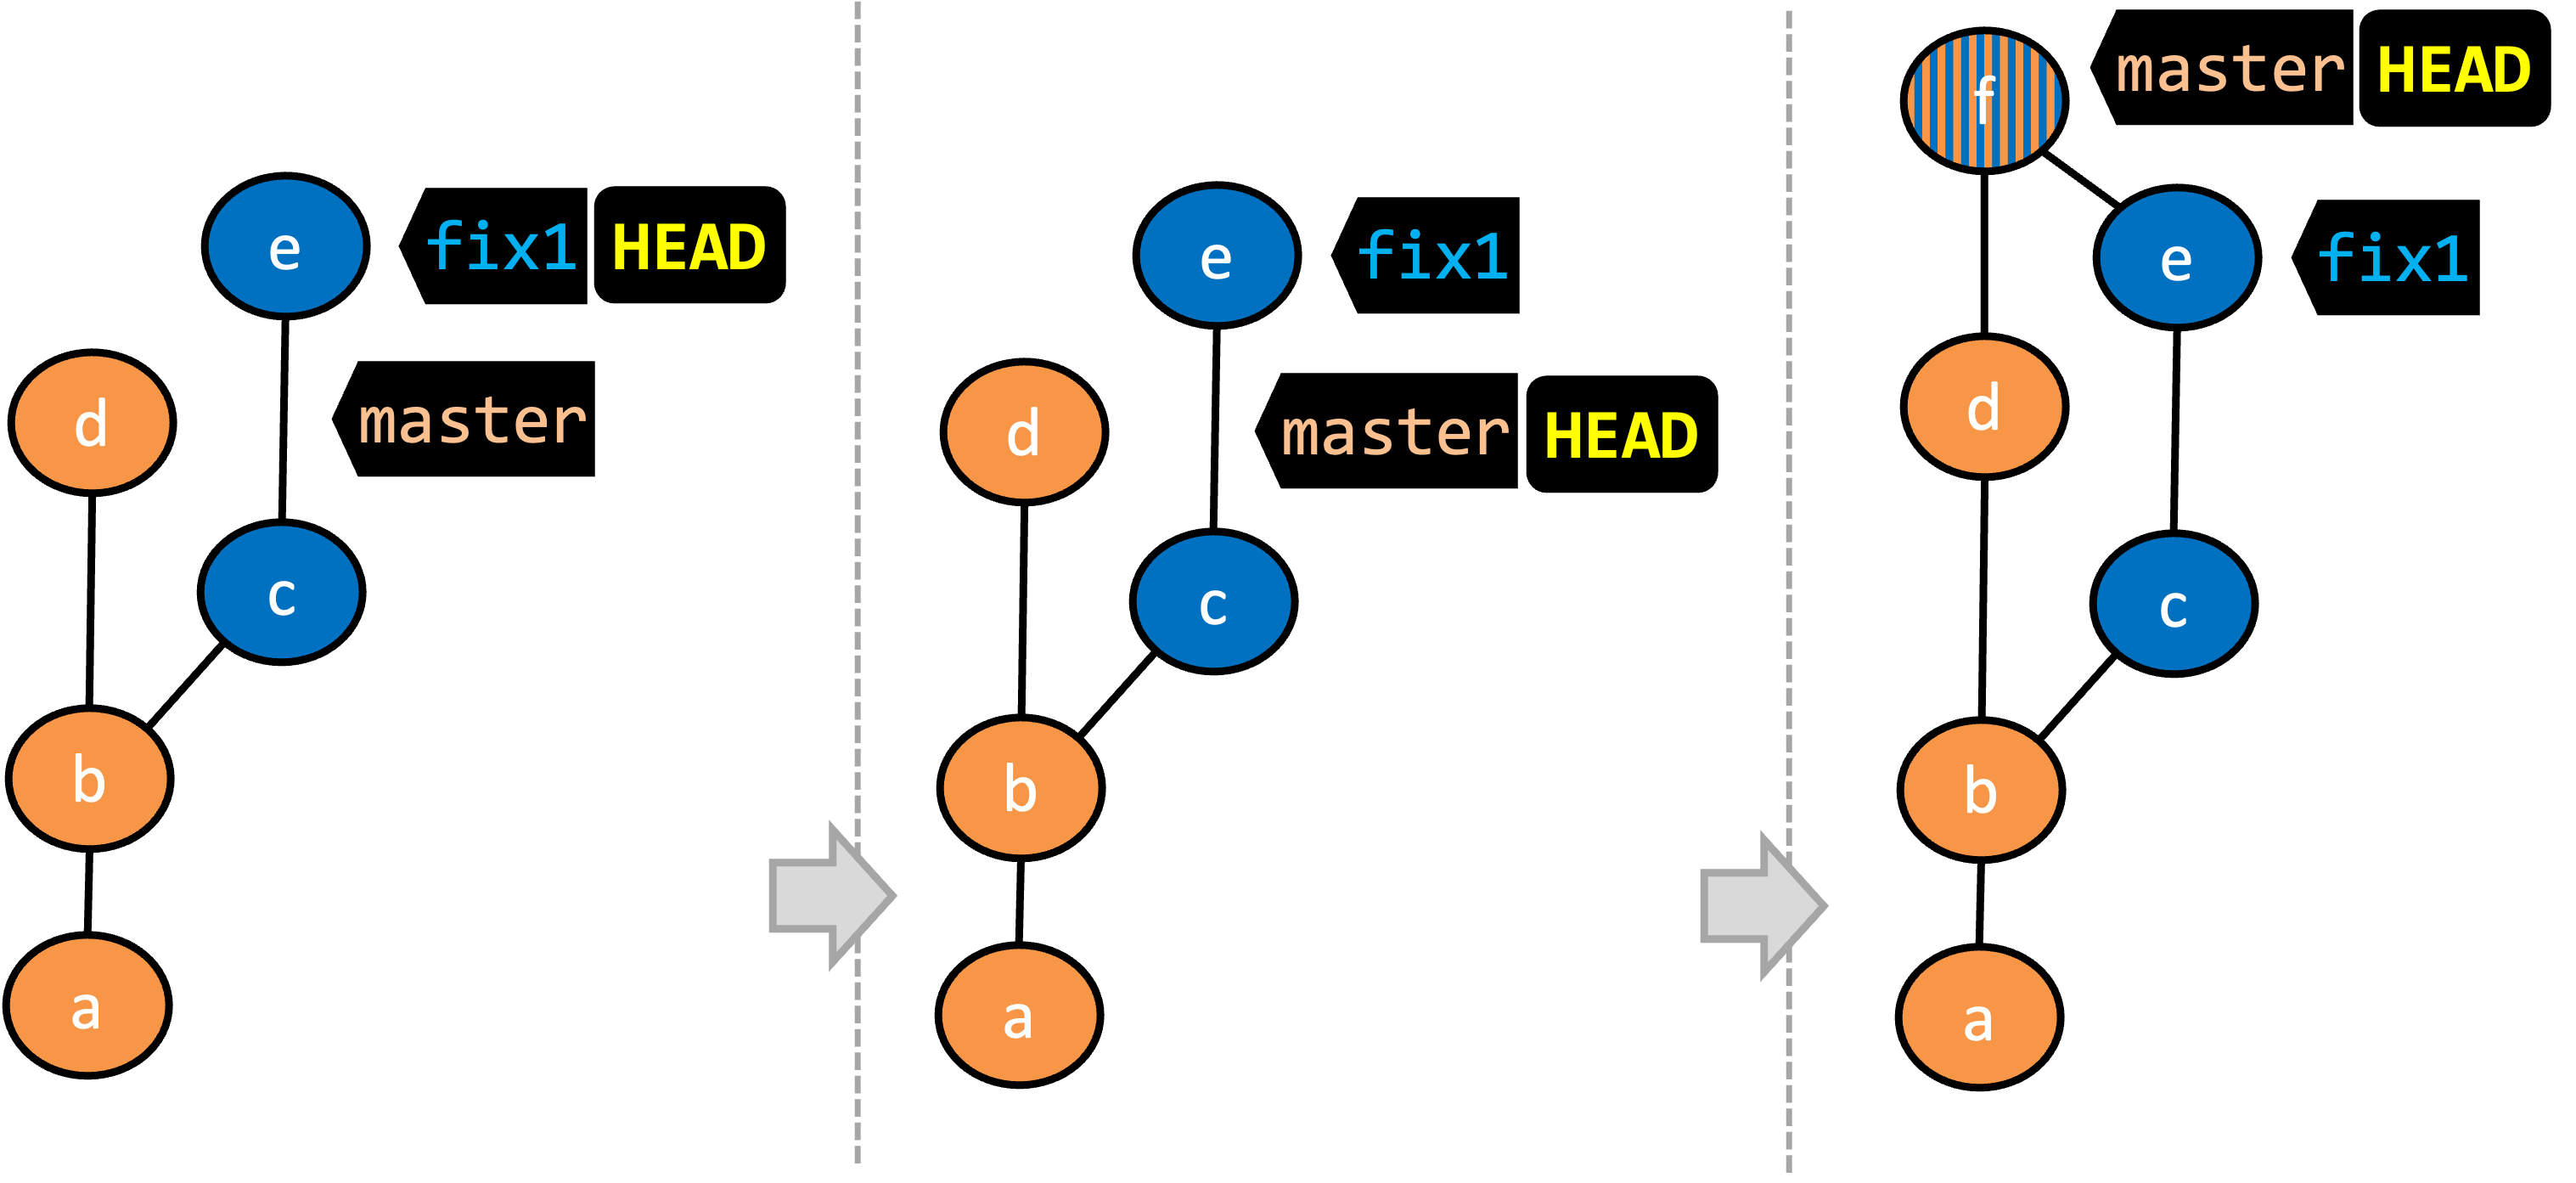
- We are on the
fix1branch (as indicated byHEAD). - We have switched to the
masterbranch (thus,HEADis now pointing tomasterref). - The
fix1branch has been merged into themasterbranch, creating a merge commitf. The repo is still on themasterbranch.
The branch you are merging into called the destination branch (other terms: receiving branch, target branch)
The branch you are merging is referred to as the source branch (other terms: incoming branch, merge branch).
In the above example, master is the destination branch and fix1 is the source branch.
A merge commit has two parent commits e.g., in the above example, the merge commit f has both d and e as parent commits. The parent commit on the destination branch is considered the first parent and the parent commit on the source branch is considered the second parent e.g., in the example above, fix1 branch is the source branch that is being merged into the destination branch master -- accordingly, d is the first parent and e is the second parent.
Preparation We continue with the sports repo from earlier, which should look like the following. Note that we are ignoring the feature1-alt branch, for simplicity.
gitGraph BT:
%%{init: { 'theme': 'default', 'gitGraph': {'mainBranchName': 'master'}} }%%
commit id: "m1"
commit id: "m2"
branch feature1
commit id: "f1"
commit id: "[feature1] f2"
checkout master
commit id: "[HEAD → master] m3"
checkout feature1
1 Switch back to the feature1 branch.
gitGraph BT:
%%{init: { 'theme': 'default', 'gitGraph': {'mainBranchName': 'master'}} }%%
commit id: "m1"
commit id: "m2"
branch feature1
commit id: "f1"
commit id: "[HEAD → feature1] f2"
checkout master
commit id: "[master] m3"
checkout feature1
2 Merge the master branch to the feature1 branch, giving an end-result like the following. Also note how Git has created a merge commit (shown as mc1 in the diagram below).
gitGraph BT:
%%{init: { 'theme': 'default', 'gitGraph': {'mainBranchName': 'master'}} }%%
commit id: "m1"
commit id: "m2"
branch feature1
commit id: "f1"
commit id: "f2"
checkout master
commit id: "[master] m3"
checkout feature1
merge master id: "[HEAD → feature1] mc1"
$ git merge master
Right-click on the master branch and choose merge master into the current branch. Click OK in the next dialog.
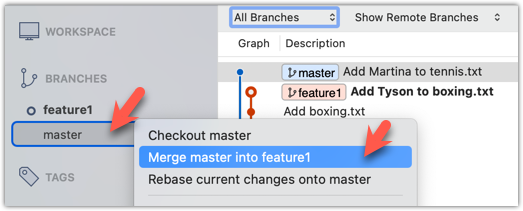
If a confirmation dialog pops up, choose as follows:
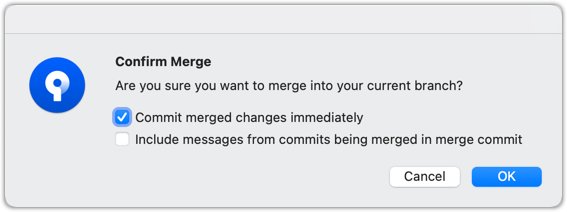
The revision graph should look like this now (colours and line alignment might vary but the graph structure should be the same):

Observe how the changes you made in the master branch (i.e., the imaginary bug fix in m3) is now available even when you are in the feature1 branch.
Furthermore, observe (e.g., git show HEAD) how the merge commit contains the sum of changes done in commits m3, f1, and f2.
3 Add another commit to the feature1 branch, in which you do some further changes to the boxing.txt.
echo -e "Manny Pacquiao" >> boxing.txt
git commit -am "Add Manny to boxing.txt"
Switch to the master branch and add one more commit.
git switch master
echo -e "Lionel Messi" >> football.txt
git commit -am "Add Messi to football.txt"
gitGraph BT:
%%{init: { 'theme': 'default', 'gitGraph': {'mainBranchName': 'master'}} }%%
commit id: "m1"
commit id: "m2"
branch feature1
commit id: "f1"
commit id: "f2"
checkout master
commit id: "m3"
checkout feature1
merge master id: "mc1"
commit id: "[feature1] f3"
checkout master
commit id: "[HEAD → master] m4"
4 Merge feature1 to the master branch, giving an end-result like this:
gitGraph BT:
%%{init: { 'theme': 'default', 'gitGraph': {'mainBranchName': 'master'}} }%%
commit id: "m1"
commit id: "m2"
branch feature1
commit id: "f1"
commit id: "f2"
checkout master
commit id: "m3"
checkout feature1
merge master id: "mc1"
commit id: "[feature1] f3"
checkout master
commit id: "m4"
merge feature1 id: "[HEAD → master] mc2"
git merge feature1
Right-click on the feature1 branch and choose Merge.... The resulting revision graph should look like this:

Now, any changes you made in feature1 branch are available in the master branch.
done!
When the destination branch hasn't diverged — meaning it hasn't had any new commits since the merge base commit — Git simply moves the branch pointer forward to include all the new commits in the source branch, keeping the history clean and linear. This is called a fast-forward merge because Git simply "fast-forwards" the branch pointer to the tip of the other branch. The result looks as if all the changes had been made directly on one branch, without any branching at all.
gitGraph BT:
%%{init: { 'theme': 'default', 'gitGraph': {'mainBranchName': 'master'}} }%%
commit id: "m1"
commit id: "[HEAD → master] m2"
branch bug-fix
commit id: "b1"
commit id: "[bug-fix] b2"
checkout master
→
[merge bug-fix]
gitGraph BT:
%%{init: { 'theme': 'default', 'gitGraph': {'mainBranchName': 'master'}} }%%
commit id: "m1"
commit id: "m2"
commit id: "b1"
commit id: "[HEAD → master][bug-fix] b2"
checkout master
In the example above, the master branch has not changed since the merge base (i.e., m2). Hence, merging the branch bug-fix onto master can be done by fast-forwarding the master branch ref to the tip of the bug-fix branch (i.e., b2).
Preparation Let's continue with the same sports repo we used above, and do a fast-forward merge this time.
Create a new branch called add-swimming, and some commits to it as follows:
Switch to the master branch, create a new branch, switch to the new branch, add a file named swimming.txt, stage it, and commit it.
Do some changes to swimming.txt, and commit those changes.
git switch master
git switch -c add-swimming
echo "Michael Phelps" > swimming.txt
git stage swimming.txt
git commit -m "Add swimming.txt"
echo "Ian Thorpe" >> swimming.txt
git commit -am "Add Thorpe to swimming.txt"
git switch master
You should have something like this now:
gitGraph BT:
%%{init: { 'theme': 'default', 'gitGraph': {'mainBranchName': 'master'}} }%%
commit id: "[master] mc2"
branch add-swimming
commit id: "a1"
commit id: "[HEAD → add-swimming] a2"
Target Do a fast-forward merge of the add-swimming branch.
1 Ensure you are on the master branch.
gitGraph BT:
%%{init: { 'theme': 'default', 'gitGraph': {'mainBranchName': 'master'}} }%%
commit id: "[HEAD → master] mc2"
branch add-swimming
commit id: "a1"
commit id: "add-swimming] a2"
2 Merge the add-swimming branch onto the master branch. Observe that there is no merge commit. The master branch ref (and the HEAD ref along with it) moved to the tip of the add-swimming branch (i.e., a2) and both branches now point to a2.
gitGraph BT:
%%{init: { 'theme': 'default', 'gitGraph': {'mainBranchName': 'master (and add-swimming)'}} }%%
commit id: "mc2"
commit id: "a1"
commit id: "[HEAD → master][add-swimming] a2"
done!
It is possible to force Git to create a merge commit even if fast forwarding is possible. This is useful if you prefer the revision graph to visually show when each branch was merged to the main timeline.
To prevent Git from fast-forwarding, use the --no-ff switch when merging. Example:
git merge --no-ff add-swimming
Windows: Tick the box shown below when you merge a branch:
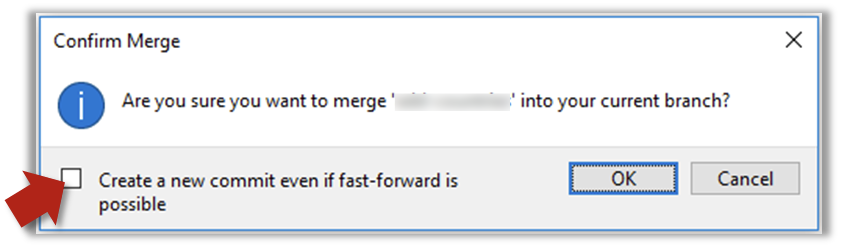
Mac:
Trigger the branch operation using the following menu button:
In the next dialog, tick the following option:
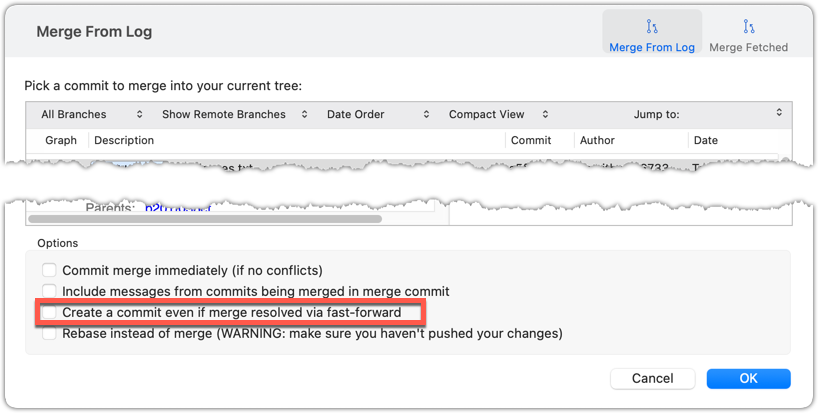
To permanently prevent fast-forwarding:
- Go to Sourcetree
Settings. - Navigate to the
Gitsection. - Tick the box
Do not fast-forward when merging, always create commit.
A squash merge takes all the changes from the source branch and combines them into a single commit on the destination branch. It is especially useful when the source branch has many small or experimental commits that would otherwise clutter history.
gitGraph BT:
%%{init: { 'theme': 'default', 'gitGraph': {'mainBranchName': 'master'}} }%%
commit id: "[HEAD → master] m1"
branch feature
checkout feature
commit id: "f1"
commit id: "[feature] f2"
→
[squash merge...]
gitGraph BT:
%%{init: { 'theme': 'default', 'gitGraph': {'mainBranchName': 'master'}} }%%
commit id: "m1"
branch feature
checkout feature
commit id: "f1"
commit id: "[feature] f2"
checkout master
commit id: "[HEAD → master] s1 (same as f1+f2)"
In the example above, the branch feature has been squash merged onto the master branch, creating a single 'squashed' commit s1 that combines all the commits in feature branch.
After a squash merge, you typically delete the source branch, so its individual commits are no longer kept. The destination branch's history stays linear, as the work done in the source branch is replaced by one commit on the destination branch. As a result, a squash merge commit is just a normal commit, and does not have a 'parent' reference to the source branch.
gitGraph BT:
%%{init: { 'theme': 'default', 'gitGraph': {'mainBranchName': 'master'}} }%%
commit id: "[HEAD → master] m1"
branch feature
checkout feature
commit id: "f1"
commit id: "[feature] f2"
checkout master
merge feature
with a merge commit]
gitGraph BT:
%%{init: { 'theme': 'default', 'gitGraph': {'mainBranchName': 'master'}} }%%
commit id: "m1"
commit id: "f1"
commit id: "[HEAD → master][feature] f2"
gitGraph BT:
%%{init: { 'theme': 'default', 'gitGraph': {'mainBranchName': 'master'}} }%%
commit id: "m1"
commit id: "[HEAD → master] s1 (same as f1+f2)"
deleting the source branch thereafter]
The mechanics of doing a squash merge is covered in a separate detour.
DETOUR: Undoing a Merge
- Ensure you are in the .
- Do a hard reset of that branch to the commit that would be the tip of that branch had you not done the offending merge i.e., rewind that branch to the state it was in before the merge.
In the example below, you merged master to feature1.
If you want to undo that merge,
- Ensure you are in the
feature1branch (because that's the destination branch). - Reset the
feature1branch to the commit spotlighted in the screenshot above (because that was the tip of thefeature1branch before you merged themasterbranch to it).
Branches can be renamed, for example, to fix a mistake in the branch name.
Local branches can be renamed easily. Renaming a branch simply changes the branch reference (i.e., the name used to identify the branch) — it is just a cosmetic change.
Preparation First, create the repo samplerepo-books for this hands-on practical, by running the following commands in your terminal.
mkdir samplerepo-books
cd samplerepo-books
git init
echo "Horror Stories" >> horror.txt
git add .
git commit -m "Add horror.txt"
git switch -c textbooks
echo "Textbooks" >> textbooks.txt
git add .
git commit -m "Add textbooks.txt"
git switch master
git switch -c fantasy
echo "Fantasy Books" >> fantasy.txt
git add .
git commit -m "Add fantasy.txt"
git switch master
git merge --no-ff -m "Merge branch textbooks" textbooks
The above should give you a repo similar to the revision graph given below, on the left.
gitGraph BT:
%%{init: { 'theme': 'default', 'gitGraph': {'mainBranchName': 'master'}} }%%
commit id: "m1"
branch textbooks
checkout textbooks
commit id: "[textbooks] t1"
checkout master
branch fantasy
checkout fantasy
commit id: "[fantasy] f1"
checkout master
merge textbooks id: "[HEAD → master] mc1"
→
[rename branches]
gitGraph BT:
%%{init: { 'theme': 'default', 'gitGraph': {'mainBranchName': 'master'}} }%%
commit id: "m1"
branch study-books
checkout study-books
commit id: "[study-books] t1"
checkout master
branch fantasy-books
checkout fantasy-books
commit id: "[fantasy-books] f1"
checkout master
merge study-books id: "[HEAD → master] mc1"
Target Rename the fantasy branch to fantasy-books. Similarly, rename textbooks branch to study-books. The outcome should be similar to the revision graph above, on the right.
steps:
To rename a branch, use the git branch -m <current-name> <new-name> command (-m stands for 'move'):
git branch -m fantasy fantasy-books
git branch -m textbooks study-books
git log --oneline --decorate --graph --all # verify the changes
* 443132a (HEAD -> master) Merge branch textbooks
|\
| * 4969163 (study-books) Add textbooks.txt
|/
| * 0586ee1 (fantasy-books) Add fantasy.txt
|/
* 7f28f0e Add horror.txt
Note these additional switches to the log command:
--all: Shows all branches, not just the current branch.--graph: Shows a graph-like visualisation (notice how*is used to indicate a commit, and branches are indicated using vertical lines).
Right-click on the branch name and choose Rename.... Provide the new branch name in the next dialog.
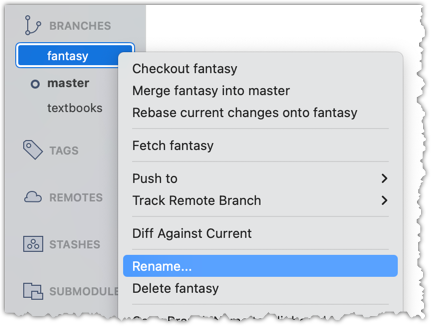
done!
SIDEBAR: Branch naming conventions
Branch names can contain lowercase letters, numbers, /, dashes (-), underscores (_), and dots (.).
You can use uppercase letters too, but many teams avoid them for consistency.
A common branch naming convention is to prefix it with <category>/. Some examples:
feature/login-form— for new features (origin/feature/login-formcould be the matching remote-tracking branch)bugfix/profile-photo— for fixing bugshotfix/payment-crash— for urgent production fixesrelease/2.0— for prepping a releaseexperiment/ai-chatbot— for “just trying stuff”
Although forward-slash (/) in the prefix doesn't mean folders, some tools treat it kind of like a path so you can group related branches when you run git branch. Shown below is an example of how Sourcetree groups branches with the same prefix.
Branches can be deleted to get rid of them when they are no longer needed.
Deleting a branch deletes the corresponding branch ref from the revision history (it does not delete any commits). The impact of the loss of the branch ref depends on whether the branch has been merged.
When you delete a branch that has been merged, the commits of the branch will still exist in the history and will be safe. Only the branch ref is lost.
gitGraph BT:
%%{init: { 'theme': 'default', 'gitGraph': {'mainBranchName': 'master'}} }%%
commit id: "m1"
branch bug-fix
checkout bug-fix
commit id: "[bug-fix] b1"
checkout master
merge bug-fix id: "[HEAD → master] mc1"
→
[delete branch bug-fix]
gitGraph BT:
%%{init: { 'theme': 'default', 'gitGraph': {'mainBranchName': 'master'}} }%%
commit id: "m1"
branch _
checkout _
commit id: "b1"
checkout master
merge _ id: "[HEAD → master] mc1"
In the above example, the only impact of the deletion is the loss of the branch ref bug-fix. All commits remain reachable (via the master branch), and there is no other impact on the revision history.
In fact, some prefer to delete the branch soon after merging it, to reduce branch references cluttering up the revision history.
When you delete a branch that has not been merged, the loss of the branch ref can render some commits unreachable (unless you know their commit IDs or they are reachable through other refs), putting them at risk of being lost eventually.
gitGraph BT:
%%{init: { 'theme': 'default', 'gitGraph': {'mainBranchName': 'master'}} }%%
commit id: "[HEAD → master] m1"
branch bug-fix
checkout bug-fix
commit id: "[bug-fix] b1"
checkout master
→
[delete branch bug-fix]
gitGraph BT:
%%{init: { 'theme': 'default', 'gitGraph': {'mainBranchName': 'master'}} }%%
commit id: "[HEAD → master] m1"
branch _
checkout _
commit id: "b1"
checkout master
In the above example, the commit b1 is no longer reachable, unless we know its commit ID (i.e., the SHA).
SIDEBAR: What makes a commit 'unreachable'?
Recall that a commit only has a pointer to its parent commit (not its descendent commits).
A commit is considered reachable if you can get to it by starting at a branch, tag, or other ref and walking backward through its parent commits. 'Reachable' is the normal state for commits — they are part of the visible history of a branch or tag.
If no branch, tag, or ref in the repo can be used as the starting point to reach a certain commit, that commit is unreachable. This often happens when you delete a branch or rewrite history (e.g., with reset or rebase), leaving some commits "orphaned" (or "dangling") without a ref pointing to them.
In the example below, C4 is unreachable (i.e., cannot be reached by starting at any of the three refs: v1.0 or master or ←HEAD), but the other three are all reachable.
Unreachable commits are not deleted immediately — Git keeps them for a while before cleaning them up. By default, Git retains unreachable commits for at least 30 days, during which they can still be recovered if you know their SHA. After that, they will be garbage-collected, and will be lost for good.
Preparation First, create the repo samplerepo-books-2 for this hands-on practical, by running the following commands in your terminal.
mkdir samplerepo-books-2
cd samplerepo-books-2
git init
echo "Horror Stories" >> horror.txt
git add .
git commit -m "Add horror.txt"
git switch -c textbooks
echo "Textbooks" >> textbooks.txt
git add .
git commit -m "Add textbooks.txt"
git switch master
git switch -c fantasy
echo "Fantasy Books" >> fantasy.txt
git add .
git commit -m "Add fantasy.txt"
git switch master
git merge --no-ff -m "Merge branch textbooks" textbooks
The result should be something like this:
gitGraph BT:
%%{init: { 'theme': 'default', 'gitGraph': {'mainBranchName': 'master'}} }%%
commit id: "m1"
branch textbooks
checkout textbooks
commit id: "[textbooks] t1"
checkout master
branch fantasy
checkout fantasy
commit id: "[fantasy] f1"
checkout master
merge textbooks id: "[HEAD → master] mc1"
1 Delete the (the merged) textbooks branch.
Use the git branch -d <branch> command to delete a local branch 'safely' -- this command will fail if the branch has unmerged changes.
git branch -d textbooks
git log --oneline --decorate --graph --all # check the current revision graph
* 443132a (HEAD -> master) Merge branch textbooks
|\
| * 4969163 Add textbooks.txt
|/
| * 0586ee1 (fantasy) Add fantasy.txt
|/
* 7f28f0e Add horror.txt
Right-click on the branch name and choose Delete <branch>:
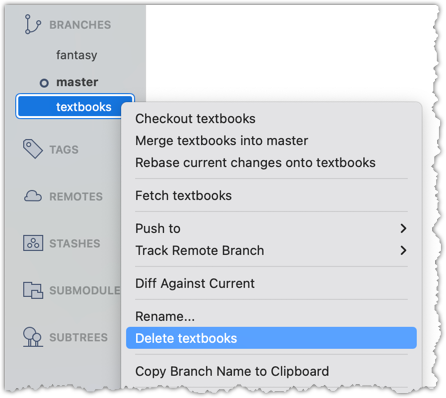
In the next dialog, click OK:
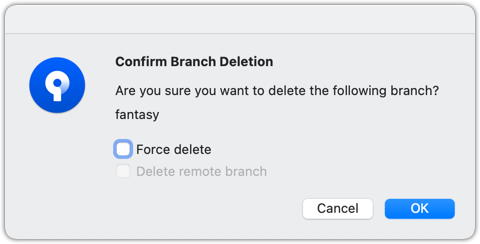
Observe that all commits remain. The only missing thing is the textbook ref.
2 Make a copy of the SHA of the tip of the (unmerged) fantasy branch.
3 Delete the fantasy branch.
Attempt to delete the branch. It should fail, as shown below:
git branch -d fantasy
error: the branch 'fantasy' is not fully merged
hint: If you are sure you want to delete it, run 'git branch -D fantasy'
As also hinted by the error message, you can replace the -d with -D to 'force' the deletion.
git branch -D fantasy
Now, check the revision graph:
git log --oneline --decorate --graph --all
* 443132a (HEAD -> master) Merge branch textbooks
|\
| * 4969163 Add textbooks.txt
|/
* 7f28f0e Add horror.txt
Attempt to delete the branch as you did before. It will fail because the branch has unmerged commits.
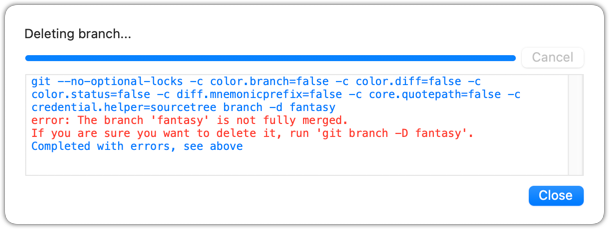
Try again but this time, tick the Force delete option, which will force Git to delete the unmerged branch:
Observe how the branch ref fantasy is gone, together with any unmerged commits on it.
4 Attempt to view the 'unreachable' commit whose SHA you noted in step 2.
e.g., git show 32b34fb (use the SHA you copied earlier)
Observe how the commit still exists and still is reachable using the commit ID, although it is not reachable by other means, and not visible in the revision graph.
done!
At this point: Now you can create, maintain, and merge multiple parallel branches in a local repo. This tour covered only the basic use of Git branches. More advanced usage will be covered in other tours.
What's next: Tour 7: Keeping Branches in Sync
Target Usage: To keep branches in a local repository synchronised with each other, as needed.
Motivation: While working on one branch, you might want to have access to changes introduced in another branch (e.g., to take advantage of a bug fix introduced in another branch).
Lesson plan:
T7L1. Merging to Sync Branches covers that part.
T7L2. Rebasing to Sync Branches covers that part.
T7L3. Copying Specific Commits covers that part.
At this point: You should now be able to bring changes from one branch to another in your local repository.
What's next: Tour 8: Working with Remote Branches
Target Usage: To synchronise branches in the local repo with a remote repo's branches.
Motivation: It is useful to be able to have another copy of branches in a remote repo.
Lesson plan:
T8L1. Pushing Branches to a Remote covers that part.
T8L2. Pulling Branches from a Remote covers that part.
T8L3. Deleting Branches from a Remote covers that part.
T8L4. Renaming Branches in a Remote covers that part.
Local branches can be replicated in a remote.
Pushing a copy of local branches to the corresponding remote repo makes those branches available remotely.
In a previous lesson, we saw how to push the default branch to a remote repository and have Git set up tracking between the local and remote branches using a remote-tracking reference. Pushing any other local branch to a remote works the same way as pushing the default branch — you simply specify the target branch instead of the default branch. Pushing any new commits in any local branch to a corresponding remote branch is done similarly as well.
gitGraph BT:
%%{init: { 'theme': 'default', 'gitGraph': {'mainBranchName': 'master'}} }%%
commit id: "m1"
branch bug-fix
checkout master
commit id: "[origin/master][HEAD → master] m2"
checkout bug-fix
commit id: "[bug-fix] b1"
checkout master
[bug-fix branch does not exist in the remote origin]
→
gitGraph BT:
%%{init: { 'theme': 'default', 'gitGraph': {'mainBranchName': 'master'}} }%%
commit id: "m1"
branch bug-fix
checkout master
commit id: "[origin/master][HEAD → master] m2"
checkout bug-fix
commit id: "[origin/bug-fix][bug-fix] b1"
checkout master
[after pushing bug-fix branch to origin,
and setting up a remote-tracking branch]
Preparation Fork the samplerepo-company to your GitHub account. When doing so, un-tick the Copy the master branch only option.
After forking, go to the fork and ensure both branches (master, and track-sales) are in there.
Clone the fork to your computer. It should look something like this:
gitGraph BT:
%%{init: { 'theme': 'default', 'gitGraph': {'mainBranchName': 'master'}} }%%
commit id: "m1"
commit id: "m2"
branch track-sales
checkout track-sales
commit id: "[origin/track-sales] s1"
checkout master
commit id: "[origin/master][origin/HEAD][HEAD → master] m3"
The origin/HEAD remote-tracking ref indicates where the HEAD ref is in the remote origin.
1 Create a new branch called hiring, and add a commit to that branch. The commit can contain any changes you want.
Here are the commands you can run in the terminal to do this step in one shot:
git switch -c hiring
echo "Receptionist: Pam" >> employees.txt
git commit -am "Add Pam to employees.txt"
gitGraph BT:
%%{init: { 'theme': 'default', 'gitGraph': {'mainBranchName': 'master'}} }%%
commit id: "m1"
commit id: "m2"
branch track-sales
checkout track-sales
commit id: "[origin/track-sales] s1"
checkout master
commit id: "[origin/master][origin/HEAD][master] m3"
branch hiring
checkout hiring
commit id: "[HEAD → hiring] h1"
The resulting revision graph should look like the one above.
2 Push the hiring branch to the remote.
You can use the usual git push <remote> -u <branch> command to push the branch to the remote, and set up a remote-tracking branch at the same time.
git push origin -u hiring
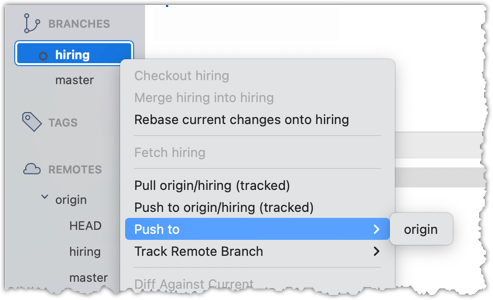
3 Verify that the branch has been pushed to the remote by visiting the fork on GitHub, and looking for the origin/hiring remote-tracking ref in the local repo.
done!
Branches in a remote can be replicated in the local repo, and maintained in sync with each other.
Sometimes we need to create a local copy of a branch from a remote repository, make further changes to it, and keep it synchronised with the remote branch. Let's explore how to handle this in a few common use cases:
Use case 1: Working with branches that already existed in the remote repo when you cloned it to your computer.
When you clone a repository,
- Git checks out the default branch. You can start working on this branch immediately. This branch is tracking the default branch in the remote, which means you can easily synchronise changes in this branch with the remote by pulling and pushing.
- Git also fetches all the other branches from the remote. These other branches are not immediately available as local branches, but they are visible as remote-tracking branches.
You can think of remote-tracking branches as read-only references to the state of those branches in the remote repository at the time of cloning. They allow you to see what work has been done on those branches without yet making local copies of them.
To work on one of these branches, you can create a new local branch based on the remote-tracking branch. Once you do this, your local branch will usually be configured to track the corresponding branch on the remote, so you can easily synchronise your work later.
Preparation Use the same samplerepo-company repo you used in Lesson T8L1. Pushing Branches to a Remote. Fork and clone it if you haven't done that already.
1 Verify that the remote-tracking branch origin/track-sales exists in the local repo, but there is no local copy of it.
You can use the git branch -a command to list all local and tracking branches.
git branch -a
* hiring
master
remotes/origin/HEAD -> origin/master
remotes/origin/hiring
remotes/origin/master
remotes/origin/track-sales
The * in the output above indicates the currently active branch.
Note how there is no track-sales in the list of branches (i.e., no local branch named track-sales), but there is a remotes/origin/track-sales (i.e., the remote-tracking branch)
Observe how the branch track-sales appear under REMOTES → origin but not under BRANCHES.
2 Create a local copy of the remote branch origin/track-sales.
You can use the git switch -c <branch> <remote-branch> command for this e.g.,
git switch -c track-sales origin/track-sales
Locate the track-sales remote-tracking branch (look under REMOTES → origin), right-click, and choose Checkout....
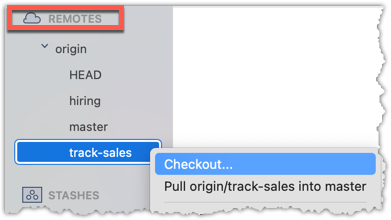
In the next dialog, choose as follows:
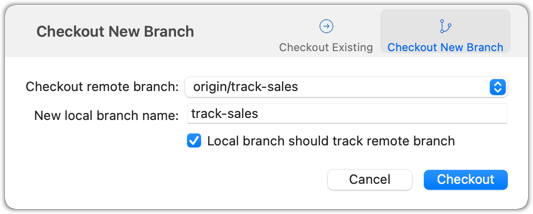
The above command/action does several things:
- Creates a new branch
track-sales. - Sets the new branch to track the remote branch
origin/track-sales, which means the local branch reftrack-saleswill also move to where theorigin/track-salesis. - Switch to the newly-created branch i.e., makes it the current branch.
3 Add a commit to the track-sales branch and push to the remote, to verify that the local branch is tracking the remote branch.
Commands to perform this step in one shot:
echo "5 reams of paper" >> sales.txt
git commit -am "Update sales.txt"
git push origin track-sales
done!
Use case 2: Working with branches that were added to the remote repository after you cloned it e.g., a branch someone else pushed to the remote after you cloned.
Simply fetch to update your local repository with information about the new branch. After that, you can create a local copy of it and work with it just as you did in Use Case 1.
Fetching was covered in Lesson T3L3. Downloading Data Into a Local Repo.
Often, you'll need to delete a branch in a remote repo after it has served its purpose.
To delete a branch in a remote repository, you simply tell Git to remove the reference to that branch from the remote. This does not delete the branch from your local repository — it only removes it from the remote, so others won’t see it anymore. This is useful for cleaning up clutter in the remote repo e.g., delete old or merged branches that are no longer needed on the remote.
Preparation Fork the samplerepo-books to your GitHub account. When doing so, un-tick the Copy the master branch only option.
After forking, go to the fork and ensure all three branches are in there.
Clone the fork to your computer.
1 Create a local copy of the fantasy branch in your clone.
Follow instructions in Lesson T8L2. Pulling Branches from a Remote.
2 Delete the remote branch fantasy.
You can use the git push <remote> --delete <branch> command to delete a branch in a remote. This is like pushing changes in a branch to a remote, except we request the branch to be deleted instead, by adding the --delete switch.
git push origin --delete fantasy
Locate the remote branch under REMOTES → origin, right-click on the branch name, and choose Delete...:
3 Verify that the branch was deleted from the remote, by going to the fork on GitHub and checking the branches page https://github.com/{YOUR_USERNAME}/samplerepo-books/branches
e.g., https://github.com/johndoe/samplerepo-books/branches.
Also verify that the local copy has not been deleted.
4 Restore the remote branch from the local copy.
Push the local branch to the remote, while enabling the tracking option (as if pushing the branch to the remote for the first time), as covered in Lesson T8L1. Pushing Branches to a Remote.
In the above steps, we first created a local copy of the branch before deleting it in the remote repo. Doing so is optional. You can delete a remote branch without ever checking it out locally — you just need to know its name on the remote. Deleting the remote branch directly without creating a local copy is recommended if you simply want to clean up a remote branch you no longer need.
done!
At this point: You should now be able to work with branches in a remote repo, and keep them synchronised with branches in the local repo.
What's next: More trails to be added in the future.