Git-Mastery App

What it is for

The GitMastery app is a small utility that helps learners with the following:

  • Set up scaffolded sandboxes for hands-on practicals and exercises
  • Give feedback on exercises
  • Track progress through exercises, locally and online (opt-in)

Installation and Setup

If you are following Git-Mastery lessons in the given sequence you will be introduced Git-Mastery in appropriate points in the lesson path. You don't need to set it up in advance.

If you are following lessons out of sequence, or if you are doing the exercises only, follow the instructions given below to set up Git-Mastery app (and other required tools) in your computer, in the given sequence.

1. Setting up Git

PREPARATION: Install Git

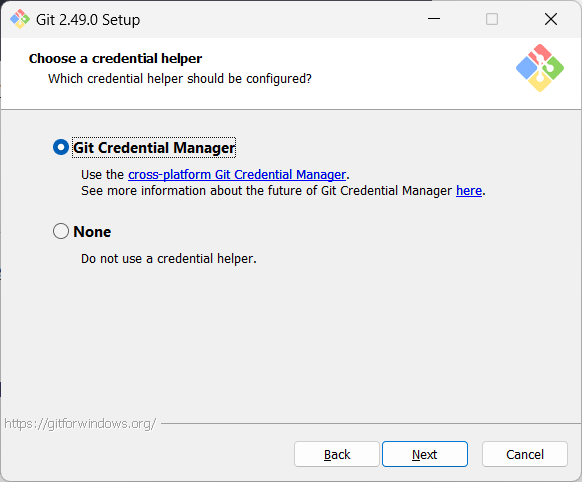
Download the Git installer from the official Git website.
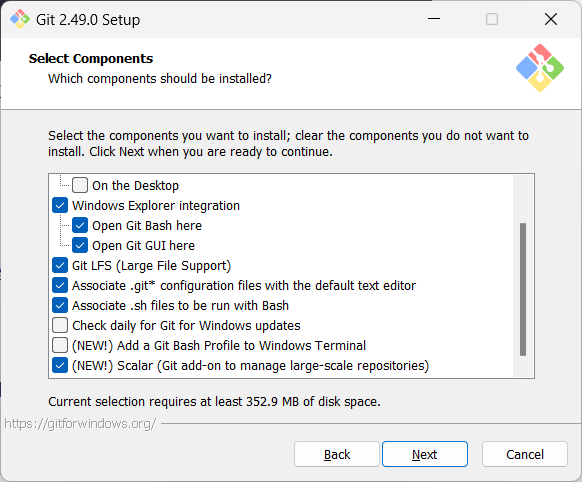
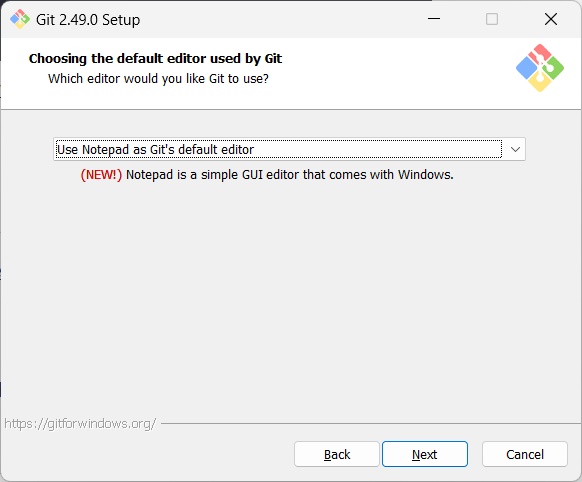
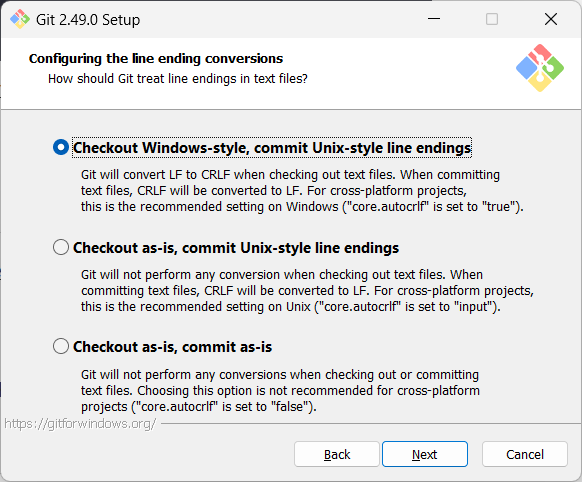
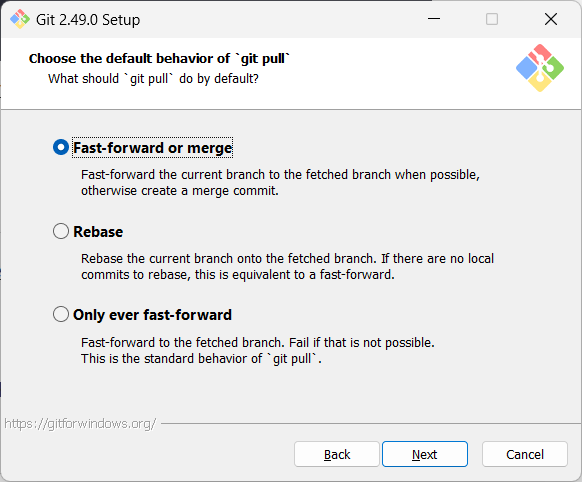
Run the installer and make sure to select the option to install Git Bash when prompted.

Screenshots given below provide some guidance on the dialogs you might encounter when installing Git. In other cases, go with the default option.


When running Git commands, we recommend Windows users to use the Git Bash terminal that comes with Git. To open Git Bash terminal, hit the key and type git-bash.

It may be possible that the installation didn't add a shortcut to the Start Menu. You can navigate to the directory where git-bash.exe is (most likely C:\Program Files\Git\git-bash.exe), double click git-bash.exe to open Git Bash.
You can also right-click it and choose Pin to Start or Pin to taskbar.

SIDEBAR: Git Bash Terminal

Git Bash is a terminal application that lets you use Git from the command line on Windows. Since Git was originally developed for Unix-like systems (like Linux and macOS), Windows does not come with a native shell that supports all the commands and utilities commonly used with Git.

Git Bash provides a Unix-like command-line environment on Windows. It includes:

  • A Bash shell (Bash stands for Bourne Again SHell), which is a widely used command-line interpreter on Linux and macOS.
  • Common Unix tools and commands (like ls, cat, ssh, etc.) that are useful when working with Git and scripting.

When copy-pasting text onto a Git Bash terminal, you will not be able to use the familiar Ctrl+V key combo to paste. Instead, right-click on the terminal and use the Paste menu option.

On Windows, you might need to close and open the terminal again for it to recognise changes done elsewhere in the computer (e.g., newly-installed software, changes to system variables, etc.).


Install homebrew if you don't already have it, and then, run brew install git


Use your Linux distribution's package manager to install Git. Examples:

  • Debian/Ubuntu, run sudo apt-get update and then sudo apt-get install git.

  • Fedora: run sudo dnf update and then sudo dnf install git.


Verify Git is installed, by running the following command in a terminal.

git --version
git version 2._._

The output should display the version number.


PREPARATION: Set user.name and user.email

To set the two config settings, run the following commands in your terminal window:

git config --global user.name "<your-name>"
git config --global user.email "<your-email@example.com>"

To check if they are set as intended, you can use the following two commands:

git config --global user.name
git config --global user.email

PREPARATION: [Optional] Install a GUI client

Optionally, you can install a Git GUI client. e.g., Sourcetree (installation instructions).

Our Git lessons show how to perform Git operations in Git CLI, and in Sourcetree -- the latter just to illustrate how Git GUIs work. It is perfectly fine for you to learn the CLI only.


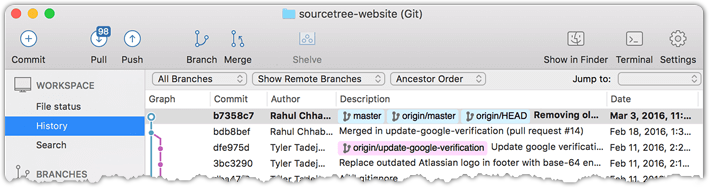
[image credit: https://www.sourcetreeapp.com]


2. Setting up Git-Mastery App

1. Install the Git-Mastery App

  • Download the .exe file from the latest release.
  • Add the folder containing the .exe to your Windows System Variable PATH, by following this guide.
    E.g. If the file location is C:\Users\Jane\Tools\gitmastery.exe, you should add C:\Users\Jane\Tools to your PATH.
  • Close and reopen the Git Bash terminal (for the updated PATH to take effect).

Windows Defender says gitmastery.exe is a virus?

In some cases, Windows Defender virus scanner can incorrectly block gitmastery.exe as a virus. The Git-Mastery team is currently working on getting the app white-listed. In the meantime, it is safe to override the warning/blockade, either by choosing Run anyway option (if given) or using the following steps.

  1. Open Windows SecurityVirus & threat protection.
  2. Click Protection history.
  3. Find the blocked gitmastery.exe and click it.
  4. Choose ActionsAllow on device.
    After this step, you may need to re-download the file if it was removed previously.

Alternatively, refer to this page to see how to exclude a file from Windows virus scanner (look for the section named 'Exclusions').


brew tap git-mastery/gitmastery
brew install gitmastery

Ensure you are running libc version 2.38 or newer (you can use the ldd --version command to check the current version).

Then install the app by running the following commands:

echo "deb [trusted=yes] https://git-mastery.github.io/gitmastery-apt-repo any main" | \
  sudo tee /etc/apt/sources.list.d/gitmastery.list > /dev/null
sudo apt install software-properties-common
sudo add-apt-repository "deb https://git-mastery.github.io/gitmastery-apt-repo any main"
sudo apt update
sudo apt-get install gitmastery

Use an AUR helper to install gitmastery-bin. For example using yay:

yay -S gitmastery-bin

Alternatively, you can build the PKGBUILD yourself following the instructions on the Arch wiki.


If you are using a Linux distribution that is not yet supported by Git-Mastery, please download the right binary for your architecture from the latest release.

Install it to /usr/bin to access the binary, the following using version 3.3.0 as an example.

install -D -m 0755 gitmastery-3.3.0-linux-arm64 /usr/bin/gitmastery


2. To verify the installation, run the gitmastery --help command from a couple of different folder locations. An example given below (IMPORTANT: change the cd command to match your folders):

gitmastery --help
cd ../my-projects  # cd into a different folder
gitmastery --help

The current version of the app takes about 3-5 seconds to respond to a command. This is because the app comes with a bundled Python runtime (so that users don't need to install Python first) which needs to load first before the command can be executed.

3. Trigger the initial setup by running the gitmastery setup command in a suitable folder (the app will create files/folders inside this folder).

mkdir gitmastery-home
cd gitmastery-home
gitmastery setup

The gitmastery setup command will perform the following tasks:

  • Checks if Git is installed.
  • Checks if user.name and user.email are set.
  • Prompts you to specify a name for the git-mastery exercises directory
    • Recommended: accept the default (i.e., gitmastery-exercises) by pressing Enter.
    • If you choose to specify a different name for that folder, remember to use that name instead whenever our instructions refer to the gitmastery-exercises folder.
  • Sets up a mechanism to locally track the progress of your exercises.

Notes:

  • If the command failed due to checks (a) or (b) failing, you can rectify the problem and run the command again.
  • If you wish to check the Git set up again at a later time, you can run the gitmastery check git command.
Git-Mastery App: Commands
Command Description
gitmastery [command] help Prints the help documentation for each command. Omitting the [command] prints the documentation for the app
gitmastery setup Setup Git-Mastery for your local machine.
gitmastery check git Verify that you have setup Git for Git-Mastery
gitmastery check github Verify that you have setup Github and Github CLI for Git-Mastery
gitmastery download <exercise name> Downloads the specified exercise to your local machine. For the list of exercises, refer the Exercises page.
gitmastery verify Verify your exercise attempt. Saves the progress made.
gitmastery version Get the current version of the Git-Mastery app on your machine.
gitmastery progress sync on Enable remote progress tracking.
gitmastery progress sync off Disable remote progress tracking.
gitmastery progress show Disables your progress made so far and a link to the progress dashboard if you have already enabled sync.
gitmastery progress reset Resets the progress for one of your exercises.
Updating the Git-Mastery App

As the Git-Mastery app is under active development, it is likely to get updated frequently. When you run a gitmastery <command>, the output will warn you if there is a new version, in which case you should update the app immediately, by following the instructions in that message.

Download the .exe file from the latest release


brew update
brew upgrade gitmastery

sudo apt-get install --only-upgrade gitmastery


sudo pacman -S gitmastery-bin


3. Setting up Git-Hub Tools

PREPARATION: Create a GitHub account

Create a personal GitHub account as described in GitHub Docs → Creating an account on GitHub, if you don't have one yet.

Choose a sensible GitHub username as you are likely to use it for years to come in professional contexts e.g., in job applications.

[Optional, but recommended] Set up your GitHub profile, as explained in GitHub Docs → Setting up your profile.


PREPARATION: Set up authentication with GitHub

Set up your computer's GitHub authentication, as described in the se-edu guide Setting up GitHub Authentication.


PREPARATION: [Optional] Configure user.email to use the no-reply email from GitHub

If you prefer not to include your real email address in commits, you can do the following:

  1. Find your no-reply email provided by GitHub: Navigate to the email settings of your GitHub account and select the option to Keep my email address private. The no-reply address will then be displayed, typically in the format ID+USERNAME@users.noreply.github.com.

  2. Update your user.email with that email address e.g.,

    git config --global user.email "12345678+username@users.noreply.github.com"
    

PREPARATION: Set up GitHub CLI

1. Download and run the installer from the GitHub CLI releases page. This is the file named as GitHub CLI {version} windows {chip variant} installer.


1. Install GitHub CLI using Homebrew:

brew install gh

1. Install GitHub CLI, as explained in the GitHub CLI Linux installation guide for your distribution.


2. Authenticate yourself to GitHub account:

gh auth login

When prompted, choose the protocol (i.e., HTTPS or SSH) you used previously to set up your GitHub authentication.

3. Give GitHub CLI permission to delete repos in your account, as this is required for some of the Git-Mastery exercises.

gh auth refresh -s delete_repo

4. Verify the setup by checking the status of your GitHub CLI with your GitHub account.

gh auth status

You should see confirmation that you’re logged in.

5. Verify that Github and GitHub CLI is set up for Git-Mastery:

gitmastery check github

6. [Optional, Recommended] Ask Git-Mastery to switch on the 'progress sync' feature.

# cd into the gitmastery-exercises folder first
gitmastery progress sync on

What happens when you switch on the Git-Mastery 'progress sync' feature?

  • Your Git-Mastery exercises progress will be backed up to your GitHub account. If you wipe out your local progress data by mistake, the remote copy will still be preserved.
  • Git-Mastery will create a repo in your GitHub account, to back up your progress data. This repo will be publicly visible.